Getting Started
Icons
Below describes the main icons and their functions
- (1)The Grid can be changed to display a Week view as selected here or by Day, Month or Custom
- (2) The user can view the shifts by a number of different options. The above option the shifts are displayed by Employee, however you can view them by Customer, Site and many more by clicking on the drop down list
- (3) The disk will save any changes to the database. Any changes made to shifts are not automatically saved to the database, when a change takes place a number appears to the right of the disk and increases depending on the number of changes. When you click the disk, all the changes will be saved and the number will disappear.
- (4) Undo & Redo buttons Undo will revert any change or changes back to what they were previously and redo will put them back.
- (5) Refresh button This refreshes the screen
Filters
Below describes the different type of filters in the application
Advance Filters
- (1) Any customised filters will be displayed in this drop down list. These can be set by clicking on the labels (2) at the top of the page by selecting the required criteria. The user has the option to save their selection which will display in the drop down list (1) or clear it at the end of the session
Dynamic Filters
- (3) These filters can be used for shifts that have been created/updated but have not been saved to the database
Features using the Modify Schedule button
Adding Shifts
- Select Add Shift by clicking on the button
- Panel will slideout from the right hand side of the screen. Complete the mandatory fields and click on the button
- Panel disappears and the shift will appear in the grid.
Right Click on the Grid and select Add
- Right click in the grid and the option Add will appear. Click on Add.
- Panel will slide out from the right hand side of the screen with the employee field populated. Complete the remaining mandatory fields and click on the button
- Panel disappears and the shift will appear in the grid.
Add a new shift from a blank grid
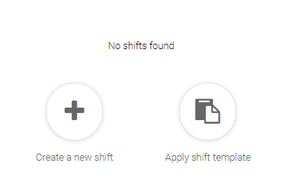
- If there are no shifts on the grid then a button labelled Create a new shift will be displayed
- Click on the button and the shift panel will open
Copy and paste existing shift
- Right click on an existing shift. The following options will display
- Select Copy. Right click on the date you wish to paste the shift and then select Paste.
- Shift will be copied into the grid with the appropriate fields updated depending on where the shift is pasted (employee, date, location, etc.).
Copy/cut and paste using Shortcuts
- Shifts can also be copied and pasted using keyboard shortcuts.
- Click on the shift and hit CTRL+C to copy the shift (or CTRL+X to cut).
- Click on the day you want to paste the shift onto and hit CTRL+V.
- Shift will be copied into the grid with the appropriate fields updated depending on where the shift is pasted (employee, date, location, etc.)
Create Shift Template
A Shift Template allows users to save time by saving a schedule of shifts that can be recalled and reused over a different period of time.
- Create one or more shifts over a period of time
- Highlight the shifts you wish to include in the template by any of the ways described in Tips and Tricks
- Click on the button and select .
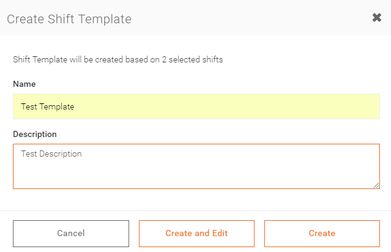
- The following Window displays
- The field Name is mandatory while the Description field is not
- Click on Create. Template is saved.
- Create and Edit button will save the Template and take the user to the Edit Page
Apply Shift Template
- Apply Shift Template panel slide outs from the right hand side
- Select the correct date (1) and the correct Template (2)
- Click on the Apply button, shifts from the selected Template will be pasted into the grid starting on the date specified.
Replace Employee
- Select the button and a panel slides out from the right hand side of the screen
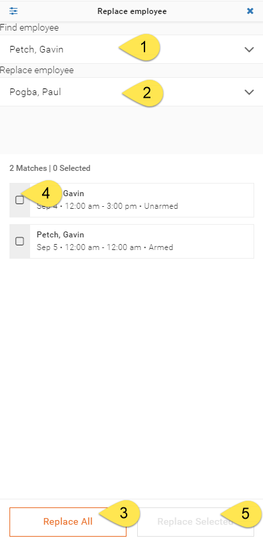
- For the field Find employee (1) select the employee whose shifts which are to be replaced. The shifts will appear at the bottom of the panel.
- In the Replace employee (2) select the employee who will take the shifts.
- Click Replace all (3) to replace all shifts with the employee selected or select the specific shifts (4) and then click Replace Selected (5)
- The selected shifts will be updated to display the new employee as shown below
Bulk Update
To be completed
Find Replacement
- To see how to setup the Find Replacement filters and settings refer to <Add Here>
- Click on
- Find Replacement panel appears on the right hand of the screen
- Default Find Replacement template displays (1). Click on the (2)to select a different option
- Select the shift you would like to find a replacement for. A list of possible Employees who meet the criteria will display
- Select the employee from the list and click on the button Update Shift
- Shift is updated with the new employee
- To send a message to an employee/s, select one or more employees and click on the Send message button
Tips and Tricks
Selecting multiple shifts
There are a number of different ways to select multiple shifts. The different options are explained below
Select a number of shifts by dragging the mouse
- Hold the left mouse button somewhere in the grid where there are no shifts and start to move the mouse. A dotted border will appear.
- Drag the border over the shift/s you would like to select. When you have highlighted the desired shifts let go of the mouse button and all the shifts will automatically be selected. This is indicated by the checkbox in the bottom right hand corner displaying a
Selecting all shifts through the right click option
- Right click on the Headings row (the headings will change depending on what display has been selected)
- The options Select all shifts and Unselect all shifts display
- Select all shifts will select all shifts displayed in the grid view
Selecting all shifts for a specific date
- Right click on a date and the following two options will display 'Select shifts which overlap this date' and 'Unselect all shifts which overlap this date.'
- Click on the option 'Select shifts which overlap this date' and all shifts for this date will be selected
Drag and Drop
Moving a shift via Drag and Drop
- Select one or more shifts and hold down the left mouse button whilst the mouse pointer is over one of the selected shifts and drag the shifts and drop them on a different day/s or for a different employee.
- From the shifts above which display a light blue border indicates where the shifts will be moved to once the left mouse button has been released.
Copying & moving a shift/s via Drag and Drop
- Repeat the steps above but this time hold down the CTRL button.
- When you release the mouse and CTRL button the additional shifts will be created


