Time and Attendance
- Gurpreet Banwait (Deactivated)
The Time & Attendance User Guide will review the features available in the Time & Attendance, Billing and Payroll modules.
eTime Xpress
Time & Attendance User Guide
(For versions 7.0098.000 and above)
Table of Contents
1. Time & Attendance Overview
2. Shift Distribution Rules
2.1. Branch Bill/Pay Settings
2.1.1. Bill/Pay Preferences
2.1.2. Bill/Pay Periods
2.1.3. Pay Rate Factors
2.1.4. Overtime Thresholds
2.2. Statutory Days (Holidays)
2.2.1. Customizing Statutory Days for Employees and Sites
2.3. Daylight Savings Time
2.4. Pay Settings
2.4.1. Default Pay Settings
2.4.2. Changing Employee Pay Settings
2.4.3. Changing Site Pay Settings
2.5. Pay Rates
2.5.1. Application of Pay Rates
2.5.2. Employee Pay Rates
2.5.3. Site Pay Rates
2.5.4. Combination Pay Rates (previously Site Employee Pay Rates)
2.5.5. Branch Pay Rates
2.6. Bill Settings
2.6.1. Default Bill Settings
2.6.2. Changing Site Bill Settings
2.7. Bill Rates
2.7.1. Application of Bill Rates
2.7.2. Employee Bill Rates
2.7.3. Site Bill Rates
2.7.4. Combination Bill Rates (previously Site Employee Pay Rates)
2.7.5. Branch Bill Rates
3. Managing Time and Attendance Records
3.1. Load View
3.2 Setting Shifts to Worked
3.2.1. Set a Scheduled Shift to Worked
3.2.2. Reset a Worked Shift to Scheduled
3.3. Add a Worked Shift
3.4. Update a Worked Shift
3.5. Delete a Worked Shift
3.6. Update a Shift Distribution
3.6.1. Shift Distribution Calculated by Shift Start Date
3.6.2. Shift Distribution Calculated by Calendar Date (Midnight Cutoff)
3.6.3. Reset a Shift Distribution
3.7. Replace Tool
3.7.1. Update Shift Details
3.7.2. Update Shift Times
3.7.3. Update Pay Hours
3.7.4. Update Pay Rates
3.7.5. Update Bill Hours
3.7.6. Update Bill Rates
3.7.7. Update Recalculation Status
3.8. Allowances
3.8.1. Create Allowance Types
3.8.2. Add an Allowance
3.8.3. Update an Allowance
3.8.4. Delete Allowances
3.8.5. Recurring Allowances
3.9. Setting Shifts to Locked
3.9.1. Set a Worked Shift to Locked
3.9.2. Reset a Locked Shift to Worked
3.10. Other Options
3.10.1. Set Time & Attendance Security
3.10.2. Import Attendance Information
3.10.3. Exporting Shifts Distribution
3.10.4. Time Entry Settings
3.10.5. Accruals
4. Using Payroll Main Screen
4.1. Review Shift Life Cycle
4.2. Set Scheduled Shifts to Worked
4.3. Reset Worked Shifts to Scheduled
4.4. Set Worked Shifts to Locked
4.5. Reset Locked Shifts to Worked
5. Using Billing Main Screen
5.1. Review Shift Life Cycle
5.2. Set Scheduled Shifts to Worked
5.3. Reset Worked Shifts to Scheduled
5.4. Set Worked Shifts to Locked
5.5. Reset Locked Shifts to Worked
6. Using Control Center to Record Attendance
6.1. Load View
6.2. Record Check-In/Out
6.3. Record Safety Check
6.4. Add a Shift
6.5. Update a Shift
6.6. Delete a Shift
6.7. Set a Shift to Open
6.8. Change Employee
6.9. Employee Availability Search
6.10. Set Control Center Security
1. Time & Attendance Overview
The Time & Attendance module of eTime Xpress allows you to process and manage shifts for attendance, billing, and payroll purposes. The Visual Scheduler is used to create the work plan. Time and Attendance is used to finalize and record the work results.
Within eTime Xpress, Time & Attendance is used to manage shifts during the Worked and Locked stages of the Shift Life Cycle as shown in the figure below.
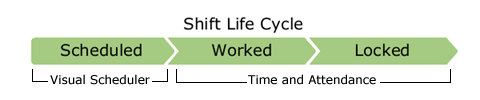
Stage | Description |
Scheduled | The shift is created and assigned to an Employee in the Visual Scheduler. |
Worked | The shift is worked and matched to attendance information (i.e. recording of actual start and end times). |
Locked | The shift is finalized with the correct bill and pay calculations. |
To access the Time & Attendance screen, go to the Main Menu and double-click on the Time & Attendance button. The Time & Attendance screen should appear as shown in the figure below.
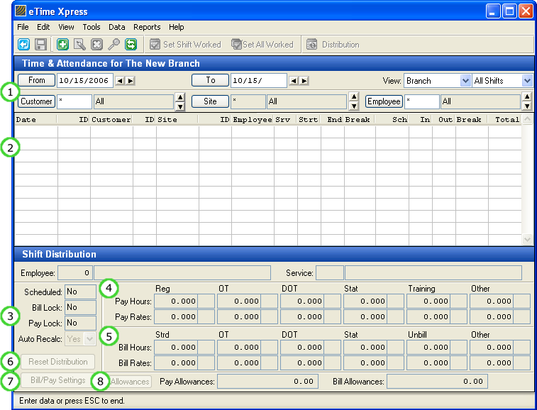 Time & Attendance Screen with Annotations
Annotation | Description |
(1) View Selectors | Specify the date range and Time and Attendance records to view. |
(2) Time & Attendance Records | Displays Time and Attendance records over date range. |
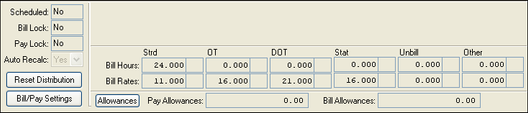
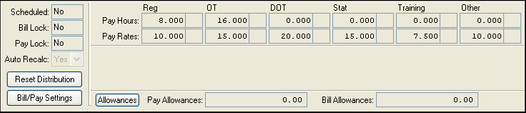
(3) Process Information | Displays information and settings related to Time and Attendance processing including shift life cycle status, recalculation and bill/pay settings. |
(4) Pay Distribution | Displays the break-out of shift time for pay purposes using your configured business rules. |
(5) Bill Distribution | Displays the break-out of shift time for bill purposes using your configured business rules. |
(6) Reset Distribution | Recalculates Shift Distribution using preset business rules (i.e. resets any manual changes or overrides made to a Shift Distribution) |
(7) Bill/Pay Settings | Displays the bill and pay settings used to calculate Shift Distribution. |
(8) Allowances | Attach allowances to shifts for pay or bill purposes. |
2. Shift Distribution Rules
Employee attendance information can be entered manually or imported into eTime Xpress from a variety of sources such as web time sheets, time collection devices, HandPunches and more.
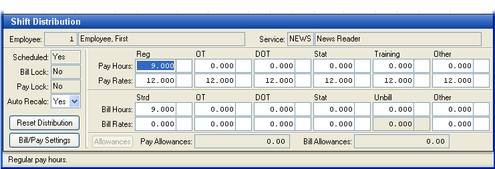
eTime Xpress Time & Attendance processes your attendance information into Worked Shifts and calculates your gross payroll and billing information. The breakdown of how a shift will be paid and billed is called the Shift Distribution. It separates the total hours of a shift into its components such as overtime, double overtime and statutory (holiday) hours as shown in the figure below.
Shift Distribution if based on Shift Start Date
Shift Distribution if based on Midnight Cutoff
The calculation of a Shift Distribution is based on the business rules configured in eTime Xpress. This section discusses the definition of business rules governing overtime, statutory days (holidays), daylight savings time, pay rates, bill rates and more.
Note: When configuring your Shift Distribution Rules, you may be asked whether you want to recalculate all of the existing shifts affected by these changes. Click 'Yes' to apply the rules to existing, non-locked shifts and future shifts or 'No' to apply the rules only to future shifts.
2.1. Branch Bill/Pay Settings
The Branch Bill/Pay Settings allows you to define your baseline business rules for calculating overtime and pay factors. These rules are applied when calculating Shift Distributions for Scheduled and/or Worked shifts in a Branch.
From the Main Menu, click Configuration > Company & Branch > Bill/Pay Settings. The Branch Bill/Pay Settings Screen should appear as shown in the figure below.
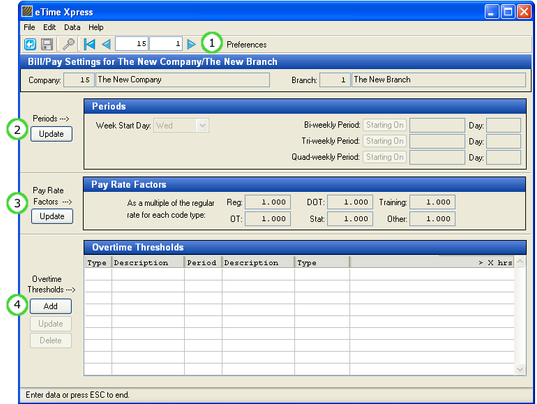
Branch Bill/Pay Settings with Annotations
Annotation | Description |
(1) Preferences | Setup advanced rules for processing bill and pay information. |
(2) Periods | Setup period start days for weekly, bi-weekly, tri-weekly and quad-weekly periods. |
(3) Pay Rate Factors | Setup pay rate factors for regular, overtime, double overtime, statutory, training and other hours. |
(4) Overtime Thresholds | Setup overtime thresholds for bill and/or pay calculations. |
2.1.1. Bill/Pay Preferences
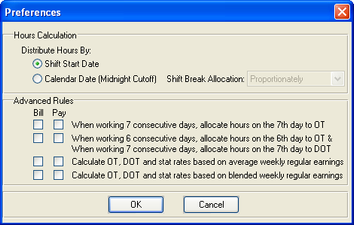
Bill/Pay Preferences allow you to define advance rules for processing bill and pay to comply with specific labor contracts or legislative requirements. From Branch Bill/Pay Settings, click the Preferences button on the Toolbar. The Preferences dialog box should appear as shown in the figure below.
!worddav0c5286fd411c0faeaa7e7c5d3570516a.png|height=225,width=354!Branch Bill/Pay Settings Preferences
Setting Hours Calculation:
The hours calculation rule sets the cutoff rule when a shift ends the following calendar day (i.e. a graveyard shift from 10pm to 6am). It is a fundamental rule needed to correctly measure the number of hours worked in a day.
The Shift Start Date option will allocate the total hours of a shift to the date when the shift started. The Calendar Date (Midnight Cutoff) option will allocate the total hours of a shift proportionately between the shift date and the next day. The difference between the hours calculation options are illustrated below based on a graveyard shift from 10pm to 6am (8 hours).
Rule/Day | Shift Start Date Rule | Calendar Date Rule |
Current Day (Shift Date) | 8 Hours | 2 Hours |
Next Day | 0 Hours | 6 Hours |
Total Hours | 8 Hours | 8 Hours |
If the Calendar Date option is selected, use the "Shift Break Allocation" pull-down to define how you want to allocate break hours between the Current Day (Shift Date) and Next Day.
Break Allocation | Description |
Proportionately | Allocates shift break hours proportionately between the Current Day and Next Day (i.e. a 10pm to 6am shift would allocate break hours as 2/8 Current Day and 6/8 Next Day). |
Current Day | Allocates all shift break hours to the Current Day (shift date). |
Next Day | Allocates all shift break hours to the Next Day. |
Evenly | Allocates shift break hours 50/50 between the Current Day and Next Day. |
Middle of Shift | Allocates shift break hours based on the date when the mid-point of the shift occurs (i.e. a 10pm to 6am shift would allocate all break hours to the Next Day). |
Advanced Rules: eTime Xpress provides additional advanced hours allocation and rate calculation options to accommodate certain labor contracts or legislative requirements. To enable an advanced rule for bill and/or pay, check-on the applicable checkbox. This allows you to Pay Employees and Bill Customers differently for the same shift.
Advanced Rule | Description |
When working 7 consecutive days, allocate hours on the 7th day to OT | Select rule if overtime rule applies when working 7 consecutive days. |
When working 6 consecutive days, allocate hours on the 6th day to OT & When working 7 consecutive days, allocate hours on the 7th day to DOT | Select rule if overtime rule applies when working 6 or 7 consecutive days. |
Calculate OT, DOT and Stat rates based on average weekly regular earnings | Select rule to calculate OT, DOT and Stat rates by the following formula: (weekly earnings/weekly hours) * applicable pay factor. |
Calculate OT, DOT and Stat rates based on blended weekly regular earnings | Select rule to calculate OT, DOT and Stat rates by the following formula: Regular rate + [(weekly earnings/weekly hours) * (applicable pay factor-1)]. |
2.1.2. Bill/Pay Periods
Overtime is calculated when the number of hours over a period exceeds a specified threshold. If you are configuring a Weekly, Bi-weekly, Tri-weekly and/or Quad-weekly overtime rule, you are required to specify the starting point for the applicable period. To specify a Bill/Pay Period, click on the Update button under Periods and define the start date of the applicable period(s).
Note: For Bi-weekly, Tri-weekly and/or Quad-weekly periods, specify a start date corresponding to a period that starts and ends prior to your first scheduled shift. eTime Xpress will then extrapolate the start and end dates of all future periods.
2.1.3. Pay Rate Factors
Pay rates may be grossed up by a multiple or factor based on the hours type listed below. To specify Pay Rate Factors, click on the Update button under Pay Factors and define the applicable multiple or factor.
Hours Type | Description |
Reg | Regular Hours |
OT | Overtime Hour |
DOT | Double Overtime Hours |
Stat | Statutory (Holiday) Hours |
Training | Training Hours |
Other | Other (Miscellaneous) Hours |
2.1.4. Overtime Thresholds
Overtime Thresholds allow you to define overtime rules based on daily, weekly, bi-weekly, tri-weekly, quad-weekly and monthly periods.
To Add an Overtime Threshold:
- Click the Add button under Overtime Thresholds - the fields in the Overtime Thresholds browser should become active as shown in the figure below.

- Assign the thresholds type (Billing or Payroll), period type, overtime type (Overtime or Double Overtime) and threshold hours. Remember for fields that require entry by codes, you may press the F5 key to bring up a list of valid entries.
- Press the Enter key to save your new Overtime Threshold record.
2.2. Statutory Days (Holidays)
When a shift occurs on a Statutory Day (Holiday), the associated hours may be broken-out as Statutory hours for billing and/or payroll purposes. Statutory days can be setup to apply to all shifts worked at a Branch or customized to apply to specific Employees and Sites.
From the Main Menu, click Configuration > Company & Branch > Branch Tab > Branch Statutory Days. The Branch Statutory Days screen should appear as shown in the figure below.
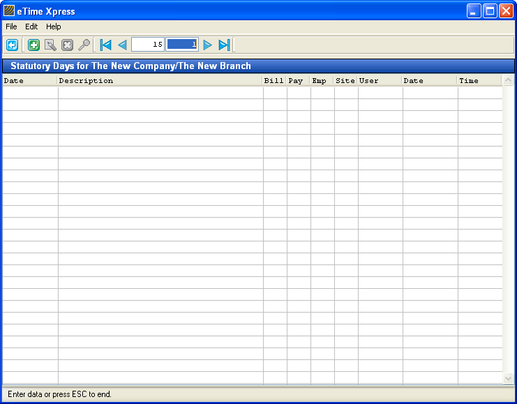 Branch Statutory Days
To Add a Statutory Day:
- Click the Add button (
 ) on the Tool Bar - the fields in the Statutory Days browser should become active.
 - Assign the Date, Description, Bill (Yes/No), Pay (Yes/No), Employee (Yes/No) and Site (Yes/No) as shown in the figure below. Remember for fields that require entry by codes, you may press the F5 key to bring up a list of valid entries.
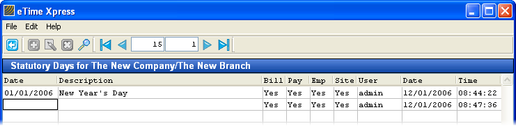
- Press the Enter key to save your new Statutory Day record.
Note: For each Statutory Day, you can define how a Statutory Day rule is applied by toggling between Yes and No for Bill, Pay, Employee and Site. For example, the combination Bill (No), Pay (Yes), Employee (Yes) and Site (Yes) results in shifts being billed normally and paid as a Statutory Day.
2.2.1. Customizing Statutory Days for Employees and Sites
The Employee (Yes/No) and Site (Yes/No) values of a Branch Statutory Day record are used as the initial 'Apply?' value in the Employee Statutory Days and Site Statutory Days screens, respectively. You can customize the Statutory Day rules for Employees and Sites by selecting which Statutory Days to 'Apply'.
To customize Employee Statutory Days:
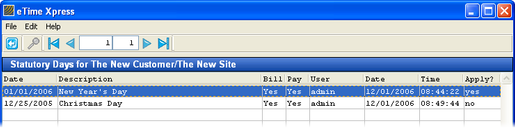
From the Main Menu, click Employee > Employee Statutory Days. The Employee Statutory Days screen should appear as shown in the figure below.
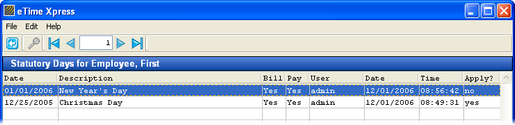 Employee Statutory Days
Employee Statutory Days lists all of the Statutory days defined for the Branch and whether a Statutory Day applies for bill or pay purposes. To turn off a Statutory Day rule, double-click on the record - the value in the 'Apply?' column will toggle between 'yes' and 'no'.
To customize Site Statutory Days:
From the Main Menu, click Customers > Site Statutory Days. The Site Statutory Days screen should appear as shown in the figure below.
 Site Statutory Days
Site Statutory Days lists all of the Statutory days defined for the Branch and whether a Statutory Day applies for bill or pay purposes. To turn on/off a Statutory Day rule, double-click on the record - the value in the 'Apply?' column will toggle between 'yes' and 'no'.
Note: For a Statutory Day rule to be applied to a shift, the Employee and Site both must have Apply = 'Yes'. For example, only the combination of Employee (Yes) and Site (Yes) results in Statutory Day treat. The combination of Employee (No) and Site (Yes) or Employee (Yes) and Site (No) does not result in Statutory Day treatment.
2.3. Daylight Savings Time
When a shift occurs during a Daylight Savings Time change, the total hours of a shift can be automatically adjusted for the time change. A "spring" Forward rule would subtract one hour from a shift whereas a "fall" Back rule would add one hour to a shift.
From the Main Menu, click Configuration > Company & Branch > Branch Daylight Savings Times. The Branch Daylight Savings Time Changes screen should appear as shown in the figure below.
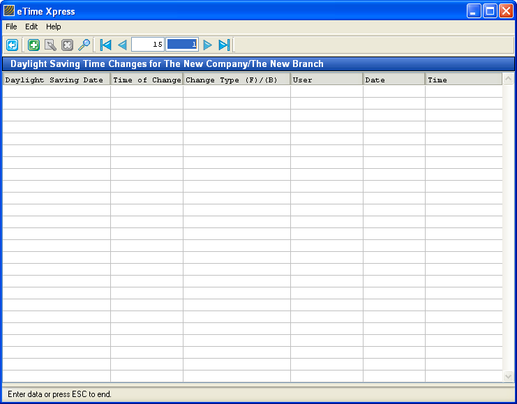
Branch Daylight Savings Times
To Add a Daylight Savings Time Change:
- Click the Add button ( ) on the Tool Bar - the fields in the Daylight Savings Time Change browser should become active.
- Assign the Date, time of change and change type ("spring" Forward or "fall" Back). The time of change value is normally 0159 (01:59AM) in North America and 0059 (00:59AM) in the European Union.
- Press the Enter key to save your new Statutory Day record.
2.4. Pay Settings
eTime Xpress pay rules controlling the calculation of statutory pay, overtime pay and pay rates are managed at both the Employee and Site levels. For example, controls governing statutory pay and overtime can be found in the Employee and Site Main screens.
When a feature control (i.e. statutory pay) exists at both the Employee and Site levels, they are evaluated in "concert". That is, for Statutory hours to occur both the Site and Employee assigned to a shift must have the setting "Pay Stat = Yes".
2.4.1. Default Pay Settings
When Employees and Sites are first created, they are configured with default Pay rules as outlined in the figure below. These Pay rules can be customized for specific Employees and/or Sites by modifying the applicable Pay rule found in their respective Pay Settings tabs.
Employee Pay Rule | Default Setting | Description |
Statutory Pay |
| Shifts for the Employee that occur on Statutory Days (Holidays) should be processed as Statutory hours for pay purposes. |
Overtime Pay |
| Shifts for the Employee exceeding Branch overtime thresholds will be processed as overtime. |
Rate Calculation |
| Pay rates for overtime, double overtime, statutory, training and other are calculated based on Pay Rate Factors defined in Branch Bill/Pay Settings. |
Site Pay Rule | Default | Description |
Statutory Pay |
| Shifts for the Site occurring on Statutory Days (Holidays) should be processed as Statutory hours for pay purposes.Days defined in Site Statutory Days will be used to determine whether a shift occurs on a Statutory Day. |
Overtime Pay |
| Shift hours exceeding Branch overtime thresholds will be processed as overtime or double overtime. Shift hours are calculated based on all shifts worked within the Branch. |
Pay Rates |
| Rates defined in Employee Pay Rates will be used to determine pay rates for a shift. |
2.4.2. Changing Employee Pay Settings
From the Main Menu, click Employees and select the Pay Settings tab. The Employee Main screen should appear as shown as in the figure below.
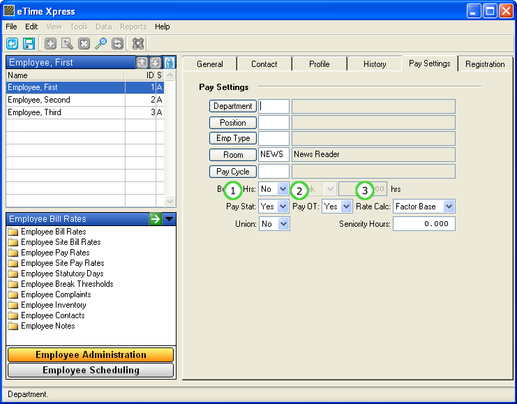 Employee Pay Settings tab with Annotations
Annotation | Description |
(1) Pay Stat | Specify if the Employee is paid Statutory pay. |
(2) Pay OT | Specify if the Employee is paid Overtime. |
(3) Rate Calc | Select the pay rate calculation formula to be applied. |
Note: Only items that directly affect the calculation of Shift Distributions are listed above.
Rate Calculation Options
Rate calculation is the formula applied to a Regular pay rate to calculate Overtime, Double Overtime, Statutory, Billing and Training pay rates.
Rate Calculation | Description |
Factor Base | Multiplies the Regular Pay rate by Pay Rate Factors defined in Branch Bill/Pay Settings or by user defined Custom Pay Factors (see Employee User Guide or Customer and Site User Guide). |
Avg. Base | Regular rate is dynamically re-calculated to eliminate Overtime pay. |
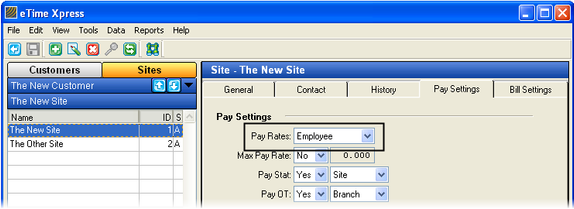
2.4.3. Changing Site Pay Settings
From the Main menu, click Customers and select the Sites > Pay Settings tab. The Site Main screen should appear as shown as in the figure below.
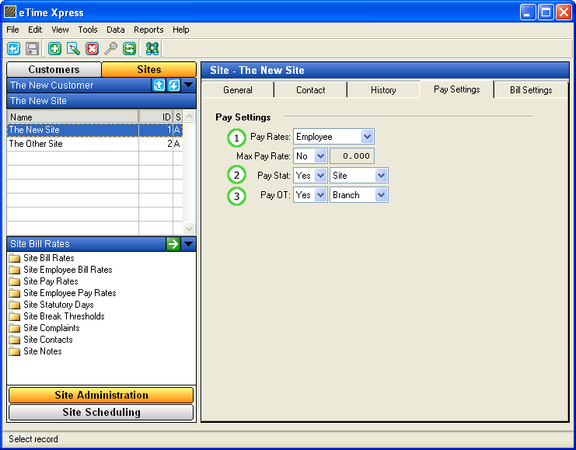 Site Main Screen – Pay Settings Tab
Annotation | Description |
(1) Pay Rates | Select which pay rates to apply for shifts worked at the Site. See Pay Rates section in this guide for more information. |
(2) Pay Stat | Specify if the shifts worked at the Site earn Statutory pay and specify which Statutory Day definitions to use. |
(3) Pay OT | Specify if the shifts worked at the Site earn Overtime and specify the subset of shift hours to sum when calculating Overtime (see Summing Hours for Overtime Pay). |
Note: Only items that directly affect the calculation of Shift Distributions are listed above.
Summing Hours for Overtime Pay
When calculating Overtime Pay, eTime Xpress sums the shift hours of an Employee to determine if Overtime thresholds have been exceeded. You can customize your Overtime Pay Rules by Site to control how shifts hours are summed for Overtime.
Overtime Sum Rule | Description |
Branch | Sums the hours of all shifts worked at a Branch by an Employee. |
Customer | Sums the hours of all shifts worked at a Customer by an Employee. |
Site | Sums the hours of all shifts worked at a Site by an Employee. |
2.5. Pay Rates
eTime Xpress allows pay rates to be defined at the Employee, Site, Combination and Branch levels. The selection of which pay rate definition to apply is made at the Site level - this allows you to customize how shifts are paid when worked at a particular Site.
2.5.1. Application of Pay Rates
eTime Xpress applies pay rates according to the 'Pay Rate' setting found on the Pay Settings tab in the Site Main screen as shown in the figure below. By default, eTime Xpress applies the pay rate definitions created in Employee Pay Rates.
If a pay rate cannot be found, eTime Xpress will then apply the pay rates defined under Branch Pay Rates.
For example, where the Site Pay Rates pointer is set to 'Employee', eTime Xpress will first attempt to match pay rates defined under Employee Pay Rates. If a Pay Rate cannot be found under Employee Pay Rates, the system will apply the pay rates defined under Branch Pay Rates.
Note: The Greatest and Least options will dynamically compare the pay rates defined in Employee Pay Rates, Site Pay Rates and Combination Pay Rates to determine the applicable pay rate.
2.5.2. Employee Pay Rates
Employee Pay Rates allow you to define a pay rate by Service. When shifts are paid according Employee Pay Rates, an Employee is paid by the Service performed regardless of where they worked.
From the Main Menu, click Employees > Employee Pay Rates. The Employee Pay Rates screen should appear as shown in the figure below.
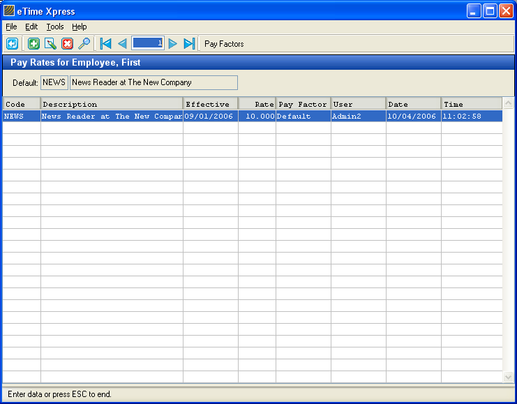 Employee Pay Rates Screen
To Add an Employee Pay Rate:
- Click the Add button ( ) on the Tool Bar - the fields in the Pay Rates browser should become active.
- Assign the Service Code (enter '*' for All Services), Effective Date and the applicable Pay Rate. Remember for fields that require entry by codes, you may press the F5 key to bring up a list of valid entries.
- Press the Enter key to save your new Employee Pay Rate.
The Effective Date allows you to define current and future Pay Rates. When calculating payroll, eTime Xpress will apply the Pay Rate in effect on the date of the shift.
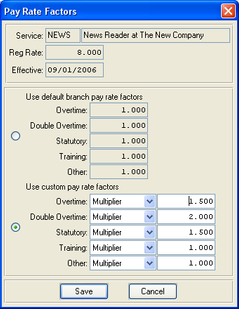
Pay Rate Factors
When entering an Employee Pay Rate, eTime Xpress automatically applies the 'Default' Pay Factors defined for the Branch (see Branch Bill/Pay Settings). If a Pay Rate requires a custom Pay Factor that is different than the 'Default' Pay Factor, select the Pay Rate and click the Pay Factors button in the Tool Bar. The custom Pay Factors dialog should appear as shown in the figure below.
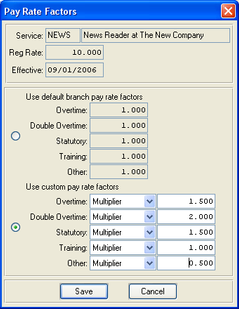 Custom Pay Rate Factors Window
Custom Pay Factors allow you to define new Pay Rate Factors (Multipliers) or dollar amounts (Fixed Amounts) for each type of hours. Pay Rates using custom Pay Factors will be identified in the Employee Pay Rates screen as 'Custom' under the Pay Factor column.
Note: If shifts were created prior to defining Pay Rates or you are updating an existing Pay Rate, you will be asked whether you want to apply the new Pay Rate to existing shifts. Selecting 'Yes' will recalculate your payroll information with the new rate, where as selecting 'No' will apply the new rate only to newly created shifts.
2.5.3. Site Pay Rates
Site Pay Rates allow you to define a pay rate by Service. When a Site is set to pay by Site Pay Rates, all Employees working at the Site will be paid at the same rate when performing the same Service.
From the Main Menu, click Customers > Site Pay Rates. The Site Pay Rates screen should appear as shown in the figure below.
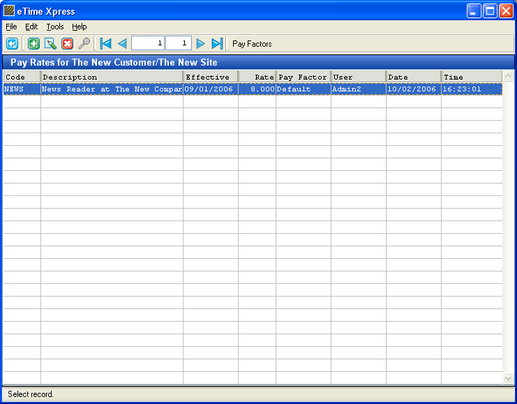 Site Pay Rates Screen
To Add a Site Pay Rate:
- Click the Add button ( ) on the Tool Bar - the fields in the Pay Rates browser should become active.
- Assign the Service Code (enter '*' for All Services), Effective Date and the applicable Pay Rate. Remember for fields that require entry by codes, you may press the F5 key to bring up a list of valid entries.
- Press the Enter key to save your new Site Pay Rate.
The Effective Date allows you to define current and future Pay Rates. When calculating payroll, eTime Xpress will apply the Pay Rate in effect on the date of the shift.
Pay Rate Factors
When entering a Site Pay Rate, eTime Xpress automatically applies the 'Default' Pay Factors defined for the Branch. If a Pay Rate requires a custom Pay Factor that is different than the 'Default' Pay Factor, select the Pay Rate and click the Pay Factors button in the Tool Bar. The custom Pay Factors dialog should appear as shown in the figure below.
 Custom Pay Rate Factors Window
Custom Pay Factors allow you to define new Pay Rate Factors (Multipliers) or dollar amounts (Fixed Amounts) for each hour's type. Pay Rates using custom Pay Factors will be identified in the Site Pay Rates screen as 'Custom' under the Pay Factor column.
Note: If shifts were created prior to defining Pay Rates or you are updating an existing Pay Rate, you will be asked whether you want to apply the new Pay Rate to existing shifts. Selecting 'Yes' will recalculate your payroll information with the new rate, where as selecting 'No' will apply the new rate only to newly created shifts.
2.5.4. Combination Pay Rates (previously Site Employee Pay Rates)
Combination Pay Rates allow you to define a pay rate based on a shift's Customer, Site, Employee and Service values.
Combination Pay Rates may be defined from three areas within the application:
- Employee > Employee Combination Pay Rates
Employee Combination Pay Rates allow you to define and view combination pay rates filtered by employee. Customer, Site and Service values may be a combination of specific or wild card values. Please see the Employee Combination Pay Rates section in the Employee User Guide for more information.
- Customer > Site Combination Pay Rates
Site Combination Pay Rates allow you to define and view combination pay rates filtered by site. Employee and Service values may be a combination of specific or wild card values. Please see the Site Combination Pay Rates section in the Customer User Guide for more information.
- Company/Branch > Branch Combination Pay Rates
Branch Combination Pay Rates allow you to view and administer All combination pay rates defined in a branch. Customer, Site, Employee and Service values may be a combination of specific or wild card values. Please see the Branch Combination Pay Rates section in the Administrator User Guide for more information.
Combination Pay Rate Tie Break/Priority Rules
Combination pay rates allow you to assign a pay rate based on a shift's customer, site, employee and service values. Those values may be defined as specific or wild card values. As a result, more than one combination pay rate may apply to a shift requiring prioritization rules as tie breakers.
The following tie break rules are applied in the following priority order when selecting between pay rates that are valid on the same shift:
Priority | Employee | Customer | Site | Service |
1 | √ | √ | √ | √ |
2 | √ | √ | √ | All |
3 | √ | √ | All | √ |
4 | √ | √ | All | All |
5 | √ | All | All | √ |
6 | √ | All | All | All |
7 | All | √ | √ | √ |
8 | All | √ | √ | All |
9 | All | √ | All | √ |
10 | All | √ | All | All |
11 | All | All | All | √ |
12 | All | All | All | All |
√ = Specific Value
All = Wild Card value
Example:
A basic scenario of 2 combination pay rates applying to the same shift would be as follows:
Combination Pay Rate | Employee | Customer | Site | Service |
Pay Rate #1 = $10 | Joe Doe | All | All | All |
Pay Rate #2 = $ 9 | All | All | All | On Call |
If Joe Doe is scheduled to perform On Call duties that shift satisfies the criteria for both combination pay rate #1 and #2.
Based on the priority table above, pay rate #1 would have priority rank of 6 while pay rate #2 would have priority rank of 11. The system would assign combination pay rate #1 of $10 to the shift.
Pay Rate Factors
When entering a Combination Pay Rate, eTime Xpress automatically applies the 'Default' Pay Factors defined for the Branch. If a Pay Rate requires a custom Pay Factor that is different than the 'Default' Pay Factor, select the Pay Rate and click the Pay Factors button in the Tool Bar. The custom Pay Factors dialog should appear as shown in the figure below.
Custom Pay Rate Factors Window
Custom Pay Factors allow you to define new pay rate factors (Multipliers) or dollar amounts (Fixed Amounts) for each hour's type. Pay Rates using custom Pay Factors will be identified in the Combination Pay Rates screen as 'Custom' under the Pay Factor column.
Note: If shifts were created prior to defining Pay Rates or you are updating an existing Pay Rate, you will be asked whether you want to apply the new Pay Rate to existing shifts. Selecting 'Yes' will recalculate your payroll information with the new rate, where as selecting 'No' will apply the new rate only to newly created shifts.
2.5.5. Branch Pay Rates
Branch Pay Rates allow you to define a pay rate where all Employees performing the same Service are paid at the same rate. Remember that Branch Pay Rates are default rates applied when an applicable pay rate cannot be found in Employee Pay rates, Site Pay Rates or Combination Pay rates depending on your configured business rules. Branch Pay Rates can be used as a "catch-all" or if your organization simply pays according to the service performed.
From the Main Menu, click Configuration > Company/Branch > Branch Pay Rates. The Branch Pay Rates screen should appear as shown in the figure below.
 Branch Pay Rates Screen
To Add a Branch Pay Rate:
- Click the Add button ( ) on the Tool Bar - the fields in the Pay Rates browser should become active.
- Assign the Service Code (enter '*' for All Services), Effective Date and the applicable Pay Rate. Remember for fields that require entry by codes, you may press the F5 key to bring up a list of valid entries.
- Press the Enter key to save your new Branch Pay Rate.
The Effective Date allows you to define current and future Pay Rates. When calculating payroll, eTime Xpress will apply the Pay Rate in effect on the date of the shift.
Pay Rate Factors
When entering a Branch Pay Rate, eTime Xpress automatically applies the 'Default' Pay Factors defined for the Branch. If a Pay Rate requires a custom Pay Factor that is different than the 'Default' Pay Factor, select the Pay Rate and click the Pay Factors button in the Tool Bar. The custom Pay Factors dialog should appear as shown in the figure below.
Custom Pay Rate Factors Window
Custom Pay Factors allow you to define new Pay Rate Factors (Multipliers) or dollar amounts (Fixed Amounts) for each hour's type. Pay Rates using custom Pay Factors will be identified in the Branch Pay Rates screen as 'Custom' under the Pay Factor column.
Note: If shifts were created prior to defining Pay Rates or you are updating an existing Pay Rate, you will be asked whether you want to apply the new Pay Rate to existing shifts. Selecting 'Yes' will recalculate your payroll information with the new rate, where as selecting 'No' will apply the new rate only to newly created shifts.
2.6. Bill Settings
eTime Xpress bill rules controlling the calculation of non-billable time, statutory billing, bill rates and billable overtime are managed at the Site levels.
2.6.1. Default Bill Settings
When Sites are first created, they are configured with default Bill rules as outlined in the figure below. These Bill rules can be customized for specific Sites by modifying the applicable Bill rule found in the Bill Settings tab.
Site Bill Rule | Default Setting | Description |
Bill Site |
| Shifts scheduled at the Site are billable. |
Bill Rates |
| Rates defined in Site Bill Rates will be used to determine bill rates for a shift scheduled at the Site. |
Statutory Billing |
| Shifts for the Site occurring on Statutory Days (Holidays) should be processed as Statutory hours for bill purposes.Days defined in Site Statutory Days will be used to determine whether a shift occurs on a Statutory Day. |
OT Billable |
| Overtime will be processed as standard billable hours (i.e. Overtime is not billable at a special Overtime rate). |
2.6.2. Changing Site Bill Settings
From the Main Menu, click Customers and select the (Site) Bill Settings tab. The Site Main screen should appear as shown as in the figure below.
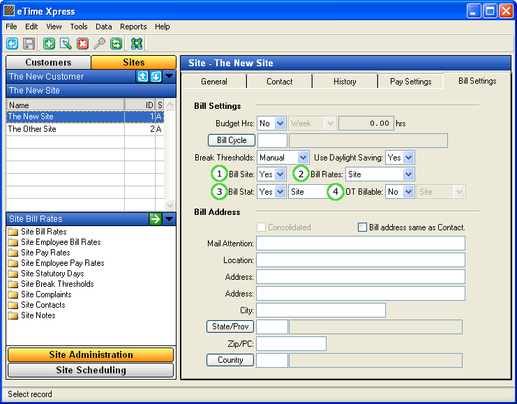
Site Bill Settings tab with Annotations
Annotation | Description |
(1) Bill Site | Specify if the shifts worked at the Site are billable. |
(2) Bill Rates | Select which bill rates to apply for shifts worked at the Site. See Bill Rates section in this guide for more information. |
(3) Bill Stat | Specify if the shifts worked at the Site are billable as Statutory hours and specify which Statutory Day definitions to use. |
(4) OT Billable | Specify if shifts worked at the Site resulting in Overtime pay can be billed as Overtime (i.e. recoverable Overtime). If Overtime is billable, specify the scope of shift when summing hours to calculate overtime. |
Note: Only items that directly affect the calculation of Shift Distributions are listed above.
Summing Hours for Billable Overtime
When calculating Billable Overtime, eTime Xpress sums the shift hours of an Employee to determine if Overtime thresholds have been exceeded. You can customize your Billable Overtime Rules by Site to control how shifts hours are summed for Billable Overtime.
Overtime Sum Rule | Description |
Branch | Sums the hours of all shifts worked at a Branch by an Employee. |
Customer | Sums the hours of all shifts worked at a Customer by an Employee. |
Site | Sums the hours of all shifts worked at a Site by an Employee. |
2.7. Bill Rates
eTime Xpress allows bill rates to be defined at the Employee, Site, Site/Employee and Branch levels. The selection of which bill rate definition to apply is made at the Site level.
2.7.1. Application of Bill Rates
eTime Xpress applies bill rates according to the 'Bill Rate' setting found on the Bill Settings tab in the Site Main screen as shown in the figure below. By default, eTime Xpress applies the bill rate definitions created in Site Pay Rates.

If a bill rate cannot be found, eTime Xpress will then apply the pay rates defined under Branch Bill Rates.
For example, where the Site Bill Rates pointer is set to 'Site', eTime Xpress will first attempt to match bill rates defined under Site Bill Rates. If a Bill Rate cannot be found under Site Bill Rates, the system will apply the bill rates defined under Branch Bill Rates.
Note: The Greatest and Least options will dynamically compare the bill rates defined in Employee Bill Rates, Site Bill Rates and Combination Bill Rates to determine the applicable bill rate.
2.7.2. Employee Bill Rates
Employee Bill Rates allow you to define a bill rate for an Employee. When shifts are billed according to Employee Bill Rates, the Employee's standard Bill Rate by Service is applied.
From the Main Menu, click Employees > Employee Bill Rates. The Employee Bill Rates screen should appear as shown in the figure below.
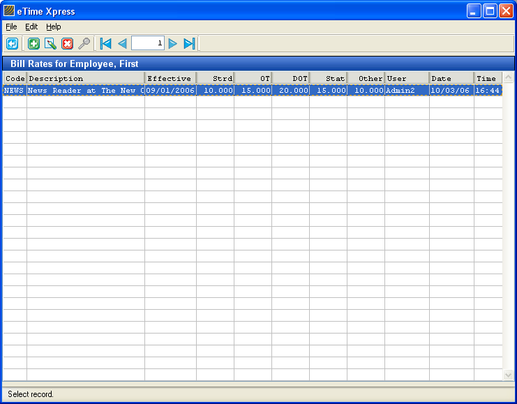 Employee Bill Rates Screen
To Add an Employee Bill Rate:
- Click the Add button ( ) on the Tool Bar - the fields in the Bill Rates browser should become active.
- Assign the Service Code (enter '*' for All Services), Effective Date and the applicable Bill Rates by hour's type (standard, overtime, double overtime, statutory and other). Remember for fields that require entry by codes, you may press the F5 key to bring up a list of valid entries.
- Press the Enter key to save your new Employee Bill Rate.
The Effective Date allows you to define current and future Bill Rates. When calculating billing, eTime Xpress will apply the Bill Rate in effect on the date of the shift.
Note: If shifts were created prior to defining Bill Rates or you are updating an existing Bill Rate, you will be asked whether you want to apply the new Bill Rate to existing shifts. Selecting 'Yes' will recalculate your billing information with the new rate, where as selecting 'No' will apply the new rate only to newly created shifts.
2.7.3. Site Bill Rates
Site Bill Rates allow you to define a bill rate by Service. When a Site is set to bill by Site Bill Rates, shifts are billed according to the Service performed regardless of the Employee who performed the Service.
From the Main Menu, click Customers > Site Bill Rates. The Site Bill Rates screen should appear as shown in the figure below.
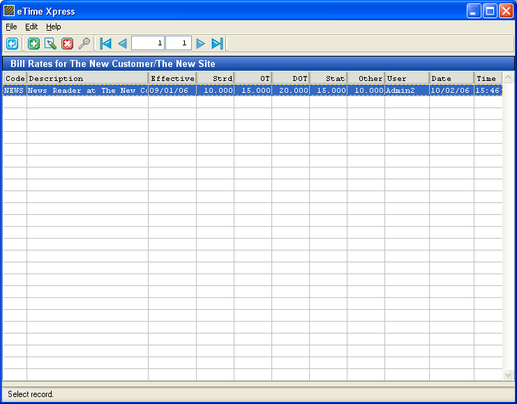 Site Bill Rates Screen
To Add a Site Bill Rate:
- Click the Add button ( ) on the Tool Bar - the fields in the Bill Rates browser should become active.
- Assign the Service Code (enter '*' for All Services), Effective Date and the applicable Bill Rates by hour's type (standard, overtime, double overtime, statutory and other). Remember for fields that require entry by codes, you may press the F5 key to bring up a list of valid entries.
- Press the Enter key to save your new Site Bill Rate.
The Effective Date allows you to define current and future Bill Rates. When calculating billing, eTime Xpress will apply the Bill Rate in effect on the date of the shift.
Note: If shifts were created prior to defining Bill Rates or you are updating an existing Bill Rate, you will be asked whether you want to apply the new Bill Rate to existing shifts. Selecting 'Yes' will recalculate your billing information with the new rate, where as selecting 'No' will apply the new rate only to newly created shifts.
2.7.4. Combination Bill Rates (previously Site Employee BillPay Rates)
Combination Bill Rates allow you to define a bill rate based on a shift's Customer, Site, Employee and Service values.
Combination Bill Rates may be defined from three areas within the application:
- Employee > Employee Combination Bill Rates
Employee Combination Bill Rates allow you to define and view combination bill rates filtered by employee. Customer, Site and Service values may be a combination of specific or wild card values. Please see the Employee Combination Bill Rates section in the Employee User Guide for more information.
- Customer > Site Combination Bill Rates
Site Combination Bill Rates allow you to define and view combination bill rates filtered by site. Employee and Service values may be a combination of specific or wild card values. Please see the Site Combination Bill Rates section in the Customer User Guide for more information.
- Company/Branch > Branch Combination Bill Rates
Branch Combination Bill Rates allow you to view and administer All combination bill rates defined in a branch. Customer, Site, Employee and Service values may be a combination of specific or wild card values. Please see the Branch Combination Bill Rates section in the Administrator User Guide for more information.
Combination Bill Rate Tie Break/Priority Rules
Combination bill rates allow you to assign a bill rate based on a shift's customer, site, employee and service values. Those values may be defined as specific or wild card values. As a result, more than one combination bill rate may apply to a shift requiring prioritization rules as tie breakers.
The following tie break rules are applied in the following priority order when selecting between bill rates that are valid on the same shift:
Priority | Employee | Customer | Site | Service |
1 | √ | √ | √ | √ |
2 | √ | √ | √ | All |
3 | √ | √ | All | √ |
4 | √ | √ | All | All |
5 | √ | All | All | √ |
6 | √ | All | All | All |
7 | All | √ | √ | √ |
8 | All | √ | √ | All |
9 | All | √ | All | √ |
10 | All | √ | All | All |
11 | All | All | All | √ |
12 | All | All | All | All |
√ = Specific Value
All = Wild Card value
Example:
A basic scenario of 2 combination bill rates applying to the same shift would be as follows:
Combination Bill Rate | Employee | Customer | Site | Service |
Bill Rate #1 = $25 | Joe Doe | All | All | All |
Bill Rate #2 = $20 | All | All | All | On Call |
If Joe Doe is scheduled to perform On Call duties that shift satisfies the criteria for both combination bill rate #1 and #2.
Based on the priority table above, bill rate #1 would have priority rank of 6 while bill rate #2 would have priority rank of 11. The system would assign combination bill rate #1 of $25 to the shift.
Note: If shifts were created prior to defining Bill Rates or you are updating an existing Bill Rate, you will be asked whether you want to apply the new Bill Rate to existing shifts. Selecting 'Yes' will recalculate your billing information with the new rate, where as selecting 'No' will apply the new rate only to newly created shifts.
2.7.5. Branch Bill Rates
Branch Bill Rates allow you to define a Bill Rate where all Employees performing the same Service are billed at the same rate. Remember that Branch Bill Rates are default rates that are applied when an applicable bill rate cannot be found in Employee Bill rates, Site Bill Rates or Combination Bill Rates depending on your configured business rules. Branch Bill Rates can be used as a "catch-all" or if your organization simply bills according to the service performed.
From the Main Menu, click Configuration > Company/Branch > Branch Bill Rates. The Branch Bill Rates screen should appear as shown in the figure below.
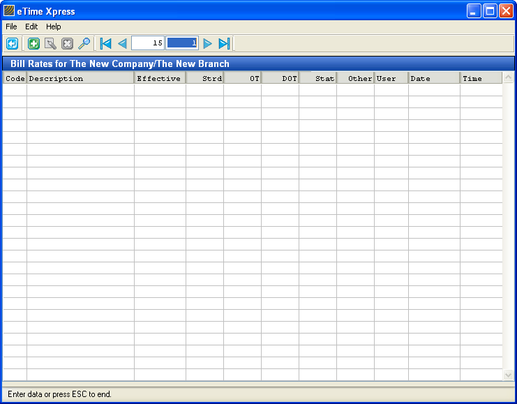 Branch Bill Rates Screen
To Add a Branch Bill Rate:
- Click the Add button ( ) on the Tool Bar - the fields in the Bill Rates browser should become active.
- Assign the Service Code (enter '*' for All Services), Effective Date and the applicable Bill Rates by hour's type (standard, overtime, double overtime, statutory and other). Remember for fields that require entry by codes, you may press the F5 key to bring up a list of valid entries.
- Press the Enter key to save your new Branch Bill Rate.
The Effective Date allows you to define current and future Bill Rates. When calculating billing, eTime Xpress will apply the Bill Rate in effect on the date of the shift.
Note: If shifts were created prior to defining Bill Rates or you are updating an existing Bill Rate, you will be asked whether you want to apply the new Bill Rate to existing shifts. Selecting 'Yes' will recalculate your billing information with the new rate, where as selecting 'No' will apply the new rate only to newly created shifts.
3. Managing Time and Attendance Records
The Time & Attendance screen allows you to verify, adjust and record the work results of your Schedule. Your Scheduled shifts are matched with attendance information (i.e. manual or web timesheets, swipe card systems, HandPunches etc.) to create Worked shifts.
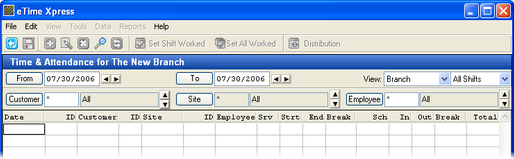
3.1. Load View
The Time & Attendance screen allows you load only the shifts which you want to view and update.
To load shifts into the Time & Attendance screen:
- From the View Selector, specify the applicable filters for the shifts you want to view.

Filter Option | Description |
From/To Dates | Specify the date range for shifts. |
View | Specify the type of shift to be viewed. |
Customer | Specify the shifts by Customer. To see All Customers, enter '*'. |
Site | Specify the shifts by Site. To see All Sites, enter '*'. |
Employee | Specify the shifts by Employee. To see All Employees, enter '*'. To see Open shifts, enter '0'. |
- Start the shift load process by clicking the Refresh button (
 ). Refresh clears your current view and loads shifts matching your specified filters.
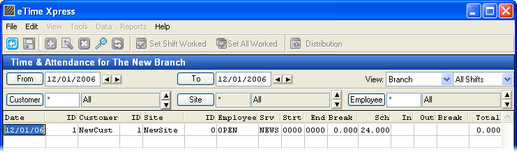
3.2 Setting Shifts to Worked
Shifts created in the Visual Scheduler are first loaded into Time & Attendance as Scheduled shifts as shown in the figure below.
 Scheduled Shift in Time & Attendance
In eTime Xpress, shifts are categorized as Worked when the work results (actual In, Out and Break values) are recorded as shown in the figure below.

Worked Shift in Time & Attendance
3.2.1. Set a Scheduled Shift to Worked
To Set a Scheduled Shift to Worked:
- Select a Scheduled shift and click the Set Shift Worked button (
 ) on the Tool Bar. By default, the In, Out, Break and Total fields will be populated with the Scheduled values.
To Set a Range of Scheduled Shifts to Worked:
- In the View Selector of Time & Attendance, specify the applicable filters for the shifts you want to view and click the Refresh button ( ).
- Click the Set All Worked button (
 ) on the Tool bar. All Scheduled shifts in the specified range will be set to Worked. By default, the In, Out, Break and Total fields will be populated with the Scheduled values.
Note: Open shifts cannot be set to Worked - an Employee must be assigned to a shift before being categorized as Worked. eTime Xpress will skip any Open shifts found in the specified range.
3.2.2. Reset a Worked Shift to Scheduled
To Reset a Worked Shift to Scheduled:
- Select a Worked shift and click Data > Worked > Reset Shift from the Menu bar. The Worked shift will be reset to Scheduled and the In, Out, Break and Total fields will be cleared.
To Reset a Range of Worked Shifts to Scheduled:
- In the View Selector of Time & Attendance, specify the applicable filters for the shifts you want to view and click the Refresh button ( ).
- From the Menu bar, click Data > Worked > Reset All. All Worked shifts will be reset to Scheduled and the In, Out, Break and Total fields will be cleared.
Note: Locked shifts cannot be reset. You must first remove the Lock status before resetting the Worked shift. eTime Xpress will skip any Locked shifts found in the specified range.
3.3. Add a Worked Shift
The Visual Scheduler is the primary method for entering "Scheduled" shifts records into eTime Xpress. Shifts may be entered in Time & Attendance but they are considered "Worked" and are not validated against your business rules such as double book and time off.
To Add a Worked shift:
- Click the Add button ( ) on the Tool Bar - the fields in the Time & Attendance browser should become active as shown in the figure below.
- Assign the date, Customer, Site, Employee, Service, In, Out and Break values. Remember for fields that require entry by codes, you may press the F5 key to bring up a list of valid entries.
- Press the Enter key to save your new Worked Shift Record. The Shift Distribution is automatically calculated for the new worked shift.
Note: In and Out refer to the actual start and end times of a shift. For example, a shift may have a scheduled 8AM "Start" time but the actual "In" or arrival time of the Employee may be 8:15AM.
3.4. Update a Worked Shift
To Update a Worked shift:
- Select a shift and click the Update button (
 ) on the Tool Bar - the fields in the Time & Attendance browser should become active as shown in the figure below.
- Update the date, Customer, Site, Employee, Service, In, Out and Break values. Remember for fields that require entry by codes, you may press the F5 key to bring up a list of valid entries.
- Press the Enter key to save changes. The Shift Distribution is automatically calculated for the updated worked shift.
3.5. Delete a Worked Shift
To Delete a Worked shift:
- Select a shift and click the Delete button (
 ) on the Tool Bar - a Confirm Delete dialog box should appear as shown in the figure below.
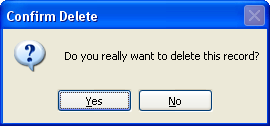 Deleting a Shift
- Click 'Yes' to delete the selected shift.
To Delete a range of Worked shifts:
- From Time & Attendance, click the Edit > Delete > Range. The Delete Range dialog box should appear as shown in the figure below.
- Set search criteria by specifying the date range, shift type (Worked or Not Worked), Employee, Service, Customer and Site.
- Click the Search button to display a list of shifts matching the search criteria.
- From the list of shifts, select the shifts which you want to delete. You can select shifts using the Select All button or by pressing the [Shift] or [Ctrl] key while selecting shift records.
- Click the OK button to start the delete process.
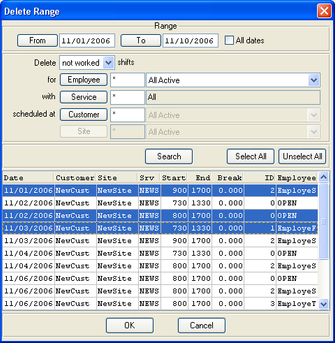 Deleting a Range of Shifts
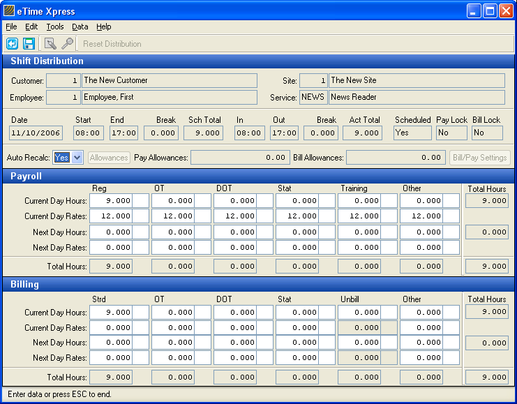
3.6. Update a Shift Distribution
When a shift is created in eTime Xpress, a Shift Distribution is automatically created based on your configured business rules. The Shift Distribution is the breakdown of how a shift will be paid and billed.
eTime Xpress allows you to adjust the hours and rates of a Shift Distribution to account for bill and/or pay exceptions that differ from your common business rules (i.e. special one-time events with specific rates and overtime rules).
The Shift Distribution calculation depends on your 'hours calculation' rule defined in the Branch Bill/Pay Settings screen as shown in the figure below. The hours calculation rule sets the cutoff rule when a shift ends the following calendar day (i.e. a graveyard shift from 10pm to 6am).
Depending on your hours calculation rule for the branch, the display of the Shift Distribution will differ as outlined below.
3.6.1. Shift Distribution Calculated by Shift Start Date
To Update a Shift Distribution Calculated by Shift Start Date:
- From Time & Attendance, select a Worked shift and click the Distribution button (
 ) on the Tool Bar - the fields under Shift Distribution should become active as shown in the figure below.
Shift Distribution Calculated by Start Date
- Update the Pay and/or Bill Hours and Rates as required. When updating Pay or Bill hours, the sum of all hour types must equal the total hours of a shift.
- Assign a Reason Code to any fields updated in the Shift Distribution. Beside every Shift Distribution field is a Reason Code field whose purpose is to record why a field was updated or overridden. You may generate a report on what changes were made to Shift Distributions and why. Remember for fields that require entry by codes, you may press the F5 key to bring up a list of valid entries.
- Click the Save button (
 ) to save the changes to the Shift Distribution.
Note: To define your own Reason Codes, click on Configuration > Codes Maintenance option from the Main Menu. Next select either 'Bill Reason Code' or 'Pay Reason Code'.
3.6.2. Shift Distribution Calculated by Calendar Date (Midnight Cutoff)
To Update a Shift Distribution Calculated by Calendar Date (Midnight Cutoff):
- From Time & Attendance, select a Worked shift and click the Distribution button ( ) on the Tool Bar - the fields under Shift Distribution should become active as shown in the figure below.
Shift Distribution Calculated by Calendar Date (Midnight Cutoff)
- Update the Pay and/or Bill Hours and Rates as required. When updating Pay or Bill hours, the sum of all hour types must equal the total hours of a shift.
- Assign a Reason Code to any fields updated in the Shift Distribution. Beside every Shift Distribution field is a Reason Code field whose purpose is to record why a field was updated or overridden. You may generate a report on what changes were made to Shift Distributions and why. Remember for fields that require entry by codes, you may press the F5 key to bring up a list of valid entries.
- Click the Save button ( ) to save the changes to the Shift Distribution.
Note: To define your own Reason Codes, click on Configuration > Codes Maintenance option from the Main Menu. Next select either 'Bill Reason Code' or 'Pay Reason Code'.
3.6.3. Reset a Shift Distribution
Resetting a Shift Distribution recalculates the Shift Distribution based on your preset business rules. It will overwrite any manual updates or overrides made to a Shift Distribution.
To Reset a Shift Distribution:
- From Time & Attendance, select a Worked shift and click the Reset Distribution button under Shift Distribution as shown in the figure below.
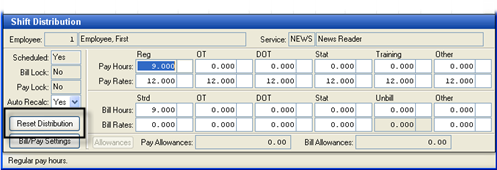
Reset Shift Distribution
To Reset Shift Distributions of a Group of Shifts:
- In the View Selector of Time & Attendance, specify the applicable filters for the shifts you want to view and click the Refresh button ( ).
- From the Menu bar, click Data > Reset > Reset All Distributions. The Shift Distributions of All Worked shifts in the specified range will be reset.
To Reset Shift Distributions of a Range of Shifts:
- From the Menu bar, click Data > Reset > Reset Distribution Range. The Shift Distributions of all matching shifts over the specified date range will be reset.
3.7. Replace Tool
Time & Attendance provides a collection of update features to manage Worked shifts and their underlying Shift Distribution information. The Time & Attendance replace tool allows you to edit and make multiple adjustments all at once.
From Time & Attendance, click Edit > Replace from the Menu bar. The Replace dialog box should appear as shown in the figure below.
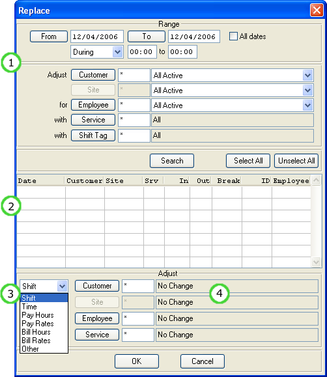 Time & Attendance Replace Tool
Annotation | Description |
(1) View Selector | Contains a list of criteria that allows you to narrow your search to a subset of Worked shifts. |
(2) Record Selector | Displays Worked shifts matching criteria defined in the View Selector. You then select the Worked shifts to which you want to apply the Replace tool. |
(3) Data Selector | Select the type of data you want to update and replace. |
(4) Data Fields | Specify the data fields and change required. The Data Fields will dynamically update based on the data type selected. |
Using the Time & Attendance Replace Tool:
- Set Search Criteria. In the View Selector, define your shift search criteria and click the Search button. The Search feature will display only shifts matching your search criteria.
- Select Records. From the list of Worked shifts, select the shifts to which you want to apply the Replace tool. You can select shifts using the Select All button or by pressing the [Shift] or [Ctrl] key while selecting shift records.
- Select Data Type. Select the type of data you want to update and replace.
- Configure Tool. Specify the data fields and change required based on the data type selected.
Note: The Replace tool searches and displays only Worked shifts (i.e. Scheduled shifts cannot be edited with the Replace tool).
3.7.1. Update Shift Details
The Shift option of the Time & Attendance Replace tool allows you to perform a bulk update of the Customer, Site, Employee and Service values of Worked shifts.
To Update Shift Details:
- From the Time & Attendance Replace tool, select Shift - the fields under Adjust should appear as shown in the figure below.
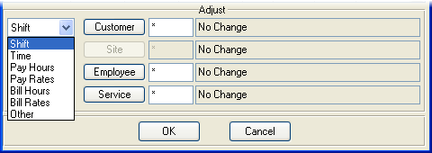
- Update the Customer, Site, Employee and/or Service as required. Enter '*' for No Change. Remember for fields that require entry by codes, you may press the F5 key to bring up a list of valid entries.
- Click the OK button start the replace process.
3.7.2. Update Shift Times
The Time option of the Time & Attendance Replace tool allows you to perform a bulk update of the In, Out and Break times of Worked shifts.
To Update Shift Times:
- From the Time & Attendance Replace tool, select Time - the fields under Adjust should appear as shown in the figure below.
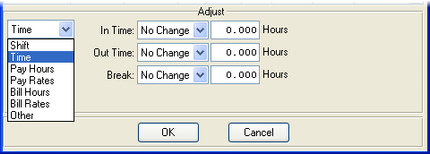
- Update the In, Out and Break as required. You may select to increase, decrease or replace values.
- Click the OK button start the replace process.
3.7.3. Update Pay Hours
The Pay Hours option of the Time & Attendance Replace tool allows you to perform a bulk update of the pay hours in the Shift Distribution of Worked shifts. This tool allows you to move hours from and to hours types (i.e. Regular to Overtime) based on a flat amount or formula.
To Update Shift Distribution Pay Hours:
- From the Time & Attendance Replace tool, select Pay Hours - the fields under Adjust should appear as shown in the figure below.
- Select the applicable move from/to hours type, reason code and the amount of hours.
- Click the OK button start the replace process.
Hours Options | Description |
All Available | Moves all hours from/to selected hours types. |
Flat Amount | Moves specified amount of hours from/to selected hours types. |
In Time Range | Moves any hours occurring during specified time period from/to selected hours types. From example, if the specified time period is 0000 to 0400, the portion of shift hours occurring from 12AM to 4AM will be moved. |
Over | Moves any hours over specified threshold from/to selected hours types. |
Under | Moves any hours under specified threshold from/to selected hours types. |
3.7.4. Update Pay Rates
The Pay Rates option of the Time & Attendance Replace tool allows you to perform a bulk update of the pay rates in the Shift Distribution of Worked shifts. This tool allows you to increase/decrease pay rates by a flat amount or percentage.
To Update Shift Distribution Pay Rates:
- From the Time & Attendance Replace tool, select Pay Rates - the fields under Adjust should appear as shown in the figure below.
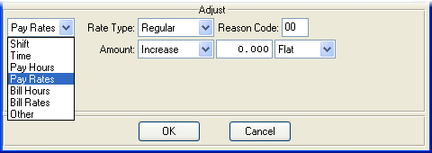
- Select the applicable rate type, reason code, action (increase/decrease) and the amount of change.
- Click the OK button start the replace process.
3.7.5. Update Bill Hours
The Bill Hours option of the Time & Attendance Replace tool allows you to perform a bulk update of the bill hours in the Shift Distribution of Worked shifts. This tool allows you to move hours to and from hours types (i.e. Standard to Overtime) based on a flat amount or formula.
To Update Shift Distribution Bill Hours:
- From the Time & Attendance Replace tool, select Bill Hours - the fields under Adjust should appear as shown in the figure below.
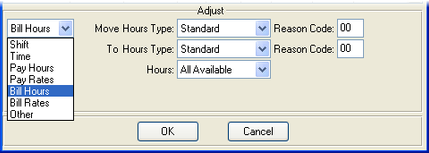
- Select the applicable move from/to hours type, reason code and the amount of hours.
- Click the OK button start the replace process.
Hours Options | Description |
All Available | Moves all hours from/to selected hours types. |
Flat Amount | Moves specified amount of hours from/to selected hours types. |
In Time Range | Moves any hours occurring during specified time period from/to selected hours types. From example, if the specified time period is 0000 to 0400, the portion of shift hours occurring from 12AM to 4AM will be moved. |
Over | Moves any hours over specified threshold from/to selected hours types. |
Under | Moves any hours under specified threshold from/to selected hours types. |
3.7.6. Update Bill Rates
The Bill Rates option of the Time & Attendance Replace tool allows you to perform a bulk update of the bill rates in the Shift Distribution of Worked shifts. This tool allows you to increase/decrease pay rates by a flat amount or percentage.
To Update Shift Distribution Bill Rates:
- From the Time & Attendance Replace tool, select Bill Rates - the fields under Adjust should appear as shown in the figure below.
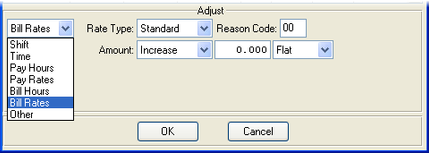
- Select the applicable rate type, reason code, action (increase/decrease) and the amount of change.
- Click the OK button start the replace process.
3.7.7. Update Recalculation Status
The Other option of the Time & Attendance Replace tool allows you to perform a bulk update of the Recalculation Status of Worked shifts. By default, eTime Xpress will recalculate the Shift Distribution of shifts. When you update or override a Shift Distribution, the Automatic Recalculation setting for that shift is set to 'No'. This occurs so that your changes are not overwritten by a future recalculation process.
If want to have eTime Xpress reverse changes made to Shift Distributions, use the Replace Other option to set the Automatic Recalculation value back to 'Yes'. eTime Xpress will recalculate Shift Distributions using your preset business rules.
To Update the Recalculation Status of Worked Shifts:
- From the Time & Attendance Replace tool, select Other - the fields under Adjust should appear as shown in the figure below.
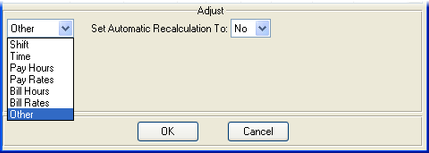
- Select the applicable Automatic Recalculation value.
- Click the OK button start the replace process.
3.8. Allowances
eTime Xpress allows allowances to be attached to shifts for payroll and billing purposes. Allowances may include mileage, per diems and other items.
From Time & Attendance, select a Worked shift and click the Allowances button under Shift Distribution. The Allowances screen should appear as shown in the figure below.
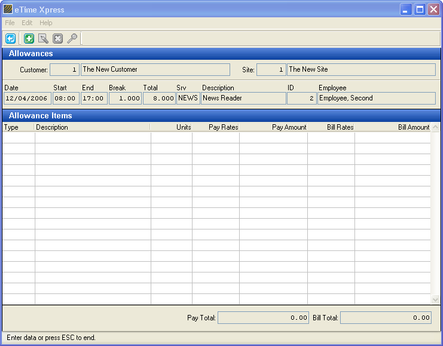 Shift Allowances
3.8.1. Create Allowance Types
eTime Xpress allows you to create the Allowance types applicable to your organization (i.e. meal allowances, health & welfare premiums, mileage, per diems etc.).
To create an Allowance types:
From the eTime Xpress Main screen, click Configuration > Codes Maintenance and select 'Shift Allowance Code'.
3.8.2. Add an Allowance
To Add an Allowance:
- Click the Add button ( ) on the Tool Bar - the fields in the Allowance Items browser should become active.
- Assign the Allowance type, unit amount, pay rate and bill rate as required. Remember for fields that require entry by codes, you may press the F5 key to bring up a list of valid entries.
- Press the Enter key to save your new Allowance record.
3.8.3. Update an Allowance
To Update an Allowance:
- Select an Allowance record and click the Update button ( ) on the Tool Bar – the fields in the Allowance Items browser should become active.
- Update the Allowance type, unit amount, pay rate and bill rate as required. Remember for fields that require entry by codes, you may press the F5 key to bring up a list of valid entries.
- Press the Enter key to save your changes.
3.8.4. Delete Allowances
To Delete an Allowance:
- Select an Allowance record and click the Delete button ( ) on the Tool Bar - the Confirm Delete dialog box should appear.
- Click 'Yes' to delete the selected Allowance.
3.8.5. Recurring Allowances
Recurring Allowances are rules can be created to automatically attach allowances based on predefined shift criteria.
To Apply Recurring Allowances:
- From Time & Attendance, click Tools > Recurring Allowances from the Menu bar.
- Specify the date range to calculate Recurring Allowances and click the Apply button. Allowances will be attached to shifts according to your Recurring Allowance rules.
Note: To setup Recurring Allowances, go to the eTime Xpress Main screen and click Configuration > Company/Branch > Branch Recurring Allowances. Please refer to the Administrator Guide for more information.
To Undo Recurring Allowances:
- From Time & Attendance, click Tools > Recurring Allowances from the Menu bar.
- Click the Log tab and select the instance which you want to Undo.
3.9. Setting Shifts to Locked
After completing the task of finalizing attendance and Shift Distribution information, it is recommended that Worked Shifts be to set to Locked. The Lock status grants read-only access to prevent accidentally deletion or changes to finalized Worked shifts. By locking shift records, you have a historical record of how shifts were paid and billed.
When locking shifts, you are required to specify a lock date. Lock dates may be used to track shifts by accounting periods. For example, when locking shifts for pay purposes, you may assign a lock date corresponding to the last day of the pay period in which the shift was paid. Payroll reports can then be generated by pay period using the shift's lock date. You may apply lock dates in a similar fashion for bill purposes.
3.9.1. Set a Worked Shift to Locked
When a shift is locked, the shift details, times, hours and rate information of Worked shifts are set to read-only.
To Set a Worked Shift to Locked:
- From Time & Attendance, select a worked shift you want to lock.
- From the Menu bar, click Data > Lock > Lock Shift - the Lock Shift dialog box should appear.
- Select whether you are locking the shift for Payroll and/or Billing purposes.
- Specify the lock date.
- Click the OK button to lock the selected shift.
To Set a Range of Worked Shifts to Locked:
- In the View Selector of Time & Attendance, specify the applicable filters for the shifts you want to view and click the Refresh button ( ).
- From the Menu bar, click Data > Lock > Lock All - the Lock Shift dialog box should appear.
- Select whether you are locking the selected shifts for Payroll and/or Billing purposes.
- Specify the lock date.
- Click the OK button to lock the selected shifts.
Note: Shifts can also be locked from the Payroll and Billing Main Screen by clicking on the Lock Shift ( ![]() ) or Lock All (
) or Lock All ( ![]() ) buttons.
) buttons.
3.9.2. Reset a Locked Shift to Worked
To Reset a Locked Shift to Worked:
- Select a Locked shift and click Data > Lock > Unlock Shift from the Menu bar - the Unlock Shift dialog box should appear.
- Select whether you are unlocking the shift for Payroll and/or Billing purposes.
- Click the OK button. The Locked shift will be reset to Worked and the lock status will be updated from 'Yes' to 'No' under the shift distribution area.
To Reset a Range of Locked Shifts to Worked:
- In the View Selector of Time & Attendance, specify the applicable filters for the shifts you want to view and click the Refresh button ( ).
- From the Menu bar, click Data > Locked > Unlock All - the Unlock Shift dialog box should appear.
- Select whether you are unlocking the selected shifts for Payroll and/or Billing purposes.
- Click the OK button. The selected Locked shifts will be reset to Worked and the lock status will be updated from 'Yes' to 'No' under the shift distribution area.
3.10. Other Options
Time & Attendance provides additional features as outlined below.
3.10.1. Set Time & Attendance Security
For organizations where payroll and billing information are managed by different departments or individuals, eTime Xpress allows you to hide payroll and billing information from specific users.
To Hide Payroll Information:
- From Main Menu, click Administration > Security > User Security from the Menu bar (requires user with administrator rights).
- Select the applicable user and click the Menu tab.
- Double-click
") next to Time & Attendance.
next to Time & Attendance. - Double-click the 'no' value next Pay Distribution until it reads 'yes'. The pay information of the Shift Distribution should be hidden in Time & Attendance as shown in the figure below.
- Click the Close button (
 ) to return to the Main Menu.
Shift Distribution – Pay Information Hidden
To Hide Billing Information:
- From Main Menu, click Administration > Security > User Security from the Menu bar (requires user with administrator rights).
- Select the applicable user and click the Menu tab.
- Double-click next to Time & Attendance.
- Double-click the 'no' value next Bill Distribution until it reads 'yes'. The bill information of the Shift Distribution should be hidden in Time & Attendance as shown in the figure below.
- Click the Close button ( ) to return to the Main Menu.
 Shift Distribution – Bill Information Hidden
3.10.2. Import Attendance Information
eTime Xpress integrates with both Celayix attendance solutions and 3rd party hardware to automate the flow of attendance information into eTime Xpress. Attendance information can be entered by employees via the Web, telephone, HandPunch or card swipe system and later imported into eTime Xpress.
The following is a list of common attendance solutions that can be integrated with eTime Xpress:
System | Description |
Web Xpress | Web Xpress is Celayix's Web Time Sheet solution that allows employees to enter their time over the Internet. |
Voice Xpress | Voice Xpress is Celayix's telephone based attendance solution that allows employees to check-in and check-out from shifts using a telephone. |
Time Collection Devices | eTime Xpress integrates into a variety of time collection devices such as HandPunch, TraxG and XPocket time collection devices. Time records from other 3rd party time collection devices may also be supported using our standard CSV import template. |
If you want to purchase any of the attendance solutions above, please contact your Celayix Software Sales Representative. Integrating eTime Xpress with an attendance solution requires additional configuration – please consult the respective user manual or contact Celayix support for assistance.
3.10.3. Exporting Shifts Distribution
eTime Xpress allows Shift Distribution information to be exported to a .CSV file.
From the menu bar in the Time & Attendance Main screen, click File > Export Shifts Distribution. Select Shifts Distribution and click OK.
For more information on exporting data from eTime Xpress, see the Global Features Guide.
3.10.4. Time Entry Settings
If you have licensed either Celayix's Voice Xpress or Web Xpress product, you can configure when employees are able to enter their time.
To configure your Time Entry rules:
- From Time & Attendance, click File > Time Entry Settings from the Menu bar. The Time Entry Settings dialog box should be shown as in the figure below.
- Specify the dates or date range rules when employees are allowed to enter their time.
- Click OK to save your Time Entry rules.
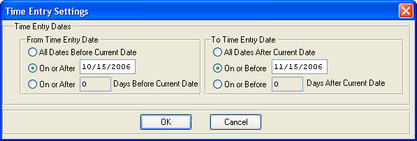 Time Entry Settings
Note: Voice Xpress and Web Xpress are additional products that are licensed separately from eTime Xpress. Both products require additional setup and configuration. Please refer to the installation documentation for these products.
3.10.5. Accruals
Accruals allow you to configure complex formulas to automatically calculate accrual balances such as holiday, sick time and other entitlements. Please refer to the Accruals User Guide for more information.
The Accruals module in eTime Xpress requires additional licensing. If you wish to purchase the Accruals Module, please contact your Celayix Software Sales Representative.
4. Using Payroll Main Screen
The Payroll Main screen allows you to manage the 'Life Cycle' of shifts over a pay period. From the Payroll Main screen, you can generate a view of Scheduled, Worked and Pay Locked shifts to ensure that all shifts have been properly processed at each stage. For example, if a pay period is Locked, it is recommended that a Scheduled and Worked view is generated to ensure that no shifts have been missed.
From the Main Menu, double-click Payroll. The Payroll Main screen should appear as shown in the figure below.
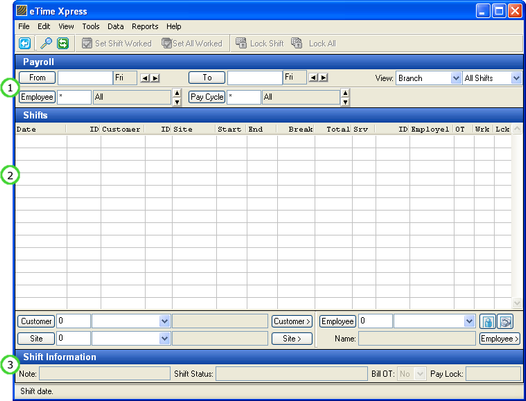 Payroll Screen with Annotations
Annotation | Description |
(1) View Selector | Specify the date range and shift records to view. |
(2) Shift Records | Displays shift records over date range with Worked and Locked status. |
(3) Shift Information | Displays shift information including notes, shift status, bill OT status and pay lock date. |
4.1. Review Shift Life Cycle
The following is a list of shift views available in the Payroll Main screen:
Shift View | Description |
All Shifts | Displays all shifts over date range. |
Scheduled | Displays Scheduled shifts over date range. |
Worked | Displays Worked shifts over date range. |
Locked | Displays shifts Locked for Pay over date range. |
Unlocked | Displays shifts Locked for Bill but not Locked for Pay over date range. |
4.2. Set Scheduled Shifts to Worked
To Set a Scheduled Shift to Worked:
- Select a Scheduled shift and click the Set Shift Worked button ( ) on the Tool Bar. The Scheduled shift will be set to Worked.
To Set a Range of Scheduled Shifts to Worked:
- In the View Selector of the Payroll Main screen, specify the applicable filters for the shifts you want to view and click the Refresh button ( ).
- Click the Set All Worked button ( ) on the Tool bar. All Scheduled shifts in the specified range will be set to Worked.
Note: Open shifts cannot be set to Worked - an Employee must be assigned to a shift before being categorized as Worked.
4.3. Reset Worked Shifts to Scheduled
To Reset a Worked Shift to Scheduled:
- Select a Worked shift and click Data > Worked > Reset Shift from the Menu bar. The Worked shift will be reset to Scheduled.
To Reset a Range of Worked Shifts to Scheduled:
- In the View Selector of the Payroll Main screen, specify the applicable filters for the shifts you want to view and click the Refresh button ( ).
- From the Menu bar, click Data > Worked > Reset All. All Worked shifts will be reset to Scheduled.
Note: Locked shifts cannot be reset. You must first remove the Lock status before resetting the Worked shift. eTime Xpress will skip any Locked shifts found in the specified range.
4.4. Set Worked Shifts to Locked
To Set a Worked Shift to Pay Locked:
- Select a Worked shift and click the Lock Shift button (
 ) on the Tool Bar - the Lock Shift dialog box should appear.
 - Specify the Pay Lock date.
- Click the OK button. The Worked shift will be Pay Locked and the Pay Lock date will appear in the shift information area.
To Set a Range of Worked Shifts to Pay Locked:
- In the View Selector of the Payroll Main screen, specify the applicable filters for the shifts you want to view and click the Refresh button ( ).
- Click the Lock All button (
 ) on the Tool bar - the Lock Shift dialog box should appear.
 - Specify the Pay Lock date.
- Click the OK button. All Worked shifts in the specified range will be Pay Locked and the Pay Lock dates will appear in the shift information area.
4.5. Reset Locked Shifts to Worked
To Reset a Pay Locked Shift to Worked:
- Select a Pay Locked shift and click Data > Locked > Unlock Shift from the Menu bar - the Unlock Shift dialog box should appear.
- Click the OK button. The Pay Locked shift will be reset to Worked and the Pay Lock date will be cleared in the shift information area.
To Reset a Range of Pay Locked Shifts to Worked:
- In the View Selector of the Payroll Main screen, specify the applicable filters for the shifts you want to view and click the Refresh button ( ).
- From the Menu bar, click Data > Worked > Unlock All - the Unlock Shift dialog box should appear.
- Click the Ok button. All Pay Locked shifts will be reset to Worked and the Pay Lock dates will be cleared in the shift information area.
5. Using Billing Main Screen
The Billing Main screen allows you to manage the 'Life Cycle' of shifts over a Bill period. From the Billing Main screen, you can generate a view of Scheduled, Worked and Bill Locked shifts to ensure that all shifts have been properly processed at each stage. For example, if a Bill period is Locked, it is recommended that a Scheduled and Worked view is generated to ensure that no shifts have been missed.
From the Main Menu, double-click Billing. The Billing Main screen should appear as shown in the figure below.
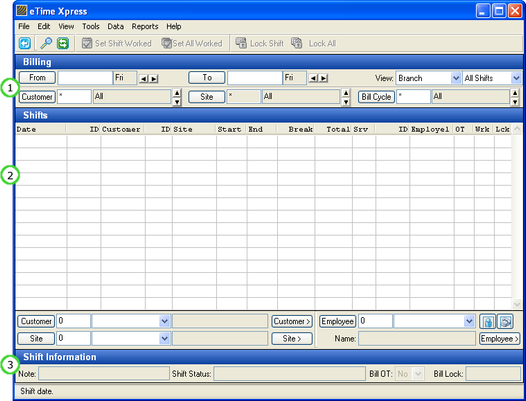 Billing Screen with Annotations
Annotation | Description |
(1) View Selector | Specify the date range and shift records to view. |
(2) Shift Records | Displays shift records over date range with Worked and Locked status. |
(3) Shift Information | Displays shift information including notes, shift status, bill OT status and bill lock date. |
5.1. Review Shift Life Cycle
The following is a list of shift views available in the Billing Main screen:
Shift View | Description |
All Shifts | Displays all shifts over date range. |
Scheduled | Displays Scheduled shifts over date range. |
Worked | Displays Worked shifts over date range. |
Locked | Displays shifts Locked for Bill over date range. |
Unlocked | Displays shifts Locked for Pay but not Locked for Bill over date range. |
5.2. Set Scheduled Shifts to Worked
To Set a Scheduled Shift to Worked:
- Select a Scheduled shift and click the Set Shift Worked button ( ) on the Tool Bar. The Scheduled shift will be set to Worked.
To Set a Range of Scheduled Shifts to Worked:
- In the View Selector of the Billing Main screen, specify the applicable filters for the shifts you want to view and click the Refresh button ( ).
- Click the Set All Worked button ( ) on the Tool bar. All Scheduled shifts in the specified range will be set to Worked.
Note: Open shifts cannot be set to Worked - an Employee must be assigned to a shift before being categorized as Worked.
5.3. Reset Worked Shifts to Scheduled
To Reset a Worked Shift to Scheduled:
- Select a Worked shift and click Data > Worked > Reset Shift from the Menu bar. The Worked shift will be reset to Scheduled.
To Reset a Range of Worked Shifts to Scheduled:
- In the View Selector of the Billing Main screen, specify the applicable filters for the shifts you want to view and click the Refresh button ( ).
- From the Menu bar, click Data > Worked > Reset All. All Worked shifts will be reset to Scheduled.
Note: Locked shifts cannot be reset. You must first remove the Lock status before resetting the Worked shift. eTime Xpress will skip any Locked shifts found in the specified range.
5.4. Set Worked Shifts to Locked
To Set a Worked Shift to Bill Locked:
- Select a Worked shift and click the Lock Shift button ( ) on the Tool Bar - the Lock Shift dialog box should appear.
- Specify the Bill Lock date.
- Click the OK button. The Worked shift will be Bill Locked and the Bill Lock date will appear in the shift information area.
To Set a Range of Worked Shifts to Bill Locked:
- In the View Selector of the Billing Main screen, specify the applicable filters for the shifts you want to view and click the Refresh button ( ).
- Click the Lock All button ( ) on the Tool bar - the Lock Shift dialog box should appear.
- Specify the Bill Lock date.
- Click the OK button. All Worked shifts in the specified range will be Bill Locked and the Bill Lock dates will appear in the shift information area.
5.5. Reset Locked Shifts to Worked
To Reset a Bill Locked Shift to Worked:
- Select a Bill Locked shift and click Data > Locked > Unlock Shift from the Menu bar - the Unlock Shift dialog box should appear.
- Click the OK button. The Bill Locked shift will be reset to Worked and the Bill Lock date will be cleared in the shift information area.
To Reset a Range of Bill Locked Shifts to Worked:
- In the View Selector of the Billing Main screen, specify the applicable filters for the shifts you want to view and click the Refresh button ( ).
- From the Menu bar, click Data > Worked > Unlock All - the Unlock Shift dialog box should appear.
- Click the Ok button. All Bill Locked shifts will be reset to Worked and the Bill Lock dates will be cleared in the shift information area.
6. Using Control Center to Record Attendance
The Control Center of eTime Xpress can be used to manually record attendance information as shifts are being worked. You can easily sort shifts by time and shift type to determine missed check-ins, check-outs and health & welfare (safety) checks.
From the eTime Xpress Main Menu, double-click on the Control Center button. The Control Center screen should appear as shown in the figure below.
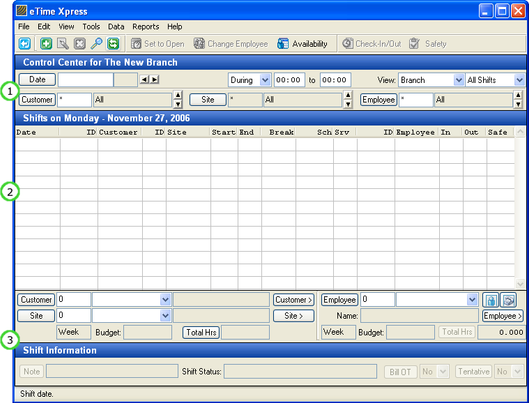 Control Center with Annotations
Annotation | Description |
(1) View Selectors | Specify the date and shift records to view. |
(2) Shift Records | Displays shift records matching search criteria. |
(3) Shift Information | Displays detailed shift information. |
6.1. Load View
The Control Center allows you load only the shifts which you want to view and update.
To load shifts into the Control Center:
- From the View Selector, specify the applicable filters for the shifts you want to view.
- Start the shift load process by clicking the Refresh button ( ). Refresh clears your current view and loads shifts matching your specified filters.
6.2. Record Check-In/Out
The Check-In/Out values record the actual start and end times of a shift.
To Record a Check-in or Check-out:
- Select a shift and click the Check-In/Out button (
 ) on the Tool Bar. The Check-In/Out dialog box should appear as shown in the figure below.
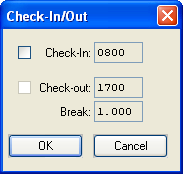
- Specify the check-in, check-out or break time as required and click the OK button.
6.3. Record Safety Check
The Safety Check is used where employees are required to perform regular call-ins for health & welfare or other service related updates.
To Record a Safety Check:
Select a shift and click the Safety button ( ![]() ) on the Tool Bar. The value in the Safe column for the shift will be populated with the current time.
) on the Tool Bar. The value in the Safe column for the shift will be populated with the current time.
To Reset a Safety Check:
Select a shift and click Data > Reset Safety > All or Shift in the Menu bar. The value in the Safe column for the shift(s) should be cleared.
6.4. Add a Shift
To Add a Shift:
- Click the Add button ( ) on the Tool Bar - the fields in the shift browser should become active.
- Assign the date, Customer, Site, start time, end time, break, Service and Employee. Remember for fields that require entry by codes, you may press the F5 key to bring up a list of valid entries.
- Press the Enter key to say the new record.
6.5. Update a Shift
To Update a Shift:
- Select a shift and click the Update button ( ) on the Tool Bar - the fields in the shift browser should become active.
- Update the date, Customer, Site, start time, end time, break, Service and/or Employee. Remember for fields that require entry by codes, you may press the F5 key to bring up a list of valid entries.
- Press the Enter key to save your changes.
6.6. Delete a Shift
To Delete a Shift:
- Select a shift and click the Delete button ( ) on the Tool Bar - a Confirm Delete dialog box should appear as shown in the figure below.
- Click 'Yes' to delete the selected shift.
6.7. Set a Shift to Open
Open shifts are shifts where no Employee is currently assigned (i.e. Employee ID is zero).
To Set a Shift to Open:
Select a shift and click the Set to Open button ( ![]() ) on the Tool Bar. The Employee ID will be set to zero and the description will be 'Open'.
) on the Tool Bar. The Employee ID will be set to zero and the description will be 'Open'.
6.8. Change Employee
To Change an Employee:
Select a shift and click the Change Employee button ( ![]() ) on the Tool Bar. Select the required desired employee from the lookup dialog box.
) on the Tool Bar. Select the required desired employee from the lookup dialog box.
6.9. Employee Availability Search
The Employee Availability tool automates the process of finding and replacing employees for shifts. Searches are dynamic allowing you query your entire employee database based on criteria such as qualifications, experience and overtime.
From the Visual Scheduler, click the Availability button ( ![]() ) on the Tool Bar. The Availability dialog box should appear as shown in the figure below.
) on the Tool Bar. The Availability dialog box should appear as shown in the figure below.
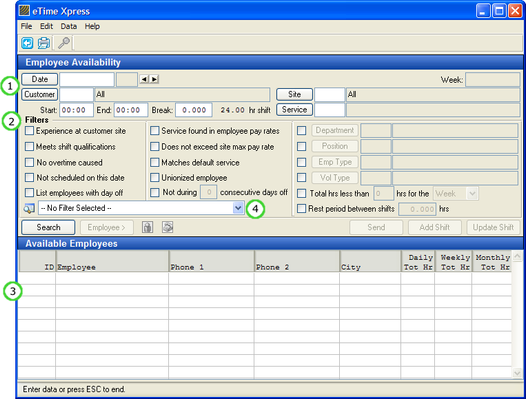
Employee Availability with Annotations
Annotation | Description |
(1) Shift Details | Specify a shift that you want to assign an employee. |
(2) Filters | Specify search criteria to filter your employee list. Appendix III Employee Search Filters provides detailed explanations of each search criteria. |
(3) Available Employees | Displays employee matching search criteria defined in the Filters section. You then select the employee(s) you want to assign to the specified shift. |
(4) Employee Filter | Select or create a user definable employee filter to search for specific groups of employees. To create your own filters, click |
If you have different availability filtering rules, you may save profiles in the Settings Manager so for fast loading in the future. The Settings Manager allows you to save setting profiles to the database or to an xml file as well as setting your default availability settings. From the Availability screen, click Data > Settings > Settings Manager from the menu bar.
To run the Employee Availability tool:
- Select a shift or an empty cell and click the Availability button (
 ) in the Tool Bar. The Availability dialog box should appear with the Shift Details automatically populated - if any shift information is missing, specify the necessary information.
 - Specify the applicable search Filters and/or user definable employee filter and click the Search button. A list of employees matching your search criteria should appear under Available Employees.
- Select an employee and click the Add Shift or Update Shift button. The Visual Scheduler display should now show your newly created or updated shift.
6.10. Set Control Center Security
eTime Xpress allows you to set security on the Control Center to manage what dates are accessible as well as add, update and delete permissions.
To set Control Center Security:
- From the eTime Xpress Main Menu, click Configuration > Control Center.
- Select a User and define the applicable View and Edit permissions. If you select to 'Track Changes', you can review changes made through the Control Center by going to Reports > Scheduling > Control Center > Changes.