Visual Scheduler
- Gurpreet Banwait (Deactivated)
The Scheduling User Guide will review the features available in the Scheduling Module.
eTime Xpress
Scheduling User Guide
(For versions 7.008.000 and above)
 Table of Contents
1. Scheduling Overview
1.1. Working Schedule
1.2. Volunteer Schedule
1.3. Time Off Schedule
2. Working Schedule
2.1. Visual Scheduler Overview
2.2. Loading Shifts
2.3. Selecting Layouts
2.4. Hiding Layouts
2.5. Resizing View
2.6. Shift Colors
3. Managing Your Working Schedule
3.1. Add a Shift
3.2. Update a Shift
3.3. Delete a Shift
3.4. Cut/Copy a Shift
3.5. Undo/Redo Changes
3.6. Shift Toolbox
3.6.1. Shift Statistics
3.6.2. Copy Shifts
3.6.3. Replace Shifts
3.6.4. Copy/Replace Shifts
3.6.5. Delete Shifts
3.6.6. Schedule Template
3.6.7. Multi-Shift Availability
3.7. Using Shift Tags Sets
3.8. Using Schedule Templates
3.9. Building Shift Patterns
3.10. Employee Availability Search
3.11. Autofill Shifts
3.12. Using Shift Counters
3.12.1. Shift Counter Setup
3.12.2. Shift Counter Results
3.13. Using Shift Location
3.14. Using Shift References
3.15. Slide Show
3.15.1. Setup Slide Show
3.15.2. Start Slide Show
3.15.3. Stop Slide Show
4. Saving Shift Changes
4.1. Save Validations
4.2. Validate Changes
5. Customizing Layouts
5.1. Visual Scheduler Objects
5.2. Layout Options
5.3. Configuring Data Definitions
5.4. Create Layout
5.5. Setting Default Layout
6. Other Options
6.1. New Scheduler Window
6.2. Printing
6.3. Importing and Exporting Shifts
6.4. Publish Schedule
6.5. Email Schedules
6.6. Enable Drag and Drop
6.7. Save Settings
6.8. Self-Scheduling Shifts
6.8.1. Publishing Open Shifts for Self-Scheduling
6.8.2. Setting Self-Scheduling Options
6.8.3. Configuring Self-Scheduling in Web Xpress
7. Volunteer (Availability) Schedule
7.1. Create Volunteer Types
7.2. Add a Volunteer Record
7.3. Update a Volunteer Record
7.4. Delete a Volunteer Record
7.5. Cut/Copy a Volunteer Record
7.6. Copy Volunteer Records
7.7. Deleting Volunteer Records
7.8. Building Volunteer Record Patterns
7.9. Entering Volunteer Records via Web Xpress
8. Time Off Schedule
8.1. Create Time Off Types and Statuses
8.2. Add a Time Off Record
8.3. Update a Time Off Record
8.4. Delete a Time Off Record
8.5. Cut/Copy a Time Off Record
8.6. Copy Time Off Records
8.7. Deleting Time Off Records
8.8. Updating Time Off Status
8.9. Building Time Off Record Patterns
8.10. Entering Time Off Requests
8.11. Approving and Importing Time Off Requests
Appendix I – Visual Scheduler Buttons
Appendix II - Classic Scheduler vs. Visual Scheduler
Appendix III - Employee Search Criteria
Appendix IV – Schedule Layout Manager
1. Scheduling Overview
eTime Xpress provides a comprehensive workforce scheduling solution that solves even the most complex employee scheduling problems.
At the core of our scheduling solution is the Visual Scheduler - a dynamic viewer and manager for your Working Schedule. The Visual Scheduler allows you to determine what and how shift information is presented – it literally adapts to the way you schedule.
In addition to the Working Schedule, eTime Xpress provides two supporting schedules that allow you to track when employees can work (Volunteer Schedule) and when employees cannot work (Time Off Schedule). When the Volunteer Schedule and Time Off Schedule are used together, you have a complete picture of your employee availability when building your Working Schedule.
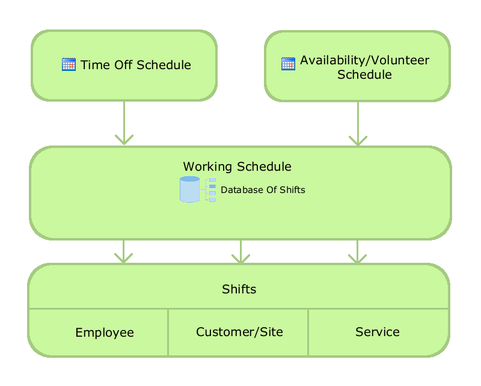
1.1. Working Schedule
The Working Schedule is the primary database of shifts. From the Working Schedule, you can build your permanent schedules and make adjustments as your work environment changes. If an Employee can't work, you re-assign their shift. If an emergency shift is needed, you add it. The Working Schedule is the evolving day-to-day work plan for your employees.
1.2. Volunteer Schedule
The Volunteer Schedule maintains your employee availability information. Common applications include: shift preferences, extra work, volunteering for overtime, on-call lists, spares lists and more. Maintaining employee availability information in the Volunteer schedule allows you to perform more precise searches when creating and updating shifts.
The Volunteer Schedule information can be entered by your schedulers directly into eTime Xpress or online by your employees using our optional Web Xpress solution.
1.3. Time Off Schedule
The Time Off Schedule maintains your employee "unavailable to work" information. Common applications include: days off, maternity leave, vacation time, sick days, personal leave days and more. Maintaining employee time off information in the Time Off Schedule allows you to perform more precise searches when creating and updating shifts.
The Time Off Schedule information can be entered by your schedulers directly into eTime Xpress or online by your employees using our optional Web Xpress solution.
Note: This document uses the default Labels that are assigned when eTime Xpress is originally installed. It's possible for a user to redefine their Labels for "Employee", "Site", "Customer", and many others. If default Labels have been changed please make a note of the new names to reduce confusion when following this Guide.
2. Working Schedule
The Working Schedule is managed through the Visual Scheduler of eTime Xpress. The Visual Scheduler is a virtual work space where you can dynamically define what and how shift information is presented.
Below is a diagram of how data flows between the Working Schedule (your database of shifts) and the Visual Scheduler.

When using the Visual Scheduler, it is important to understand the following principles:
- Virtual Workspace: The Visual Scheduler loads a copy of your shift information into its virtual workspace. This allows you to make changes and run "what if" scenarios prior to saving those changes directly to the Working Schedule (shift database). You can discard your changes simply by selecting 'No' during the save prompt.
- Validate and Save Changes: When you Save your changes, the Visual Scheduler validates only the changes made to the Working Schedule (add, update and delete of shifts) against your business rules. Changes made in the Visual Scheduler are not permanent until they are saved into the Working Schedule database.
2.1. Visual Scheduler Overview
To access the Visual Scheduler, go to the Main Menu and double-click on the Visual Scheduler button. The Visual Scheduler screen should appear as shown in the figure below (see Appendix I for a summary of Visual Scheduler Buttons and Images).
For users upgrading from the eTime Xpress Classic Scheduler, see Appendix II for a feature map between the Classic Scheduler and the Visual Scheduler.
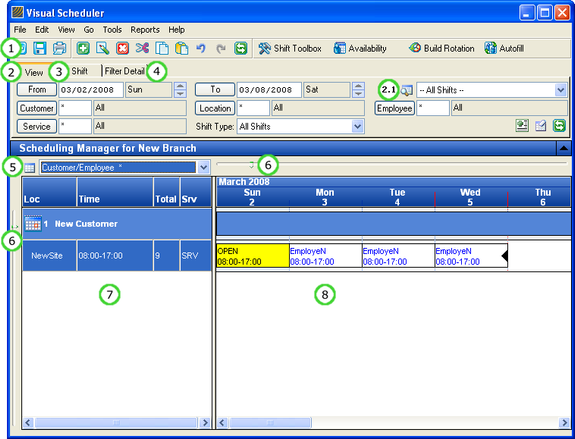
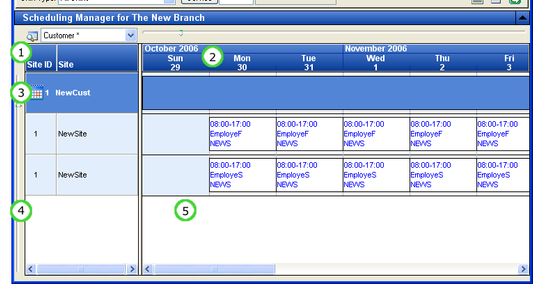
Visual Scheduler Screen – with Annotations
Annotation | Description |
(1) Tool Bar | Contains buttons to run features like Close, Save, Print, Add, Edit, Delete, Cut, Copy, Paste and more. |
(2) View Tab | Controls the subset of shifts to be loaded into the Visual Scheduler. Options include setting the date range, time, Customer, Site, Employee, Shift Type, and Service. |
(2.1) Shift Filter | Select or create a user definable shift filter for the schedule being viewed. To create your own shift filters, click |
(3) Shift Tab | Displays details of the current shift. |
(4) Filter Details | Description of the shift filter (see 2.1 Shift Filter). |
(5) Layout Selector | Select the presentation style for your schedule. |
(6) Scale Controls | Adjust the height and width size of the view. |
(7) Shift Grouping | Lists the shift grouping information. |
(8) Shift Records | Displays the Shift Records over an hourly or daily view. |
2.2. Loading Shifts
The Visual Scheduler allows you to build customized views of your Working Schedule - you can load only the shifts which you want to view or update.
To load shifts into the Visual Scheduler:
- Select the View Tab and specify the applicable filters for the shifts you want to view.
Filter Option | Description |
From/To Dates | Specify the date range for shifts. |
Shift Filter | Specify the shift filter. |
Customer | Specify the shifts by Customer. To see All Customers, enter '*'. |
Site | Specify the shifts by Site. To see All Sites, enter '*'. |
Employee | Specify the shifts by Employee. To see All Employees, enter '*'. To see Open shifts, enter '0'. |
Service | Specify the shifts by Service. To see All Services, enter '*'. |
Shift Type | Specify the type of shift to be viewed. |
- Start the shift load process by clicking the Refresh button (
 ) or the Append button (
  ). Refresh clears your current view and loads only the shifts matching your specified filters. The Append function adds shifts to your current view matching your specified filters. The Append function allows you to view specific schedules side-by-side.
Note: The Append feature ( ![]() ) can be used to view specific schedules side-by-side. For example, if you want to view the schedule of John Doe and Jane Doe side-by-side, run separate Append processes with the Employee IDs of John Doe and Jane Doe.
) can be used to view specific schedules side-by-side. For example, if you want to view the schedule of John Doe and Jane Doe side-by-side, run separate Append processes with the Employee IDs of John Doe and Jane Doe.
The Clear feature ( ![]() ) only removes shifts from your virtual workspace in the Visual Scheduler and does not delete shifts from the Working Schedule.
) only removes shifts from your virtual workspace in the Visual Scheduler and does not delete shifts from the Working Schedule.
2.3. Selecting Layouts
The Visual Scheduler offers multiple presentations of your shift information. You may select among the default views or customize your own view (see Customizing Layouts).
To change layouts, select a presentation style from the Layout Selector:
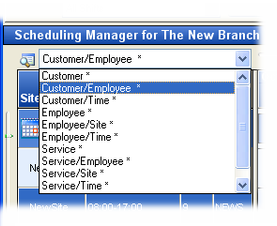
Selecting a Layout
2.4. Hiding Layouts
The Visual Scheduler has several pre-defined layouts for you convenience. You may hide those layouts which you do not use by clicking on View > View/Hide Layouts from the menu bar. The View/Hide Layouts screen should appear as shown in the figure below.
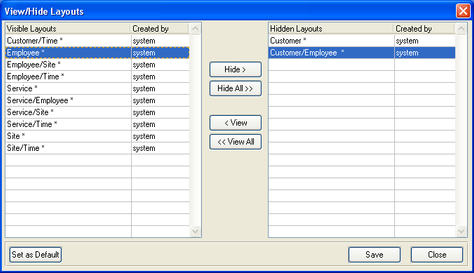
Setting the View/Hide Status of Layouts
Select the layouts you want to View or Hide using the View or Hide buttons. To apply your changes click the Save button.
2.5. Resizing View
The Visual Scheduler allows you to dynamically resize your view to increase or decrease the number of shifts being displayed. The location of your horizontal and vertical scale controls are highlighted in the figure below.
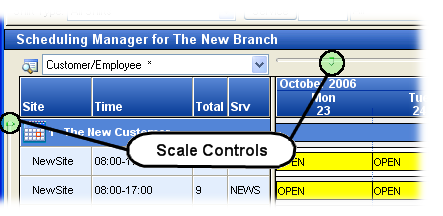
Horizontal and Vertical Scale Controls
2.6. Shift Colors
The Visual Scheduler includes a default color scheme to highlight specific shift types or conditions. A default shift color scheme is summarized in the table below.
Shift Type | Description |
| Scheduled Shifts are set with blue text on a white background. |
| Scheduled Overtime Shifts are set with white text on a red background. |
| Worked Shifts are set with black text on a white background. |
| Worked Overtime Shifts are set with red text on a white background. |
| Locked Shifts are set with black text on a white background. |
| Locked Overtime Shifts are set with red text on a white background. |
| Open Shifts are set with black text on a yellow background. |
| Tentative Shifts are set with white text on a green background. |
Note: To define your own shift color scheme, click on Configuration > Company & Branch option from the Main Menu. Next select the Company and Branch to which you want to modify colors and click the Branch Colors option.
3. Managing Your Working Schedule
The Visual Scheduler provides several productivity tools to make the management of your Working Scheduler easier. Manual changes that were once tedious and time consuming can now be performed with a single click of the mouse. Scheduling errors are eliminated because shift changes are automatically validated against your business rules prior to every save.
Note: This guide assumes that you have completed the setup of your Customer, Site, Employee and Service information. If you have not setup these objects, please refer to their respective User Guides or review the Quick Start Guide.
3.1. Add a Shift
To Add a Shift:
- Click the Add button (
 ) on the Tool Bar - the Add New Shift dialog box should appear as shown in the figure below.
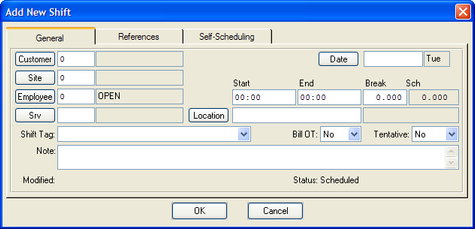
Adding a New Shift
- Under the General Tab, assign the date, Customer, Site, Employee, start time, end time, break and Service. Remember for fields that require entry by codes, you may press the F5 key to bring up a list of valid entries.
The remaining fields under the General Tab, References or Self-Scheduling are optional.
- Click OK to confirm your new shift. It should now appear in the shift record area of the Visual Scheduler.
Note: To create a shift without assigning an Employee (Open shift), enter zero in the Employee ID field. Open shifts allow you to plan coverage requirements and then use the Availability or Autofill tools to assign Employees.
3.2. Update a Shift
To Update a Shift:
- Select a shift and click the Update button (
 ) on the Tool Bar - the Shifts Update dialog box should appear as shown in the figure below.
Updating a Shift
- Update the date, Customer, Site, Employee, start time, end time, break and/or Service. Remember for fields that require entry by codes, you may press the F5 key to bring up a list of valid entries.
- Click OK to save your changes.
Note: To create a shift without assigning an Employee (Open shift), enter zero in the Employee ID field. Open shifts allow you to plan coverage requirements and then use the Availability or Autofill tools to assign Employees.
3.3. Delete a Shift
To Delete a Shift:
- Select a shift and click the Delete button (
 ) on the Tool Bar - a Confirm Delete dialog box should appear as shown in the figure below.
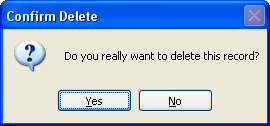
Deleting a Shift
- Click 'Yes' to delete the selected shift. If you delete a shift by mistake, you can reverse the delete by clicking the Undo button (
 ).
).
3.4. Cut/Copy a Shift
To Cut/Copy a Shift:
- Select a shift and click the Cut button (
 ) or Copy button (
  ) from the Tool Bar.
 - Select the new cell where you want to past the shift and click the Paste button (
 ).
).
3.5. Undo/Redo Changes
To Undo/Redo Changes, click on the corresponding Undo button ( ![]() ) or Redo button (
) or Redo button ( ![]() ) from the Tool Bar.
) from the Tool Bar.
3.6. Shift Toolbox
Visual Scheduler provides a collection of shift management tools collectively called the Shift Toolbox. The Shift Toolbox allows you to edit, create, delete and re-assign multiple shifts all at once using the Shift Toolbox.
From the Visual Scheduler, click the Shift Toolbox button ( ![]() ) on the Tool Bar. The Shift Toolbox dialog box should appear as shown in the figure below.
) on the Tool Bar. The Shift Toolbox dialog box should appear as shown in the figure below.
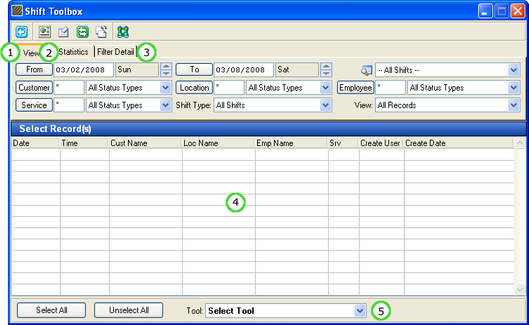
Shift Toolbox with Annotations
Annotation | Description |
(1) View Tab | Contains a list of criteria that allows you to narrow your search to a subset of shifts. The View pull-down can be used to review the changes made in your virtual workspace that have not yet been saved to the Working Schedule. |
(2) Statistics Tab | Calculates basic statistical information on selected shifts including a shift count and hours summary. |
(3) Filter Details | Text description of shift filter defined under the View tab. |
(4) Select Record(s) | Displays shifts matching criteria defined in the view tab. You then select the shifts to which you want to apply the Shift Toolbox. |
(5) Tool Selector | Select the applicable tool you want to apply to the selected shifts including Copy, Replace, Copy/Replace, Delete and Shift Template. |
Using the Shift Toolbox:
- Set Search Criteria. In the View Tab, define your shift search criteria and click the Refresh or Append buttons from the toolbar. The Refresh feature will clear the record list and display only shifts matching your search criteria. The Append feature will add shifts matching your search criteria to the existing search results.
- Select Records. From the list of shifts in Select Record(s), select the shifts to which you want to apply the shift tool. You can select shifts using the Select All button or by pressing the [Shift] or [Ctrl] key while selecting shift records.
- Select Shift Tool. Select the shift tool you want to apply from the Tool Selector.
- Configure Tool. Specify required fields and information based on the shift tool selected.
- Synchronize Records. The Visual Scheduler and the record list in the Shift Toolbox will be automatically updated when you apply the selected shift tool. If changes are made directly in the Visual Scheduler, click the Sync button in the toolbar to have the change reflected in the Shift Toolbox record list.
Note: When searching for shifts, the search criteria are applied only against the shifts already loaded into the Visual Scheduler. The Search and Append features do not reload shifts directly from the Working Schedule database.
3.6.1. Shift Statistics
The Statistics Tab provides a statistical summary of the number and hours of a group of shifts.

To generate Shift Statistics:
- In the Shift Toolbox, click the Select All button or highlight the shifts in the Select Record(s) area for which you want to calculate shift statistics.
- Click the Statistics tab. Shift statistics will be generated for the highlighted shifts.
3.6.2. Copy Shifts
The Shift Toolbox Copy tool allows multiple shifts to be copied and pasted to a date range or specified date.
To use the Copy feature:
- In the Visual Scheduler, click the Shift Toolbox button (
 ).
). - In the Shift Toolbox, specify the shifts you want to copy, select the Copy tool from the Tool Selector and click the Configure Tool button. The 'Select Copy To Date' dialog box should appear as shown in the figure below.
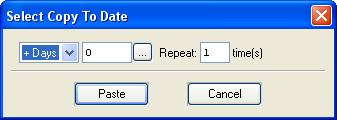
Select the copy action:
Copy Action
Description
Date
Copy selected shifts to specified date.
+ Days
Copy selected shifts to the current shift date + a number of days. For example, to copy shifts from one week to the next, select + Days and enter '7'. Specifying multiple Repeat times will copy shifts into subsequent weeks.
- Days
Copy selected shifts to the current shift date - a number of days. For example, to copy shifts to the previous week, select - Days and enter '7'. Specifying multiple Repeat times will copy shifts into subsequent prior weeks.
- Click the Paste button to start the Copy process. The Visual Scheduler display should now show your newly created shifts.
3.6.3. Replace Shifts
The Shift Toolbox Replace tool allows multiple shifts to be updated at once. Common uses include incrementing shift times, incrementing breaks times, replacing employees and other shift information.
To use the Replace feature:
- In the Visual Scheduler, click the Shift Toolbox button ( ).
- In the Shift Toolbox, specify the shifts you want to replace, select the Replace tool from the Tool Selector and click the Configure Tool button. The 'Select Fields To Replace' dialog box should appear.
- Select the fields you want to replace by clicking their respective checkbox and then specify the new value and/or increment (applicable for date, start time, end time and break fields).
- Click the Replace button to start the Replace process. The Visual Scheduler should display the shift changes.
3.6.4. Copy/Replace Shifts
The Shift Toolbox Copy/Replace tool combines the Copy and Replace tool into one process. Copy/Replace will update the selected shifts with your specified changes prior to copying the shifts to the specified date or date increment.
To use the Copy/Replace feature:
- In the Visual Scheduler, click the Shift Toolbox button ( ).
- In the Shift Toolbox, specify the shifts you want to copy and replace, select the Copy/Replace tool from the Tool Selector and click the Configure Tool button. The 'Select Fields To Replace for New Records' dialog box should appear.
- Specify the copy date or date increment required.
- Select the fields you want to replace by clicking their respective checkbox and then specify the new value and/or increment (applicable for date, start time, end time and break fields).
- Click the Paste button to start the Copy/Replace process. The Visual Scheduler should display the new shifts and changes.
3.6.5. Delete Shifts
The Shift Toolbox Delete tool allows multiple shifts to be deleted at once.
To use the Delete feature:
- In the Visual Scheduler, click the Shift Toolbox button ( ).
- In the Shift Toolbox, specify the group of shifts you want to delete, select the Delete tool from the Tool Selector.
- Click the Delete Selected Records button to start the Delete process. After confirming the delete, the Visual Scheduler should delete the selected shifts from the display.
3.6.6. Schedule Template
The Shift Toolbox Schedule Template allows the shifts selected in the shift toolbox to be saved as a schedule template.
To use the Schedule Template tool in the Shift Toolbox:
- In the Visual Scheduler, click the Shift Toolbox button ( ).
- In the Shift Toolbox, specify the group of shifts you want to save as a Schedule Template, select the Schedule Template tool from the Tool Selector.
- Click the Save As Template button. The Save As Schedule Template dialog box should appear. Then follow the steps under Using Schedule Templates section in this guide.
3.6.7. Multi-Shift Availability
The Multi-Shift Availability tool automates the process of finding a single employee that can be assigned to a group of shifts. An employee must be able work all shifts to be listed.

Multi-Shift Employee Availability Screen
Annotation | Description |
(1) Rules Tab | Displays the filter rules that will be applied to the employee search. Users can apply/un-apply specific search filters and custom employee filters. |
(2) Shifts Tab | Displays the group of shifts to run the search against. You may select/de-select shifts using the <Shift> or <Ctrl> keys on your keyboard. |
(3) Employee Filter | Select or create a user definable employee filter to search for specific groups of employees. To create your own filters, click |
(4) Apply System Rules Toggle | Uncheck to apply/un-apply specific search filters. |
(5) Search Filters | Specify search criteria to filter your employee list. Appendix III Employee Search Filters provides detailed explanations of each search criteria. |
(6) Search Button | Click to search for employees available to fill the selected group of shifts. |
(7) Available Employees | Displays employees matching search filters. You then select the employee(s) you want to assign. |
(8) Assign Employee | Select to add new shifts or replace the assigned employee with the selected employee. If you are adding new shifts, you may select multiple employees using the <Shift> or <Ctrl> keys on your keyboard. |
If you have different multi-shift availability filtering rules, you may save profiles in the Settings Manager so for fast loading in the future. The Settings Manager allows you to save setting profiles to the database or to an xml file as well as setting your default availability settings. From the Multi-Shift Availability screen, click Data > Settings > Settings Manager from the menu bar.
To run the Multi-Shift Employee Availability tool:
- In the Visual Scheduler, click the Shift Toolbox button ( ).
- In the Shift Toolbox, specify the group of shifts you want to search for available employees, select the Multi-Shift Availability option from the Tool Selector.
- Click the Configure Tool button. The Multi-Shift Employee Availability dialog box should appear.
- Specify the applicable search Filters and/or user definable employee filter and click the Search button. A list of employees matching your search criteria should appear under Available Employees.
- Select an employee and click the Add Shift or Update Shift button. The Visual Scheduler display should now show your newly created or updated shifts.
3.7. Using Shift Tags Sets
Shift Tags Sets are flags or classifications that can be attached to shifts so that they can be visually distinguished from other shifts. Shift Tag Sets allow you to customize shift colors and views of your schedule. For example, you can have a Shift Tag Set to distinguish "Indoor and Outdoor Shifts" or "Regular or Premium Shifts".
To Apply a Shift Tag Set:
- Select a shift and click the Update button ( ) on the Tool Bar - the Shifts Update dialog box should appear as shown in the figure below.
- Select the applicable Shift Tag from the pull-down list.
- Click OK to save your changes.
To View a Schedule by Shift Tag:
- Select the View Tab and specify the applicable filters for the shifts you want to view. Ensure that the Shift Tag (T) or Shift Tag Set (S) is selected from the Shift Type pull-down list.
- Start the shift load process by clicking the Refresh button ( ) or the Append button ( ). Refresh clears your current view and loads only the shifts matching your specified filters. The Append function adds shifts to your current view matching your specified filters. The Append function allows you to view specific schedules side-by-side.
Note: To setup Shift Tag Set, go to the eTime Xpress Main screen and click Configuration > Company/Branch > Branch Codes > Branch Shift Tag Sets. Please refer to the Administrator Guide for more information.
3.8. Using Schedule Templates
Schedule Templates allows you to save permanent/recurring schedules as templates that can be loaded into the Visual Scheduler. With Schedule Templates you can save a schedule configuration and re-use it over and over again.
To save all shifts in the Visual Scheduler as a Schedule Template:
- In the Visual Scheduler, click File > Save As Template. The Save As Schedule Template dialog box should appear as shown in the figure below.
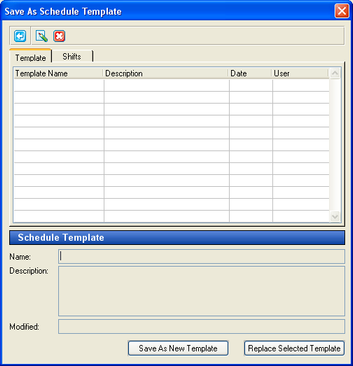
- Click the Save As New Template button to create a new template or the Replace Selected Template button to replace an existing template. You may click the Shifts tab to preview the shifts that will be saved in the schedule template. Once finished click the Close button (
 ).
).
To save a subset of shifts in the Visual Scheduler as a Schedule Template:
- In the Visual Scheduler, click the Shift Toolbox button ( ).
- In the Shift Toolbox, specify the shifts you want to save as a template, select the Schedule Template tool from the Tool Selector and click the Save As Template button. The Save As Schedule Template dialog box should appear.
- Click the Save As New Template button to create a new template or the Replace Selected Template button to replace an existing template. You may click the Shifts tab to preview the shifts that will be saved in the schedule template. Once finished click the Close button ( ).
To paste a Schedule Template to the Visual Scheduler:
- In the Visual Scheduler, click Edit > Paste Template. The Paste Schedule Template dialog box should appear as shown in the figure below.
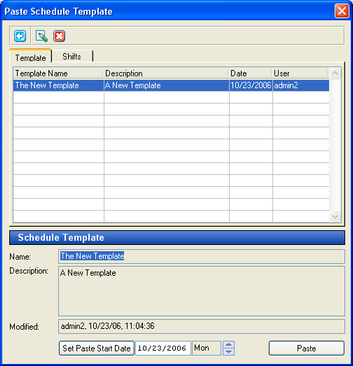
- Select the template to paste into the Visual Scheduler, specify the first day that the template should be applied and click the Paste button. You may click the Shifts tab to preview the shifts that will be pasted into the Visual Scheduler. Once finished click the Close button ( ).
Note: A schedule template can also be pasted from the Shift Toolbox after selecting the Schedule Template tool from the Tool Selector and clicking the Paste Template button.

3.9. Building Shift Patterns
The Build Rotation tool creates complex shift patterns based on the On/Off sequence you define.
To build a shift rotation:
- Select a shift in the Visual Scheduler and click the Build Rotation button (
 ) on the Tool Bar. The Build Rotations dialog box should appear.
 - Select either a Weekly or Daily frequency type and define the necessary frequency pattern. The Build Rotations dialog box should change as shown in the figures below.
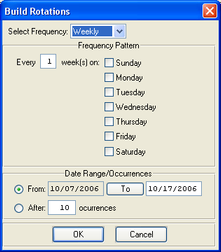
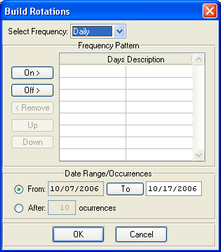
Weekly Rotation Pattern Daily Rotation Pattern
- Specify the date range of the shift rotation or the desired number of occurrences and click the OK button to build the rotation. The Visual Scheduler should display the new shifts. Shifts created as part of a shift rotation will be denoted by the (
 ) symbol in the Shift Tab as shown in the figure below.

To edit a shift rotation:
- In the Visual Scheduler, select a shift that is part of a shift rotation and click the Shift tab.
- In the Shift Tab, click the ( ) symbol to load all shifts part of the shift rotation into the Shift Toolbox. You can then use any of the Shift Toolbox commands to modify the series of shifts.
3.10. Employee Availability Search
The Employee Availability tool automates the process of finding and replacing employees for shifts. Searches are dynamic allowing you query your entire employee database based on criteria such as qualifications, experience and overtime.
From the Visual Scheduler, click the Availability button ( ![]() ) on the Tool Bar. The Availability dialog box should appear as shown in the figure below.
) on the Tool Bar. The Availability dialog box should appear as shown in the figure below.
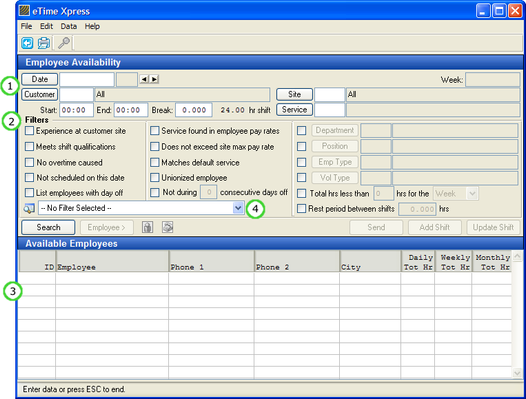
Employee Availability with Annotations
Annotation | Description |
(1) Shift Details | Specify a shift that you want to assign an employee. |
(2) Filters | Specify search criteria to filter your employee list. Appendix III Employee Search Filters provides detailed explanations of each search criteria. |
(3) Available Employees | Displays employee matching search criteria defined in the Filters section. You then select the employee(s) you want to assign to the specified shift. |
(4) Employee Filter | Select or create a user definable employee filter to search for specific groups of employees. To create your own filters, click |
If you have different availability filtering rules, you may save profiles in the Settings Manager so for fast loading in the future. The Settings Manager allows you to save setting profiles to the database or to an xml file as well as setting your default availability settings. From the Availability screen, click Data > Settings > Settings Manager from the menu bar.
To run the Employee Availability tool:
- In the Visual Scheduler, select a shift or an empty cell and click the Availability button (
 ) in the Tool Bar. The Availability dialog box should appear with the Shift Details automatically populated - if any shift information is missing, specify the necessary information.
 - Specify the applicable search Filters and/or user definable employee filter and click the Search button. A list of employees matching your search criteria should appear under Available Employees.
- Select an employee and click the Add Shift or Update Shift button. The Visual Scheduler display should now show your newly created or updated shift.
3.11. Autofill Shifts
The Autofill tool auto-assigns Employees to Open shifts in chronological order based on criteria such as qualifications, experience, overtime, seniority and more. An Open shift is a shift with no Employee assigned to it (Employee ID = 0) and is colored yellow by default in the Visual Scheduler.
Unlike other tools in the Visual Scheduler, the Autofill tool works directly with the Working Schedule (database). This is required due to the relational nature of the Priority fill rules. As a result, you may be prompted to Save any changes made in the Visual Scheduler before running Autofill.
From the Visual Scheduler, click the Autofill button ( ![]() ) in the Tool Bar. The Autofill Open Shifts dialog box should appear as shown in the figure below.
) in the Tool Bar. The Autofill Open Shifts dialog box should appear as shown in the figure below.
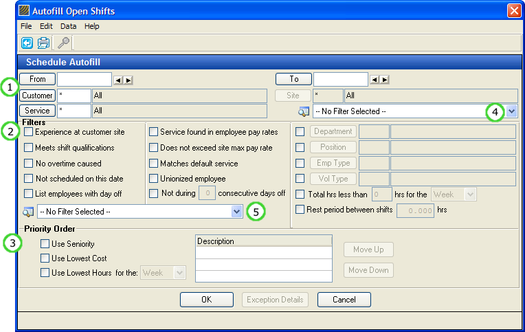
Autofill with Annotations
Annotation | Description |
(1) Autofill Range | Specify the date range and shift details to run Autofill process. |
(2) Filters | Specify employee fill rules/criteria. Appendix III Employee Search Filters provides detailed explanations of each search criteria. |
(3) Priority | Specify tie-break rules if multiple employees match fill rules/criteria. You can also specify the order in which the Priority rules will be applied. To setup Seniority rules, see the Administrator Guide for more information. |
(4) Shift Filter | Select or create a user definable shift filter to fill specific groups of open shift. To create your own filters, click |
(5) Employee Filter | Select or create a user definable employee filter to search for specific groups of employees. To create your own filters, click |
If you have different autofill filtering rules, you may save profiles in the Settings Manager so for fast loading in the future. The Settings Manager allows you to save setting profiles to the database or to an xml file as well as setting your default autofill settings. From the Autofill screen, click Data > Settings > Settings Manager from the menu bar.
To run the Autofill tool:
- In the Visual Scheduler, click the Autofill button (
 ) on the Tool Bar. The Autofill dialog box should appear.
 - Specify the date range, shift details, Filters and Priority rules and click the OK button. eTime Xpress will attempt to auto-assign Employees to Open shifts over the specified date range matching the shift details, Filters and Priority rules.
- After the Autofill process is complete, a fill results window will display the number of shifts filled and not filled, if any. If there are Open shifts that could not be filled, click on the Exception Details button in the Autofill dialog box to view and print a report of unfilled Open shifts.
The Exception Details report lists every shift that could not be assigned. There are four errors preventing the Autofill of an Open shift:
Autofill Error | Cause |
Shifts not filled because no Employees are available with the criteria selected | The Employee Filter settings are too strict resulting in few or no Employees matching the fill criteria. |
Rates not setup for these Employees and sorted by rate | The Use Lowest Cost Order Priority option was selected and Employees do not have pay rates defined. |
Open shifts found for these inactive Sites | Open shifts were found for Inactive or Void Sites. |
3.12. Using Shift Counters
Shift Counters allow you to pre-define daily shift counts to determine if minimum or maximum coverage requirements have been achieved. This tool is useful for preventing the scheduling of too few or too many shifts.
3.12.1. Shift Counter Setup
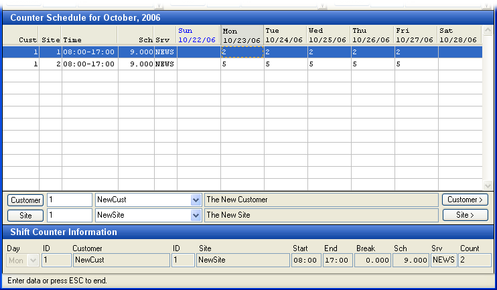
From the menu bar in the Visual Scheduler, click Tools > Shift Counters > Setup. The Shift Counter Setup dialog box should appear as shown in the figure below.
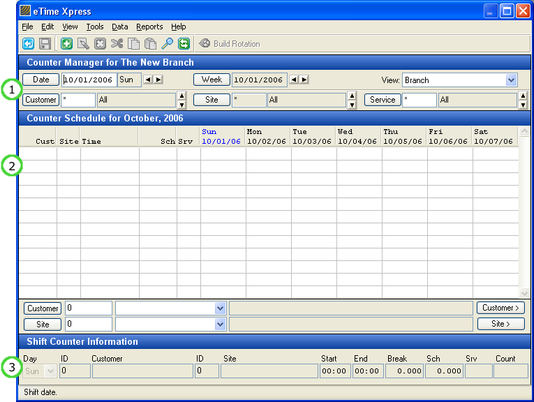
Shift Counters Setup with Annotations
Annotation | Description |
(1) View Selector | Specify the date range and shift counters to view. Enter "*" to display All records (i.e. Customer, Site and Service). |
(2) Shift Counter Schedule | Displays shift counters over date range. |
(3) Shift Counter Information | Specify shift counter details. |
To create a new Shift Counter:
- Click the Add button ( ) on the Tool Bar. The fields in the Shift Counter Information will become editable as shown in the figure below.

Creating or Editing a Shift Counter
- Specify your shift counter details including the day, Customer, Site, start, end, break, Service and shift count. Remember for fields that require entry by codes, you may press the F5 key to bring up a list of valid entries.
- Click the Save button (
 ) to save your new Shift Counter. The Shift Counter Schedule will be updated as shown in the figure below.
Shift Counter Records
To update a Shift Counter:
- Select a Shift Counter record and click the Update button ( ) on the Tool Bar. The fields in the Shift Counter Information will become editable.
- Update your shift counter details as required (the day, Customer, Site, start, end, break, Service and shift count). Remember for fields that require entry by codes, you may press the F5 key to bring up a list of valid entries.
- Click the Save button ( ) to save your new Shift Counter.
Creating or Editing a Shift Counter
To create Shift Counter Rotations:
The Build Rotation tool provides a convenient way to create multiple shift counter records at once.
- Select a Shift Counter record and click the Build Rotation button ( ) on the Tool Bar. The Build Rotations dialog box should appear as shown in the figure below.
Weekly Rotation Pattern Daily Rotation Pattern
- Select either a Weekly or Daily frequency type and define the necessary frequency pattern.
- Specify the date range of the shift counter rotation or the desired number of occurrences and click the OK button to build the rotation. The Shift Counter Setup should display the new shift counter records.
To import Shift Counters:
If your Shift Counter information already exists in a 3rd party application, it may be possible to import that information directly into eTime Xpress from a properly formatted .CSV (Comma Separated Value) file.
- From the menu bar in the Shift Counter Setup dialog box, click File > Import. The Shift Counter Import screen should appear as shown in the figure below. The browser called Available Shift Counter Fields contains a list of all of the counter fields that may be imported, including required fields.
- Create the .CSV file containing your Shift Counter information using an export tool found in your 3rd party application or spreadsheet. Save the resulting .CSV file to a directory that is accessible from eTime Xpress.
- In eTime Xpress, click the Open button (
 ) in the Shift Counter Import screen to bring up a file dialog box. Browse to where you saved the .CSV file and select it for import.
 - In the Available Shift Counter Fields browser, add the fields you are importing in the order they appear in the .CSV file. You can modify the field order by using the Remove, Move Up, and Move Down buttons.
- Click the Import button to complete the import process.
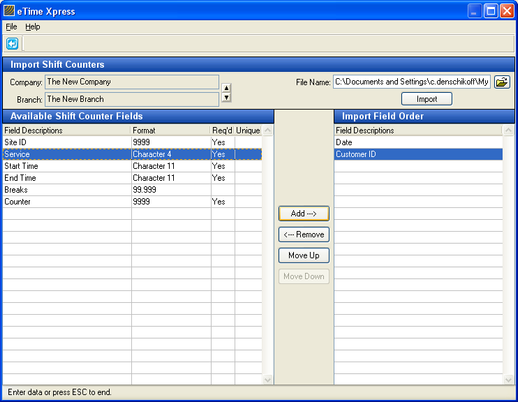
Shift Counter Import Screen
Note: The most common cause of Import failure is a mismatch between the .CSV file layout and the Import Field Order definition. Also, please ensure that all Req'd fields are defined for each record in the .CSV file.
3.12.2. Shift Counter Results
After entering shifts in the Visual Scheduler, the Shift Counters Results allows you to audit your Working Schedule against your shift coverage requirements.
Unlike other tools in the Visual Scheduler, the Shift Counter Results tool works directly with the Working Schedule (database). This is required due to Shift Counter Results calculations. As a result, you may be prompted to Save any changes made in the Visual Scheduler before running Shift Counter Results.
From menu bar in the Visual Scheduler, click Tools > Shift Counters > Results. The Shift Counter Results dialog box should appear as shown in the figure below.
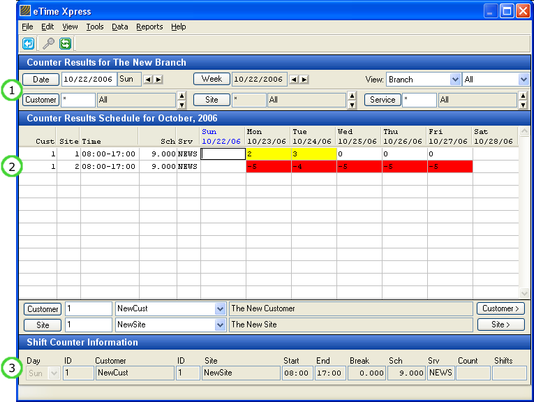
Shift Counter Results with Annotations
Annotation | Description |
(1) View Selector | Specify the date range and shift counter results to view. Enter "*" to display All records (i.e. Customer, Site and Service). |
(2) Shift Counter Results | Displays shift counter results over date range. "Under-booked" counters have negative numbers and are highlighted red. "Over-booked" counters are displayed as positive numbers and are highlighted yellow. "Filled" counters display as zero and have no highlight. |
(3) Shift Counter Information | Specify shift counter details. |
The Shift Counter Results displays the balance of shifts over or under the required shift count according to the formula:
Shift Counter Results = [# of Shifts – Shift Counter]
In determining the Shift Counter Results, the date, Customer, Site, start time, end time, break and service fields are matched exactly between shifts in the Visual Scheduler and Shift Counter Setup definitions.
To resolve "Under-Booked" Shift Counter Results:
- Select the "Under-Booked" shift counter.
- From the menu bar in Shift Counter Results, select Edit > Add > Add Multiple.
- Specify the Shift Details and Filters as required and click the Search button (note: the Add Multiple tool functions similar to the Availability tool found in the Visual Scheduler).
- Select the required employees from the Available Employee list and click the Add button. To add an Open shift, click the Add Open button. To remove shifts, click the Remove or Remove All button.
- Click the Create Shifts button to create the new shifts in the Working Schedule. The Shift Counter Results dialog box should be updated with the new counter results.
To resolve "Over-Booked" Shift Counter Results:
From the Visual Scheduler, delete the unnecessary shifts using the Delete button or the Delete tool found in the Shift Toolbox.
3.13. Using Shift Location
Shift Location allows shifts to be grouped by locations or geographic areas. When used in conjunction with the Location Travel Time validation, the system can check if there is sufficient time left between shifts to accommodate for travel.
To define a location for a shift:
- From the Visual Scheduler, click the Add button ( ) or select a shift and click the Update button ( ) - the Shifts Add/Update dialog box should appear as shown in the figure below.
- Specify the location code. Remember for fields that require entry by codes, you may press the F5 key to bring up a list of valid entries.
If the location field is left blank, the system will automatically assign the location code based on the Shift Location Rule configured for the branch.
- Click OK to save your changes.
Note: To configure location codes and location travel time validation, refer to the Administrator Guide – Branch Locations, Message Types and Branch Rules.
3.14. Using Shift References
Shift References are fields that let you add information to a shift record for grouping or identification purposes. In some cases, you may want to define additional shift information not found in the standard fields of eTime Xpress.
To define a Shift Reference:
- From the Visual Scheduler, click the Add button ( ) or select a shift and click the Update button ( ) - the Shifts Add/Update dialog box should appear. Click the References tab to display the shift reference fields as shown in the figure below.
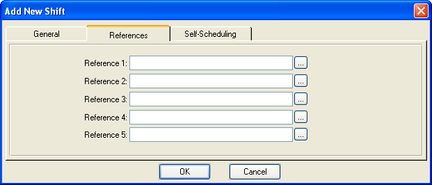
- Specify the shift reference information in free form or use the lookup.
- Click OK to save your changes.
Note: To rename the labels (i.e. Reference 1, Reference 2…) in the shift References tab, go to the eTime Xpress Main screen and click Configuration > Codes Maintenance. From the Codes Maintenance screen, select 'External Shift Ref. Labels' and then add a new Code with a matching number and description. The number in the Code field corresponds to the Reference # you want to replace and the description is the new label.
To define lookup codes for shift references, go to the eTime Xpress Main screen and click Configuration > Codes Maintenance. From the Codes Maintenance screen, select the applicable 'External Shift Ref. #' and then add a new Code.
3.15. Slide Show
The Slide Show feature allows the current view in the Visual Scheduler to be set on automatic scroll. This feature can be used to replace the manual posting of hard copy schedules with electronic schedules viewed on a monitor or flat panel display.
The schedules employees view are always current since changes are automatically posted after each refresh of the schedule.
3.15.1. Setup Slide Show
From the Visual Scheduler, click File > Slide Show > Setup Slide Show.
The following is a list slide show settings that can be configured:
Scroll Settings | Description |
Pause (seconds) | Set the # of seconds between scroll transitions. |
Horizontal Time Step | Set the horizontal scroll interval in # of days or hours. |
Vertical Row Step | Set the vertical scroll interval in # of rows. |
Transition Pattern | Select scroll pattern. |
Time Period Settings | Description |
Check for new schedule data | Set the time interval when the schedule should be refreshed before replay of the schedule. |
Automatically adjust date period before refresh | Set the schedule From/To dates to be automatically updated based on today's date. For example, the schedule can be set to always fresh the data from 1 day before and 1 day after the current date. |
Advanced Display Settings | Description |
Automatically adjust horizontal time steps displayed | Set the horizontal scroll to display times relative to current date and time ("Now"). For example, the auto-scroll can be set to always display 4 hours before and 4 hours after the current date and time. |
3.15.2. Start Slide Show
From the Visual Scheduler, click File > Slide Show > Start Slide Show to start the auto-scroll process.
3.15.3. Stop Slide Show
From the Visual Scheduler, click File > Slide Show > Stop Slide Show or close the Visual Scheduler to stop the auto-scroll process.
4. Saving Shift Changes
Since the Visual Scheduler only loads a copy of your shift information into its virtual workspace, you are required to Save ( ![]() ) your changes before they are permanently recorded into the Working Schedule database. The Visual Scheduler offers the advantage of experimenting with different "what if" scenarios without saving. You can even discard your changes simply by selecting 'No' during the save prompt.
) your changes before they are permanently recorded into the Working Schedule database. The Visual Scheduler offers the advantage of experimenting with different "what if" scenarios without saving. You can even discard your changes simply by selecting 'No' during the save prompt.
4.1. Save Validations
The Visual Scheduler tracks your change activity when you add, update or delete shifts.
When you Save your changes, the Visual Scheduler validates the change activity against your business rules before saving any changes to the Working Scheduling. The Visual Scheduler does not "re-validate" shifts where no changes have been made.
The following is a list of the standard Business Rules validated by eTime Xpress:
Validation | Description |
Shift Exceeds Counter | The number of shifts exceeds the coverage requirements pre-defined in the Shift Counters (see Using Shift Counters). |
Employee is Double Booked to a Shift | The Employee is has already booked during that time. |
Employee Budget Exceeded | The shift will cause the total number of hours budgeted for the Employee to be exceeded (see Employee Main Screen > Pay Settings Tab). |
Max Pay Rate Exceeded | The Pay Rate of the scheduled Employee exceeds the pay guidelines for the Site (see Site Main Screen > Pay Settings Tab). |
Employee Fails Shift Qualifications | The scheduled Employee does not have the required Qualifications to work the shift (see Employee User Guide and Customer and Site User Guide). |
Employee is Restricted from Shift | The scheduled Employee is restricted from this Shift (see Employee User Guide and Customer and Site User Guide). |
Site Budget exceeded | The shift will cause the total number of hours budgeted for the Site to be exceeded (see Site Main Screen > Bill Settings Tab). |
Employee has Time Off | The scheduled Employee has time off booked (see Using the Time Off Schedule). |
Employee has that Day Off | The scheduled Employee does not normally work on that day (see Employee Main Screen > File > Set Work Week). |
Shift is part of a rotation | The shift is part of a rotation or series of shifts with the same shift details. |
Shift Worked | The shift has been marked as worked with actual worked times already recorded. |
When a change fails a save validation, the Visual Scheduler will classify the failed validation as Warning, Error or Ignore. Failed validations can be resolved as follows:
Failed Validation Type | Resolution |
Warning | Correct cause of failed validation or set the Warning to "Ignore" to Yes. |
Error | Correct cause of failed validation or "Reject" proposed shift change. You are not permitted to "Ignore" validation Errors. |
Ignore | Business rule is not validated. |
To change whether a Failed Validation is processed as a Warning or Error:
- From the Main Menu of eTime Xpress, go to Configuration > Company/Branch > Message Types under the Branch tab. The Message Types screen should appear as shown in the figure below.
- Double-click on the Message Type you want to update and select Error, Ignore or Warning (click the F5 key to bring up a valid list of entries). Setting a Message Type to Ignore will permanently disable the validation.
- Click the Close button ( ) to return to the Main Menu.
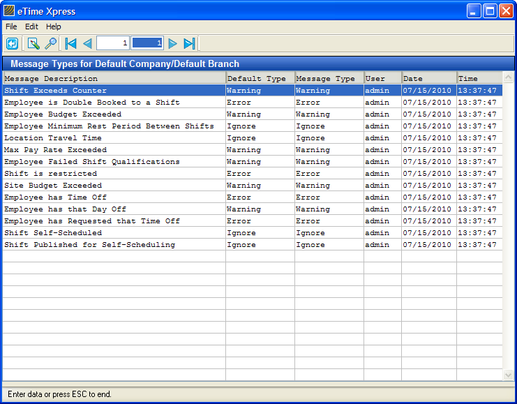
Setting Branch Message Types
4.2. Validate Changes
After completing your changes in the Visual Scheduler, click the Save button ( ![]() ) to validate your changes. If a shift change fails a validation, the Check Failed Validations dialog box should appear as shown in the figure below.
) to validate your changes. If a shift change fails a validation, the Check Failed Validations dialog box should appear as shown in the figure below.
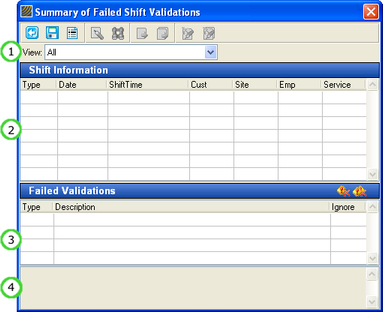
Check Failed Validations with Annotations
Annotation | Description |
(1) View Selector | Select the filter for the failed validations you want to view. By default, you may select All, Created, Updated or Deleted changes as well as by applicable failed validation type. |
(2) Shift Information | Lists all shifts with changes that have failed validations. |
(3) Failed Validations | Lists the failed validations of a shift and classification (Error or Warning). |
(4) Error Description | Displays description of failed validation. |
To resolve failed validations:
- Specify the type of Failed Validations you want to view using the View Selector.
- Select a shift from the list of shifts in Shift Information and review the list of Failed Validations.
- Correct failed validations for shift by clicking the Update button in the toolbar. You will be automatically repositioned to the selected shift in Update mode. You may also append a shift or shifts to the Shift Toolbox for bulk edits by clicking the Append or Append All buttons in the toolbar.
- To ignore Warnings, double-click on the Failed Validation until "Yes" is displayed under the Ignore column (note: you are not permitted to ignore Errors) or click on the Ignore or Ignore All buttons above the Ignore column.
- Shift changes with Errors must be corrected using the Update button or discarded using the Reject or Reject All buttons in the toolbar.
- Click the Save button to re-validate your changes.
Note: To disable a Warning for all changes during a session, click the Global Save Options button in the toolbar - the Global Save Options dialog box should appear. Simply uncheck the Validation you want to disable and click the OK button.
You may also update shifts with Failed Validations directly in Visual Scheduler. In the Visual Scheduler, shifts with Failed Validations will be indicated with a red marker as shown in the figure below.
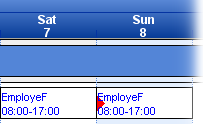
Red marker indicates a failed validation.
To review the details of a failed validation when navigating in the Visual Scheduler, open the Failed Validation dialog window and a click on a shift denoted with a red marker.
5. Customizing Layouts
The Visual Scheduler provides several pre-defined schedule presentations or layouts (default system layouts are denoted by "*"). The Layout Manager allows you to create custom layouts to better meet your scheduling needs.
When customizing your layouts be patient as it does involve some complexity. After all, the Layout Manager gives you "programmer" level control to personalize the look and feel of your schedules.
From the Menu bar in the Visual Scheduler, select View > Layout Manager. The Layout Manager dialog box should appear as shown in the figure below.
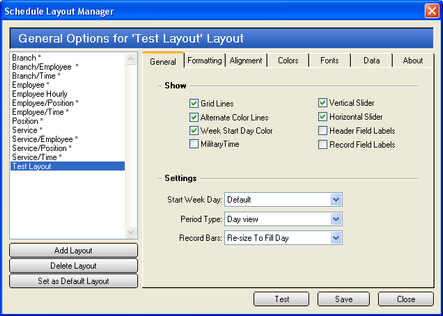
Layout Manager
5.1. Visual Scheduler Objects
The Schedule Layout Manager uses specific terminology to refer to the various objects or areas within the Visual Scheduler. When customizing your layouts, refer to the figure shown below to understand where certain objects are located in the Visual Scheduler.
Locations of Visual Scheduler Objects
Annotation | Description |
(1) Title | Displays the field labels of the List Item definitions. |
(2) Ruler/Time Bar | Display year, month, day and hours. |
(3) List Header | Displays the field value(s) of the List Header definitions. |
(4) List Item | Displays the field value(s) of the List Item definitions. |
(5) Schedule/Record Bar | Displays the field value(s) of the Record Bar definitions. |
5.2. Layout Options
The Schedule Layout Manager provides highly flexible presentation controls for most of the features found in the Visual Scheduler. Appendix IV provides detailed explanations for presentation controls listed in the tabs found in the Schedule Layout Manager.
5.3. Configuring Data Definitions
The Visual Scheduler dynamically presents your shift information based on your Data Definitions. Using the Data options tab, you define what data you want to see (Display) and how it is organized (Grouping) within the various objects of the Visual Scheduler.
Display and Grouping definitions are not required to be the same. For example, you may choose to Group your shifts by 'Site, Start Time and Break' but display only 'Site'.
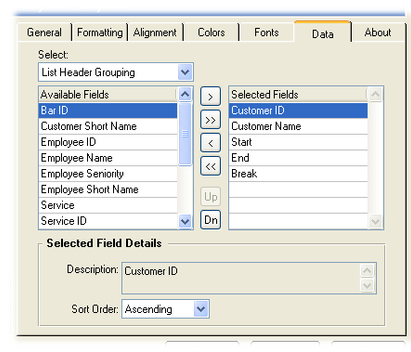
Data Options Tab
Data Options | Description |
List Header Grouping | Data fields to be used to group and sort your rows of shifts (List Items). |
List Header Display | Data fields labels you want to display in the Header area. If no fields are defined, the List Header Display will not appear in the layout. |
List Item Grouping | Data fields to be used to group and sort shift records within a List Header Grouping. |
List Item Display | Data field values you want to display in the List Item area. |
Record Bar Sort | Data fields to be used to sort shift records within a List Item Grouping. |
Record Bar Display | Data field values you want to display in a Record Bar. |
Other | Description |
Description Field | Displays field information. |
Sort Order | Ascending or descending option. |
Delimiter | Character type to be displayed between fields. |
Column Width | Sets initial column width. |
Field Label | Description to use when displaying field labels. |
Use the Add/Remove buttons to select fields and the Up/Dn buttons to reorder the field priorities
5.4. Create Layout
To create a new layout:
- From the Layout Manager, select an existing layout as a template for the new layout and click the Add Layout button. The controls and settings of the selected layout will be copied to the new layout.
- Specify a Name and Description for the new layout and click the OK button.
- Customize the layout as required using the various option tabs and click the Save button. The Test feature only previews layout in the Visual Scheduler and does not save the layout settings.
5.5. Setting Default Layout
To set a default layout:
- From the Layout Manager, select an existing layout and click the Set As Default Layout button. The select layout will be used the next time you launch the Visual Scheduler.
6. Other Options
The Visual Scheduler provides additional features as outlined below.
6.1. New Scheduler Window
The Visual Schedule allows you to launch multiple instances when you need to view more information than can be presented in a single Visual Scheduler window.
From the Menu bar in the Visual Scheduler, select File > Open New Scheduler Window. A new Visual Scheduler window should be launched as shown in the figure below.
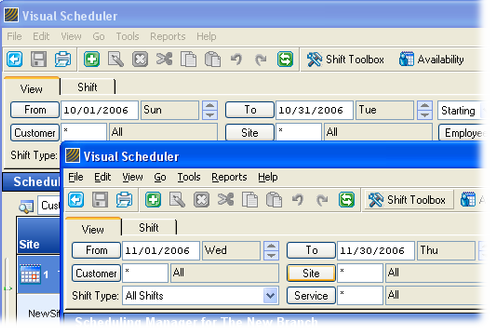
Open New Visual Scheduler Window.
6.2. Printing
The Visual Scheduler prints in the same graphical style as the selected Layout. To print from the Visual Scheduler:
- Load the shifts you want to print by defining the applicable filters in the View tab and clicking the Refresh button ( ) or the Append button
- Resize your view using the Scale Controls, if necessary.
- Click the Print button (
 ).
).
6.3. Importing and Exporting Shifts
eTime Xpress allows Shifts to be imported from or exported to a .CSV file.
From the menu bar in the Visual Scheduler, click File > Import/Export.
For more information on importing or exporting data from eTime Xpress, see the Global Features Guide.
6.4. Publish Schedule
eTime Xpress provides two real-time schedule publishing options: Voice Xpress (via phone) or Web Xpress (via Internet). Before schedules can be accessed by an employee, you must first set your schedule publishing rules.
To configure your schedule publishing rules:
- From the Menu bar in the Visual Scheduler, click File > Publish Schedule. The Schedule Publishing dialog box should be shown as in the figure below.
- Specify your Publish, Confirm and Unconfirm rules as required for your specific Web Xpress or Voice Xpress configuration.
- Click OK to save your Schedule Publishing rules.
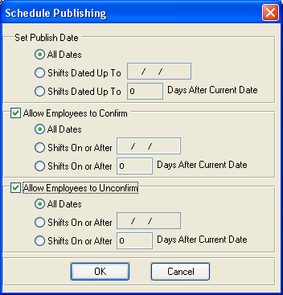
Publishing a Schedule
Note: Voice Xpress and Web Xpress are additional products that are licensed separately from eTime Xpress. Both products require additional setup and configuration. Please refer to the installation documentation for these products. If you wish to purchase Voice Xpress or Web Xpress, please contact your Celayix Software Sales Representative.
6.5. Email Schedules
eTime Xpress allows you to email schedules to your Employees, Customers or Sites. Schedules can be emailed by clicking Reports > Scheduling > Schedules. The Schedules Report dialog box should appear as shown in the figure below.
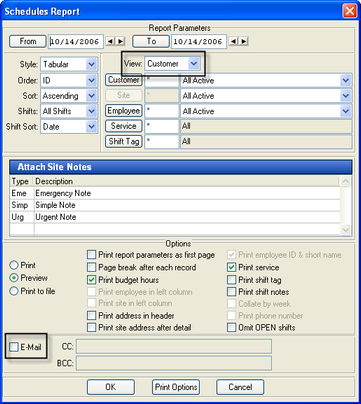 Schedules Report Dialog Box
To email schedules:
- Select Employee, Customer or Site from the View pull-down. Based on your selection, schedules will be sent to the email addresses defined under the Contact tab found in the Employee, Customer and Site Main screens, respectively.
- Specify the schedule to be sent by defining the applicable settings including style, sort order, notes and other options.
- Check-on the E-mail option and specify CC and BCC email addresses, if required. Click OK to start emailing schedules.
Note: By default, eTime Xpress attempts to send emails using the Microsoft Outlook account active on your PC. If you wish you sent emails using a SMTP server, you may configure your SMTP settings by going to the Main Menu and clicking Configuration > Company & Branch > Branch E-mail Settings.
6.6. Enable Drag and Drop
The Enable Drag and Drop feature allows you to treat shifts as graphical objects in the Visual Scheduler. Shifts can then be dragged from day to day or created by click-and-dragging on an empty cell.
From the Menu bar in the Visual Scheduler, click Tools > Options > Enable Drag and Drop. The drag and drop feature should be enabled in the Visual Scheduler.
To create Open shifts using drag and drop:
- Select an empty cell
- Click the cell and drag as shown in the figure below. The Visual Scheduler should display a new Open shift.
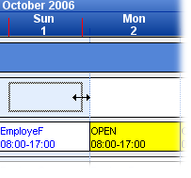
Creating an Open shift using Drag and Drop
To move a shift using Drag and Drop:
- Select a shift and click and hold.
- Move the shift to the desired location and release the mouse click as shown in the figure below. The Visual Scheduler should display the moved shift.
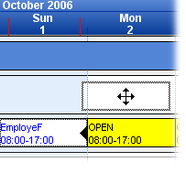
Moving a shift using Drag and Drop
6.7. Save Settings
The Visual Scheduler can save your window size/position and Drag and Drop settings after each session.
From the Menu bar in the Visual Scheduler, click Tools > Options > Save Settings. The Save Settings feature should be enabled in the Visual Scheduler.
6.8. Self-Scheduling Shifts
Self-Scheduling allows Open shifts to be published via Web Xpress. Employees can view available shifts and reserve/self-schedule themselves to shifts provided applicable business rules configured in eTime Xpress are met.
Note: The Self-Scheduling module in eTime Xpress is licensed separately and requires Web Xpress. If you wish to purchase the Self-Scheduling Module and/or Web Xpress, please contact your Celayix Software Sales Representative.
6.8.1. Publishing Open Shifts for Self-Scheduling
By default, Open shifts are not published for self-scheduling unless selected.
To Publish a Single Open Shift for Self-Scheduling:
- In the Visual Scheduler, click the Add button ( ) on the Tool Bar or select an Open shift and click the Update button ( ) on the Tool Bar. The Add/Update Shift dialog box should appear.
- Click the Self-Scheduling tab and select Published for Self-Scheduling from the Publish Type pull-down.
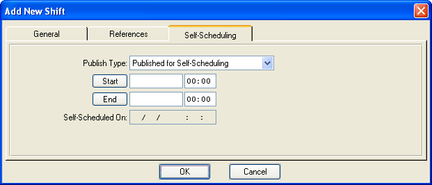 Publishing a Shift for Self-Scheduling
- Specify the Start Date/Time and End Date/Time period you want employees to be able to select the shift for self-scheduling.
- Click OK to save your changes.
To Publish Multiple Open Shifts for Self-Scheduling:
- In the Visual Scheduler, click the Shift Toolbox button ( ).
- In the Shift Toolbox, specify the Open shifts you want to set for Self-Scheduling, select the Replace tool from the Tool Selector and click the Configure Tool button. The 'Select Fields To Replace' dialog box should appear.
- Click the Self-Scheduling tab and check-off Publish Type.
- Select Published for Self-Scheduling from the Publish Type pull-down.
- Specify the Start Date/Time and End Date/Time period you want employees to be able to select the shifts for self-scheduling.
- Click the Replace button to start the Replace process.
6.8.2. Setting Self-Scheduling Options
Self-Scheduling Options allow you to configure the Web Xpress user interface for Self-Scheduling.
From the menu bar in the Visual Scheduler, click File > Self-Scheduling Options. The Self-Scheduling Options dialog box should appear as shown in the figure below.
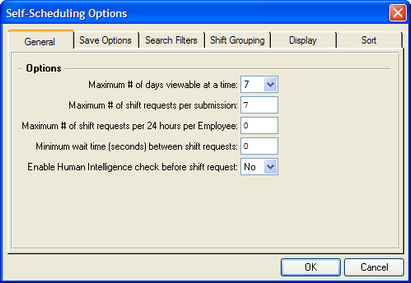 Self-Scheduling Options
General | Description |
Maximum # of days viewable at a time | Set the maximum number of days an employee may search for shifts published for self-scheduling. |
Maximum # of shift requests per submission | Set the maximum number of shifts an employee may submit per self-scheduling request. |
Maximum # of shift requests per 24 hours per Employee | Set the maximum number of times an employee can search for available shifts within day. |
Minimum wait time (seconds) between shift requests | Set the minimum amount of time an employee must wait before running the next search. During the wait period, the system will reject any search requests. |
Enable Human Intelligence check before shift request | Check-off to enable audio and video CAPTCHA check prior to any search. |
Save Options | Description |
Enable/Disable Validation | When a shift is selected by an employee for self-scheduling, the following business validations can be applied:
|
Search Filters | Description |
Filter 1, 2 and 3 | You may define up to 3 search filters which employees may use to customize their search for shifts available for self-scheduling. For example, you may create a search filter for time of day or shift type. |
Shift Grouping | Description |
Grouping Fields | Shift Grouping Fields summarize available self-scheduling shifts into user definable groupings. |
Display | Description |
Display Fields | Select the fields to be displayed for self-scheduling. The display fields are a subset of your shift grouping fields |
Sort | Description |
Sort Fields | Select the applicable sort fields and in ascending or descending order. |
6.8.3. Configuring Self-Scheduling in Web Xpress
To enable Self-Scheduling in Web Xpress, please review Web Xpress Schedule Publishing and Self-Scheduling Setup in the Web Xpress Administrator Guide.
7. Volunteer (Availability) Schedule
The Volunteer Schedule is complementary to the Working Schedule. It maintains your employee availability information such as shift preferences, extra work, volunteer overtime, on-call lists, spares lists and more. The employee availability information can then be applied when scheduling employees using the Availability or Autofill tools in the Visual Scheduler.
The Volunteer Schedule information can be entered by your schedulers directly into eTime Xpress or online by your employees using our optional Web Xpress solution. This guide will focus on how to enter and maintain availability records directly in the Volunteer Schedule.
From the Menu bar in the Visual Scheduler, select Tools > Volunteer Schedule. The Volunteer Schedule dialog box should appear as shown in the figure below.
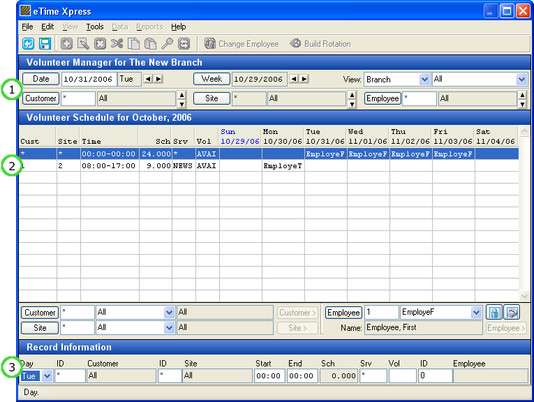
Volunteer Schedule with Annotations
Annotation | Description |
(1) View Selector | Specify the date range and volunteer records to view. Enter "*" to display All records (i.e. Customer, Site and Employee). |
(2) Volunteer Records | Displays volunteer records over date range. |
(3) Volunteer Information | Specify volunteer record details. |
7.1. Create Volunteer Types
eTime Xpress allows you to create the Volunteer types applicable to your organization (i.e. shift preferences, extra work, volunteer overtime, on-call lists, spares lists etc.). This allows you to perform precise availability searches when assigning employees to shifts.
To create Volunteer types:
From the eTime Xpress Main screen, click Configuration > Codes Maintenance and select 'Volunteer Codes'.
7.2. Add a Volunteer Record
To add a new Volunteer record:
- Click the Add button ( ) on the Tool Bar - the Volunteer Information fields should become active as shown in the figure below.

- Assign the day, Customer, Site, start time, end time, break, Service, Volunteer type and Employee. Remember for fields that require entry by codes, you may press the F5 key to bring up a list of valid entries.
- Click the Save button ( ) to save your new Volunteer record.
7.3. Update a Volunteer Record
To Update a Volunteer record:
- Select a Volunteer record and click the Update button ( ) on the Tool Bar – the Volunteer Information fields should become active.
- Update the day, Customer, Site, start time, end time, break, Service, Volunteer type or Employee. Remember for fields that require entry by codes, you may press the F5 key to bring up a list of valid entries.
- Click the Save button ( ) to save your changes.
7.4. Delete a Volunteer Record
To Delete a Volunteer record:
- Select a Volunteer record and click the Delete button ( ) on the Tool Bar - the Confirm Delete dialog box should appear.
- Click 'Yes' to delete the selected Volunteer record.
7.5. Cut/Copy a Volunteer Record
To Cut/Copy a Volunteer record:
- Select a Volunteer record and click the Cut button ( ) or Copy button ( ) from the Tool Bar.
- Select the new cell where you want to paste the Volunteer record and click the Paste button ( ).
7.6. Copy Volunteer Records
To Copy/Paste a Day:
- Select a day by clicking on a date column header.
- From the Menu bar, click Edit > Copy > Day.
- Specify the paste location by clicking on the applicable date column header. The new Volunteer records should appear in the selected 'paste to' date.
To Copy/Paste a Week:
- Specify the week you want to copy using the date controls in the View Selector.
- From the Menu bar, click Edit > Copy > Week.
- Specify the paste location using the date controls to go to the applicable week. The new Volunteer records should appear in the selected 'paste to' week.
To Copy/Paste a Date Range:
The Copy/Paste Range tool allows you to copy a day, week or range of days multiple times over a period.
- From the Menu bar, click Edit > Copy/Paste > Range. The Copy/Paste Range dialog box should appear as shown in the figure below.
- Specify the date range to copy.
- Specify the applicable Customer, Site, Service and Volunteer type filters.
- Specify the Paste to Range information (From and To dates) and click the Begin Copy/Paste button. Any exceptions can be viewed by clicking the Exception Details button.
Note: Exceptions can only occur if the Customer, Site, Service, Volunteer type or Employee is invalid (i.e. Inactive or Void).

Copy/Paste Range for Volunteer Records
7.7. Deleting Volunteer Records
To Delete a Range of Volunteer records:
- From the Menu bar, click Edit > Delete > Range. The Delete Range dialog box should appear as shown in the figure below.
- Specify the date range to delete.
- Specify the applicable Employee, Service, Volunteer type, Customer and Site filters.
- Click the Search button to view a list of Volunteer records matching the specified dates and filters.
- Select the records to be deleted using the Select All button or by pressing the [Shift] or [Ctrl] key while selecting shift records.
- Click the OK button to delete the selected Volunteer records.
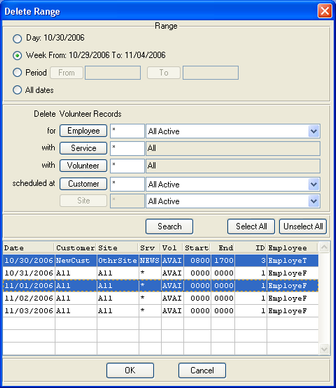
Deleting a Range of Volunteer Shifts
7.8. Building Volunteer Record Patterns
The Build Rotation tool creates complex Volunteer record patterns based on the On/Off sequence you define.
To build a record rotation:
- Select a Volunteer record and click the Build Rotation button ( ) on the Tool Bar. The Build Rotations dialog box should appear.
- Select either a Weekly or Daily frequency type and define the necessary frequency pattern. The Build Rotations dialog box should change as shown in the figures below.
Weekly Rotation Pattern Daily Rotation Pattern
- Specify the date range of the record rotation or the desired number of occurrences and click the OK button to build the rotation.
7.9. Entering Volunteer Records via Web Xpress
If you have licensed the Web Xpress Volunteer module, your Employees may submit their availability directly into the Volunteer Schedule over the Internet. eTime Xpress allows you to control the eligible dates when Employees can submit their availability.
From the Menu bar in the Volunteer Schedule, select File > Volunteer Entry Settings. The Volunteer Entry Settings dialog box should appear as shown in the figure below.
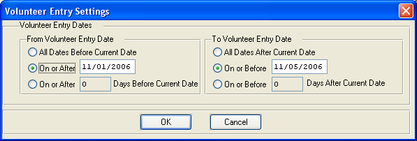
Volunteer Entry Settings
Specify the applicable date range when your Employees may submit their availability.
Note: Web Xpress is licensed separately from eTime Xpress and requires additional setup and configuration. If you wish to purchase Web Xpress, please contact your Celayix Software Sales Representative.
8. Time Off Schedule
The Time Off Schedule is complementary to the Working Schedule. It maintains your employee "cannot work" information such as days off, maternity leave, vacation time, sick days, personal leave days and more. The employee Time Off information can then be applied when scheduling employees using the Availability or Autofill tools in the Visual Scheduler.
The Time Off Schedule information can be entered by your schedulers directly into eTime Xpress or online by your employees using our optional Web Xpress solution. Unlike the Volunteer Schedule, Time Off requests entered using Web Xpress are required to follow an approval process before being posted into the Time Off Schedule.
From the Menu bar in the Visual Scheduler, select Tools > Time Off Schedule. The Time Off Schedule dialog box should appear as shown in the figure below.
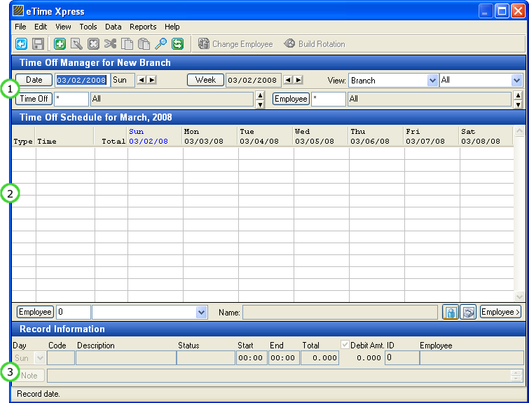
Time Off Schedule with Annotations
Annotation | Description |
(1) View Selector | Specify the date range and Time Off records to view. |
(2) Time Off Records | Displays Time Off records over date range. |
(3) Record Information | Specify Time Off record details. |
8.1. Create Time Off Types and Statuses
eTime Xpress allows you to create the Time Off types applicable to your organization (i.e. days off, maternity leave, vacation time, sick days, personal leave days etc.). Time Off status (i.e. pending, rejected, approved etc.) allow you to setup an authorization process for Time Off requests.
From the eTime Xpress Main screen, click Configuration > Company/Branch > Branch Codes > Time Off Codes. The Time Off Codes screen should appear as shown in the figure below.

Branch Time Off Codes with Annotations
Annotation | Description |
(1) Time Off Type | Displays Time Off record types. |
(2) Time Off Status | Displays Time Off statuses associated with a record type. Each Time Off type may have different Time Off statuses. |
To create Time Off types:
- From the Time Off Codes screen, click the Add button ( ).
- Specify the Time Off Code, Description and Status (Active).
- Click the Save button ( ) to save the new Time Off code.
To create Time Off Statuses:
- From the Menu bar in Time Off Codes screen, click File > Status Setup. The Status Setup screen should appear as shown in the figure below.
- Click the Add button ( ) and specify the Time Off Status code, Description, Order and Status (Active). The Order field defines the logical sequence which the status should appear. For example, the order fields may be defined as follows: Draft (1), Submitted (2), Pending Review (3), Rejected (4) and Approved (5).
- Click the Save button ( ) to save the new Time Off Status code.
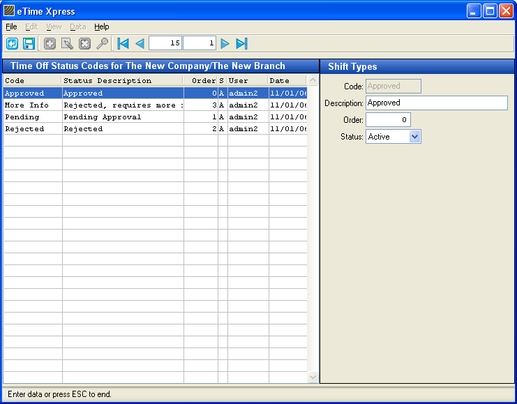
Creating Time Off Status Codes
eTime Xpress allows you to define which statuses apply to specific Time Off types. Certain Time Off types may have only a single status type (i.e. sick days may always be Approved) where as others may require the full approval process to be followed (i.e. vacation requests).
To assign Time Off statuses to Time Off types:
- From the Branch Time Off Codes screen, select the applicable Time Off code and click the Add Status button.
- Specify the Status code, Order and Use Rules value. The Order value will be defaulted to the Order value defined in the Time Off Status Codes screen – you can update this value if required. Remember for fields that require entry by codes, you may press the F5 key to bring up a list of valid entries.
The 'Use Rules' field determines whether the Time Off type and status combination will be validated against the Working Schedule. If a Time Off record has 'Use Rules' set to 'Yes', Employees are prevented from being scheduled at that time. Generally, an Approved status type has 'Use Rules' set to 'Yes' and a Pending or Rejected status type has the 'Use Rules' set to 'No'.
8.2. Add a Time Off Record
To add a new Time Off record:
- From the Time Off Schedule, click the Add button ( ) on the Tool Bar - the Time Off Record Information fields should become active as shown in the figure below.

Assign the day, Time Off type, Time Off status, start time, end time and Employee. Remember for fields that require entry by codes, you may press the F5 key to bring up a list of valid entries.
By default, the debit amount will be calculated based on your branch Time Off Debit Threshold rules. To manually enter the debit amount, uncheck the check-box beside Debit Amt. and enter the amount. To recalculate based on the branch rules, re-check the check-box beside Debit Amt.
- Click the Save button ( ) to save your new Time Off record.
The Debit Amount is the number of hours to be charged against an Employee's Time Off entitlement balance. For example, if an Employee is away on sick leave, the Employee would be unavailable for the entire day (24 hour period) but the Debit Amount would only be up to the standard work day of 8 hours.
Employee Time Off Debit balances are summarized in the Time Off Report under Reports > Employee > Time Off. If you have licensed the Accruals module, you may setup accrual calculations to automatically deduct Time Off Debit balances.
8.3. Update a Time Off Record
To Update a Time Off record:
- From the Time Off Schedule, select a Time Off record and click the Update button ( ) on the Tool Bar – the Time Off Record Information fields should become active.
- Update the day, Time Off type, Time Off status, start time, end time, Debit Amount or Employee. Remember for fields that require entry by codes, you may press the F5 key to bring up a list of valid entries.
- Click the Save button ( ) to save your changes.
8.4. Delete a Time Off Record
To Delete a Time Off record:
- From the Time Off Schedule, select a Time Off record and click the Delete button ( ) on the Tool Bar - the Confirm Delete dialog box should appear.
- Click 'Yes' to delete the selected Time Off record.
8.5. Cut/Copy a Time Off Record
To Cut/Copy a Time Off record:
- From the Time Off Schedule, select a Time Off record and click the Cut button ( ) or Copy button ( ) from the Tool Bar.
- Select the new cell where you want to paste the Time Off record and click the Paste button ( ).
8.6. Copy Time Off Records
To Copy/Paste a Day:
- From the Time Off Schedule, select a day by clicking on a date column header.
- From the Menu bar, click Edit > Copy > Day.
- Specify the paste location by clicking on the applicable date column header. The new Time Off records should appear in the selected 'paste to' date.
To Copy/Paste a Week:
- From the Time Off Schedule, specify the week you want to copy using the date controls in the View Selector.
- From the Menu bar, click Edit > Copy > Week.
- Specify the paste location using the date controls to go to the applicable week. The new Time Off records should appear in the selected 'paste to' week.
To Copy/Paste a Date Range:
The Copy/Paste Range tool allows you to copy a day, week or range of days multiple times over a period.
- From the Menu bar in the Time Off Schedule, click Edit > Copy/Paste > Range. The Copy/Paste Range dialog box should appear as shown in the figure below.
- Specify the date range to copy.
- Specify the applicable Time Off type filters.
- Specify the Paste to Range information (From and To dates) and click the Begin Copy/Paste button. Any exceptions can be viewed by clicking the Exception Details button.
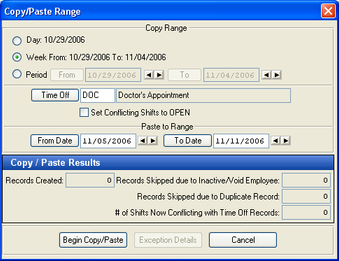
Copy/Paste Range for Time Off Records
8.7. Deleting Time Off Records
To Delete a Range of Volunteer records:
- From the Menu bar in the Time Off Schedule, click Edit > Delete > Range. The Delete Range dialog box should appear as shown in the figure below.
- Specify the date range to delete.
- Specify the applicable Time Off status, Employee and Time Off Type.
- Click the Search button to view a list of Time Off records matching the specified dates and filters.
- Select the records to be deleted using the Select All button or by pressing the [Shift] or [Ctrl] key while selecting shift records.
- Click the OK button to delete the selected Time Off records.
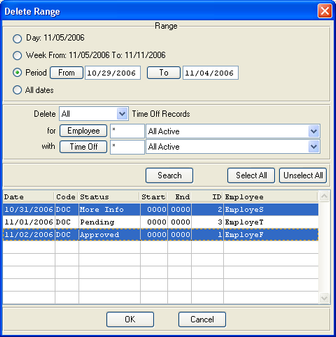
Deleting a Range of Time Off Records
8.8. Updating Time Off Status
To Update the status of a Time Off record:
- From the Time Off Schedule, select a Time Off record and click the Update button ( ) on the Tool Bar – the Time Off Record Information fields should become active.
- Update the Time Off status.
- Click the Save button ( ) to save your changes.
To Update the status of a range of Time Off records:
The Set Status tool allows you to update the status of multiple Time Off records over a period.
- From the Menu bar in the Time Off Schedule, click Data > Set Status. The Set Status Range dialog box should appear as shown in the figure below.
- Specify applicable date range and Time Off type filters.
- Select the status type of the Time Off record to be updated using the 'Set' drop down list.
- Define the new status type using the 'time off records status to' drop down list.
- Click the Search button to view a list of Time Off records matching the specified dates and filters.
- Select the records to be updated using the Select All button or by pressing the [Shift] or [Ctrl] key while selecting shift records.
- Click the OK button to update the selected Time Off records. Any exceptions can be viewed by clicking the Exception Details button.
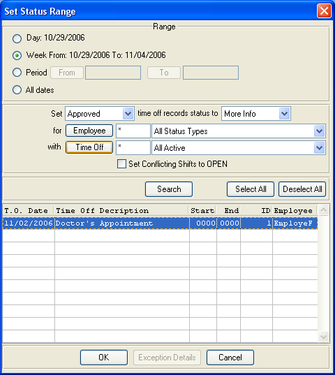
Updating the Status of a Range Time Off Records
8.9. Building Time Off Record Patterns
The Build Rotation tool creates complex Time Off record patterns based on the On/Off sequence you define.
To build a record rotation:
- From the Time Off Schedule, select a Time Off record and click the Build Rotation button ( ) on the Tool Bar. The Build Rotations dialog box should appear.
- Select either a Weekly or Daily frequency type and define the necessary frequency pattern. The Build Rotations dialog box should change as shown in the figures below.
Weekly Rotation Pattern Daily Rotation Pattern
- Specify the date range of the record rotation or the desired number of occurrences and click the OK button to build the rotation.
8.10. Entering Time Off Requests
If you have licensed the Time Off module in Voice Xpress, your Employees may submit their Time Off requests over the Internet or telephone respectively. eTime Xpress allows you to control the eligible dates when Employees can submit their Time Off requests.
From the Menu bar in the Time Off Schedule, select File > Time Off Entry Settings. The Time Off Entry Settings dialog box should appear as shown in the figure below.
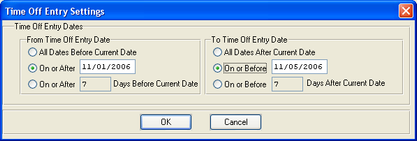
Time Off Entry Settings
Specify the applicable date range when your Employees may submit their Time Off requests.
Note: Voice Xpress are licensed separately from eTime Xpress and requires additional setup and configuration. If you wish to purchase Voice Xpress, please contact your Celayix Software Sales Representative.
8.11. Approving and Importing Time Off Requests
Time Off requests do not automatically appear in the Time Off Schedule. They must first be reviewed, approved and posted using the Time Off Requests Import feature in eTime Xpress.
From the Menu bar in the Time Off Schedule, click File > Import > Time Off Requests. The Time Off Request Import screen should appear as shown in the figure below.
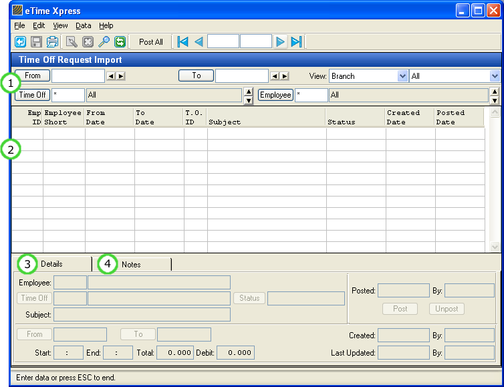
Time Off Request Import with Annotations
Annotation | Description |
(1) View Selector | Specify the date range and Time Off requests to view. |
(2) Time Off Requests | Displays Time Off requests over date range. |
(3) Time Off Details | Displays the details of the Time Off request including the employee, time off type, dates requested and creation date. |
(4) Time Off Notes | Displays additional details and descriptions for the Time Off request. |
To import Time Off records from Web Xpress:
- Specify the date range and Time Off request types in the View Selector and click the Refresh button ( ). A list of Time Off requests matching your search criteria should appear.
- Sort the Time Off request list as required.
- Select a Time Off request and review its details and notes.
- To import/post a Time Off request into the Time Off Schedule, select a Time Off request and click the Post button in the Time Off Details tab. The Post Time Off Requests dialog box should appear as shown below.
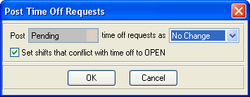
- Specify the post status of the Time Off request (i.e. Approved or Rejected) and click the OK button. The Time Off request will be posted to the Time Off Schedule.
Note: The option 'Set shifts that conflict with time off to OPEN' option will automatically update scheduled shifts to Open that conflict with Time Off records having the 'Use Rules' set to 'Yes'.
Appendix I – Visual Scheduler Buttons
The following table is a summary of the buttons and commands found in the Visual Scheduler Tool Bar.
Icon | Name | Description |
| Close | Close the Visual Scheduler and return to the Main Menu. |
| Print the current view. | |
| Save | Save your shift changes to the Working Schedule (database). |
| Add | Add new shift. |
| Update | Update selected shift details. |
| Delete | Delete selected shift. |
| Cut | Move the selected shift. |
| Copy | Copy the selected shift. |
| Paste | Paste previously 'Cut' or 'Copied' shift. |
| Undo | Reverse the last change. |
| Redo | Re-apply previous Undone change. |
| Refresh | Refresh view with current data from the Working Schedule (database). |
| Shift Toolbox | Use for bulk creation and update of shifts. |
| Availability | Use for advanced Employee searches for the creation and update of shifts. |
| Build Rotation | Use to create recurring series of shifts. |
| Autofill | Use to automatically assign available Employees to Open shifts. |
| Append | Adds shifts matching search filters to the current view. |
| Clear | Clears current view (note: does not delete shifts). |
| Photo | View Employee photograph. |
| Rotation | Denotes that shift is part of a series of shifts. |
| Reposition | Reposition to the current shift in the Shift Tab. |
| Layout | Use to create scheduling layout. |
| Filter | Use to create record filter. |
Appendix II - Classic Scheduler vs. Visual Scheduler
The Visual Scheduler is a significant upgrade to the Classic Scheduler interface found in previous versions of eTime Xpress. Below is a reference guide summarizing the various Classic Scheduler features and instructions on how to run the corresponding feature in the new Visual Scheduler.
Feature | Classic Scheduler | Visual Scheduler |
Add Shift | Edit > Add > Shift | Edit > Add |
Add Multiple Shifts | Edit > Add > Multiple | Tools > Availability > Multi-select shifts and click Add Shift(s) |
Delete Shift | Edit > Delete > Shift | Edit > Delete |
Delete Range | Edit > Delete > Range | Tools > Shift Toolbox > Delete |
Copy Shift | Edit > Copy > Shift | Edit > Copy |
Copy Day/Week | Edit > Copy > Day/Week | Tools > Shift Toolbox > Copy |
Copy/Paste Week | Edit > Copy/Paste > Week | Tools > Shift Toolbox > Copy |
Copy/Paste Shift Plan | Edit > Copy/Paste > Shift Plan | Edit > Paste Template |
Lookup | Edit > Lookup | No longer applicable |
Replace | Edit > Replace | Tools > Shift Toolbox > Replace |
View Selector by Branch, Customer, Site, Employee, Employee/Branch, Employee/Customer, Employee/Site | View > Display > Branch, Customer, Site, Employee, Employee/Branch, Employee/Customer, Employee/Site | No longer supported. Manually define Customer, Site, and Employee settings. |
Shift Types Selector | View > Shifts | View tab > Shift Types |
View by Period: Daily, Monthly | View > Period > Daily, Monthly | No longer applicable. From View tab, define From/ To Date. |
Shift Planner | Tools > Shift Planner | Tools > Shift Toolbox > Schedule Template |
Volunteer Schedule | Tools > Volunteer Schedule | Tools > Volunteer Schedule |
Time Off Schedule | Tools > Time Off Schedule | Tools > Time Off Schedule |
Group Scheduling | Tools > Group Scheduling | No longer supported |
Shift Counter Setup | Tools > Shift Counters > Setup | Tools > Shift Counters > Setup |
Shift Counter Results | Tools > Shift Counters > Results | Tools > Shift Counters > Results |
Autofill | Tools > AutoFill | Tools > AutoFill |
Bid Maintenance | Tools > Bid Maintenance | No longer supported |
Show Open Shifts | Tools > Open Shifts | View tab > Employee = 0 |
Show Overtime Shifts | Tools > Overtime Shifts | View tab > Shift Types > Overtime Shifts |
Availability | Tools > Availability | Tools > Availability |
Build Rotation | Tools > Build Rotation | Tools > Build Rotation |
Set Shift to Open | Data > Set to Open > Shift | Edit > Update > Set Employee = 0 |
Set Shift Range to Open | Data > Set to Open > Range | Tools > Shift Toolbox > Replace > Set Employee = 0 |
Change Employee | Data > Change Employee | Edit > Update > Set Employee |
Set Tentative | Data > Set Tentative | Tools > Shift Toolbox > Replace > Set Tentative Y/N |
Set Shift Note | Data > Set Shift Note | Tools > Shift Toolbox > Replace > Set Note |
Set Shift Tag Set | Data > Set Shift Tag Set | Tools > Shift Toolbox > Replace > Shift Tag |
Appendix III - Employee Search Criteria
The following table is a summary of the Employee Search Criteria that may be found in the Filter option in the Availability, Autofill, and Add Multiple Shift tools:
Filter Type | Description | Where To Configure |
Experience at customer Site | Employee has a minimum of 1 "Worked" shift at this Site. | Use Set Shift Worked feature in Time & Attendance |
Meets Shift Qualifications | Employee meets all Shift qualifications. | Employee Qualifications: Employee Main Screen > Employee Qualifications Shift Qualifications: Configuration > Company/Branch > Branch Rule Settings > Shift Qualifications |
No overtime caused | Shift will not result in overtime pay. | Company/Branch > Branch Bill/Pay Settings |
Not scheduled on this date | Employee is not scheduled to other shifts during the day. | n/a |
List Employees with day off | Override Employee day off rule. | Employee Main Screen > File > Set Work Week |
Service found in Employee pay rates | Service to be provided has been defined as in the Employee's pay rates. | Employee Main Screen > Employee Pay Rates |
Does not exceed Site max pay rate | Employee's pay rate does not exceed the specified Site Max Pay Rate rule. | Customer Main Screen > Site Pay Settings tab |
Matches default Service | Matches Employee's default Service type. | Employee Main Screen > Employee Pay Settings tab |
Unionized Employee | Employee union classification is 'Yes". | Employee Main Screen > Employee Pay Settings tab |
Not during x consecutive days off | Exclude Employee's failing minimum consecutive day off rule. | n/a |
Department | Matches Employee department classification. | Employee Main Screen > Employee Pay Settings tab |
Position | Matches Employee position classification. | Employee Main Screen > Employee Pay Settings tab |
Employee Type | Matches Employee type classification. | Employee Main Screen > Employee Pay Settings tab |
Volunteer Type | Matches Employee volunteer record (see Volunteer Schedule). | Visual Scheduler > Tools > Volunteer Schedule |
Total hours less than x hours for the day/week/month | Employee's combined scheduled and worked hours over a period are below specified hours. | n/a |
Rest period between shifts x hours | Employee is not already scheduled prior to the intended shift based on rest period guidelines. | n/a |
Appendix IV – Schedule Layout Manager
The following table is a summary of the presentation controls found in the Schedule Layout Manager of the Visuals Scheduler.
General Options | Description |
Grid Lines | Display grid lines between cells. |
Alternate Color Lines | Color alternating rows. |
Week Start Day Color | Color columns defined as the first day of each week. |
Military Time | Display time based on 24-hour clock format. |
Vertical/Horizontal Slider | Display vertical/horizontal scale control. |
Header Field Labels | Display field labels in the Header Display. |
Record Field Labels | Display field labels in the Record Display. |
Start Week Day | Sets the first day of the work week. "Default" applies the default week start day as defined by eTime Xpress administrator. |
Period Type | Display shift records in daily or hourly format. |
Record Bars | Set the width of shift records to fill a cell (Re-size to Fill Entire Day) or size based on shift hours (Proportional To Total Hours). |
Formatting Options | Description |
Day Names | Day format. |
Month Names | Month format. |
Grid Lines | Grid line format. |
Alternate Color Lines | Number of rows to color on alternating basis. |
Alignment Options | Description |
Title Align | Horizontal alignment for List Item Grouping. |
Title Position | Vertical alignment for List Item Grouping. |
Title Height | Height value for List Item Grouping. |
Title Width | Width value for List Item Grouping. |
List Align | Horizontal alignment for List Item Display. |
Row Height | Height value for List Item Display. |
List Indent | Indent value for List Item Display |
Min. Bar Width (Hours) | Minimum column width when in Hours view. |
Date Width | Column width when in Day view. |
Hour Width | Column width when in Hours view. |
Slider Min/Max Value | Range of resize values for the Horizontal and Vertical Scale Controls. |