Administrator Guide
- Gurpreet Banwait (Deactivated)
- Michael Shumko (Deactivated)
This guide applies to R814 and R900 of Celayix, except for section 10. For R900, section 10 is replaced by User access.
The Administrator Guide will instruct you on how to setup and configure eTime Xpress.
eTime Xpress
Administrator Guide

Table of Contents
1. Administrator Overview
This document will discuss how to use the various features found within the Administrator area of eTime Xpress. You may wish to review the other topical user guides prior to reading the Administrator User Guide in order to understand the various features available in eTime Xpress. The Administrator Guide can then be used as a reference source to setup only those features that your organization needs.
Note: To configure features outlined in this guide you will need to log-on with a user account having administrator rights.
1.1. eTime Xpress Data Hierarchy
eTime Xpress is highly flexible and can match the scheduling needs of most organizations. However, in order to configure eTime Xpress for your scheduling needs, you will need to understand how it organizes data.
Below is a data hierarchy diagram of eTime Xpress with relevant definitions of how various objects are used in the application. This user guide deals with the setup and configuration of the Company and Branch objects. 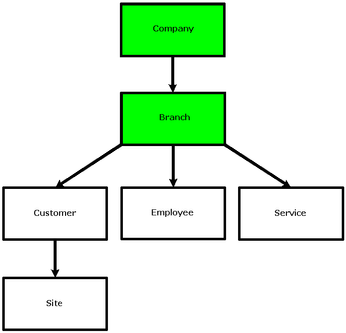 eTime Xpress Data Hierarchy
Note: The terms Company, Branch, Customer, Site, Employee and Service are customizable to match the terminology used by your organization. You will learn how to change these labels later in this guide.
Object | Common Alternate Terms |
Company | Headquarters, Parent, Partnership and District |
Branch | Division, Subsidiary, Partner, Business Unit, Office, Hospital and Mall |
Customer | Locations, Buildings and Teams |
Site | Rooms, Floors, Wards, Areas, Sections |
Employee | Resource, Contractor, Worker, Personnel and Nurse |
Service | Task, Duty, Position |
Company. The Company object is the top level organizational unit in eTime Xpress - all organizational units below Company are unique to the Company (i.e. Branch, Customer, Site, Employee and Service). eTime Xpress must have a Company defined to operate - one is created on installation called Default Company.
Branch. The Branch object is a sub-unit within a Company. Generally, branches are broken out in terms of common business rules for Customer, Site and Employee groupings. You should avoid creating unnecessary Branch groupings as Employees can only be scheduled within their home Branch (i.e. cross-Branch scheduling is not allowed). eTime Xpress must have a Branch defined in order to operate - one is created on installation called Default Branch.
Customer. The Customer object is a sub-unit within a branch. It is the 'where' to which an Employee is scheduled.
Site. The Site object is a sub-unit within a Customer. It provides further detail about the 'where' to which an Employee is scheduled. For example, instead of simply tracking the Customer (e.g. building) for a shift you can have the additional detail available by using a Customer/Site object relationship (e.g. building/main lobby).
Employee. The Employee object is a sub-unit within a Branch. It is the 'who', the person or the object you are scheduling.
Service. The Service object is a sub-unit within a Branch. It is the 'what', or the action to be performed by an Employee.
Shift. A Shift is comprised of the following objects: date, time, Break, Customer, Site, Employee and Service.
Now that you understand the purpose of each data object, you should map how you are going to apply them in your organization. For more complex configurations, your product specialist will guide you through the setup process during your training and configuration sessions.
Note: The rest of this user guide will reference the default labels. If you are planning on customizing your labels please make a note of what the original and new names are so you can still work along with the examples provided in this guide.
2. Company Overview
To access the Company screen, go to the Main Menu of eTime Xpress and click Configuration > Company/Branch. The Company Main screen should appear as shown in the figure below. 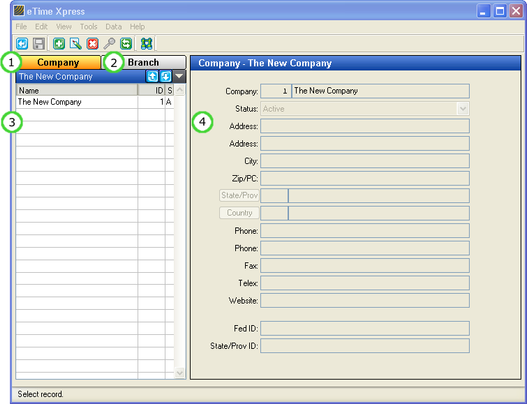 Company Main Screen
Annotation | Description |
(1) Company Tab | Displays Company related fields and information. |
(2) Branch Tab | Displays Branch related fields and information. |
(3) Company Listing | Listing of all the Companies in eTime Xpress. |
(4) Company Details | Company Details contains general and contact information. |
2.1. Rename Default Company
Your initial installation of eTime Xpress includes one default Company and one default Branch. You will want to rename these items to match your organization's information.
To rename the Default Company:
- Select the Default Company and click the Update button (
 ) on the Tool Bar - the fields in Company Details should become active.
 - Fill out the applicable company fields - only the Company Name is required. The Status is set to 'Active' automatically.
- Click the Save button (
 ) to save your Company's information.
2.2. Add a Company
eTime Xpress allows you to create multiple Companies to separate your data for scheduling and time & attendance purposes.
To Add a Company:
- Click the Add button (
 ) on the Tool Bar - the fields in Company Details should become active.
 - Fill out the applicable Company fields - only the Company Name is required. The Status is set to 'Active' automatically.
- Click the Save button ( ) to save your Company's information.
2.3. Update a Company
To Update a Company:
- Select a Company and click the Update button ( ) on the Tool Bar - the fields in Company Details should become active.
- Update the applicable Company fields.
- Click the Save button ( ) to save your changes.
2.4. Delete a Company
To Delete a Company:
- Select a Company and click the Delete button (
 ) on the Tool Bar. If you already have Branches created for the Company, you must first delete all related Branches.
If you no longer want to use Company, you can update the status of the Company to Inactive or Void in the Company Main screen. If the Company status is set to Inactive or Void, you will not be able to add new records in the Company.
2.5. Company References
Company References are fields that let you add information to a Company record for use with other applications. In some cases, you may want to define additional Company information not found in the standard fields of eTime Xpress. These References can be selected to appear in Reports or used as a linking ID when exporting to 3rd party applications.
To define a Company Reference:
- From the Company Main screen, select a Company and click File > References > Company.
- Add your references to the Company References dialog box.
- Click the Save button to save the new References.
Note: To rename the numeric labels (i.e. 1, 2, 3…) in the Company References window, go to the eTime Xpress Main screen and click Configuration > Codes Maintenance. From the Codes Maintenance screen, select 'External Company Ref.' and then add a new Code with a matching number and description. The number in the Code field is the numeric label you want to replace and the description is the new label.
2.6. Company Settings
Company Settings controls the process of assigning IDs, rounding rules and other Company related settings. The default Company Settings are shown in the figure below.  Company Settings
Setting | Description |
Automatic Employee ID Assignment | If Yes, Employee IDs are assigned sequentially.If No, Employee IDs are user definable. |
Automatic Customer ID Assignment | If Yes, Customer IDs are assigned sequentially.If No, Customer IDs are user definable. |
Automatic Site ID Assignment | If Yes, Site IDs are assigned sequentially.If No, Site IDs are user definable. |
Include Open shifts in Shift Counter | If Yes, Open shifts are included in shift counts tabulated in the Shift Counter.If No, Open shifts are excluded from shift counts tabulated in the Shift Counter. |
Round Hours | Specify default rounding rule for shift hours. |
Note: If the Automatic ID Assignment is set to 'Yes', IDs will be auto-assigned to records when importing Employees, Customers and Sites.
3. Branch Overview
To access the Branch screen, go to the Main Menu of eTime Xpress and click Configuration > Company/Branch > Branch Tab. The Branch Main screen should appear as shown in the figure below. 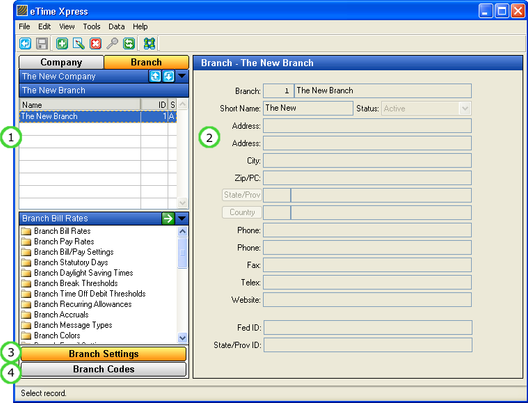 Branch Main Screen
Annotation | Description |
(1) Branch Listing | Listing of all the Branches in the Company. |
(2) Branch Details | Branch Details contains general and contact information. |
(3) Branch Settings | Settings controlling Branch related features and options. Click the Branch Settings button to bring up the Branch Settings Options and double-click on a folder to run the selected option. |
(4) Branch Codes | Branch related code setup. Click the Branch Codes button to bring up the Branch Code Options and double-click on a folder to run the selected option. |
3.1. Rename Default Branch
Your initial installation of eTime Xpress includes one default Company and one default Branch. You will want to rename these items to match your organization's information.
To rename the Default Branch:
- Select the Default Company (renamed in the previous steps) and click the Branch Tab. The Branch listings for the Default Company should appear.
- Select the Default Branch and click the Update button ( ) on the Tool Bar - the fields in Branch Details should become active
- Fill out the applicable Branch fields - only the Branch Name and Short Name are required. The Status is set to 'Active' automatically.
- Click the Save button ( ) to save your Branch's information.
3.2. Add a Branch
eTime Xpress allows you to create multiple Branches to separate your data for scheduling and time & attendance purposes.
To Add a Branch:
- Select a Company to which you want to add a Branch and click the Branch Tab.
- Click the Add button ( ) on the Tool Bar - the fields in Branch Details should become active.
- Fill out the applicable Branch fields only the Branch Name and Short Name are required. The Status is set to 'Active' automatically.
- Click the Save button ( ) to save your Branch's information.
3.3. Update a Branch
To Update a Company:
- Select a Branch and click the Update button ( ) on the Tool Bar - the fields in Branch Details should become active.
- Update the applicable Branch fields.
- Click the Save button ( ) to save your changes.
3.4. Delete a Branch
To Delete a Branch:
- Select a Branch and click the Delete button ( ) on the Tool Bar. You can only delete empty Branch objects (i.e. no customer, sites, employees, shifts etc. have been created) to ensure that historical information is always retained.
If you no longer want to use a Branch, you can update the status of the Branch to Inactive or Void in the Branch Main screen. If the Branch status is set to Inactive or Void, you will not be able to add new records in the Branch.
3.5. Branch References
Branch References are fields that let you add information to a Branch record for use with other applications. In some cases, you may want to define additional Branch information not found in the standard fields of eTime Xpress. These References can be selected to appear in Reports or used as a linking ID when exporting to 3rd party applications.
To define a Branch Reference:
- From the Branch Main screen, select a Branch and click File > References > Branch.
- Add your references to the Branch References dialog box.
- Click the Save button to save the new References.
Note: To rename the numeric labels (i.e. 1, 2, 3…) in the Branch References window, go to the eTime Xpress Main screen and click Configuration > Codes Maintenance. From the Codes Maintenance screen, select 'External Branch Ref.' and then add a new Code with a matching number and description. The number in the Code field is the numeric label you want to replace and the description is the new label.
3.6.1. Branch Bill Rates
Branch Bill Rates allow you to define a Bill rate where all Employees performing the same Service are billed at the same rate. Remember that Branch Bill Rates are default rates that are applied when an applicable bill rate cannot be found in Employee Bill rates, Site Bill Rates or Site/Employee Bill rates depending on your configured business rules. Branch Bill Rates can be used as a "catch-all" or if your organization simply bills according to the service performed.
From the Main Menu, click Configuration > Company/Branch > Branch Bill Rates. The Branch Bill Rates screen should appear as shown in the figure below. 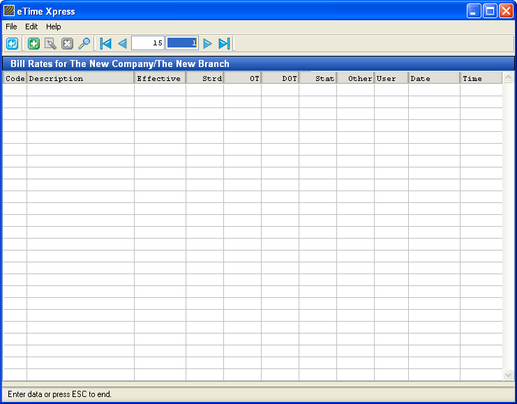 Branch Bill Rates
To Add a Branch Bill Rate:
- Click the Add button ( ) on the Tool Bar - the fields in the Bill Rates browser should become active.
- Assign the Service Code (enter '' for All Services), Effective Date and the applicable Bill Rates by hour's type (standard, overtime, double overtime, statutory and other). Remember for fields that require entry by codes, you may press the F5 key to bring up a list of valid entries. If a rate exists for both a specific Service Code and '' All Services, the rate assigned to the specific Service Code will be given priority.
- Press the Enter key to save your new Branch Bill Rate.
The Effective Date allows you to define current and future Bill Rates. When calculating billing, eTime Xpress will apply the Bill Rate in effect on the date of the shift.
Note: If shifts were created prior to defining Bill Rates or you are updating an existing Bill Rate, you will be asked whether you want to apply the new Bill Rate to existing shifts. Selecting 'Yes' will recalculate your billing information with the new rate, where as selecting 'No' will apply the new rate only to newly created shifts.
3.6.2. Branch Combination Bill Rates
Branch Combination Bill Rates allow you to view and administer All combination bill rates defined in a branch. Customer, Site, Employee and Service values may be a combination of specific or wild card values.
From the Main Menu, click Configuration > Company/Branch > Branch Combination Bill Rates. The Branch Combination Bill Rates screen should appear as shown in the figure below. 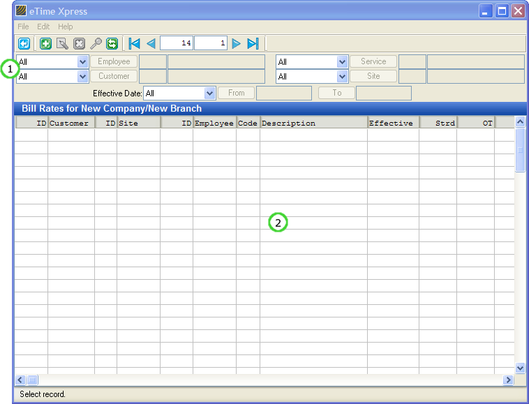
Branch Combination Bill Rates Screen
Annotation | Description |
(1) Filter | Controls the subset of combination bill rates to be loaded the browser view. Options include filtering by Employee, Customer, Site, Service and Effective Dates. |
(2) Rate Listing | Lists combination pay rate records based upon the selected filters. |
To Add ( ![]() ), Update (
), Update ( ![]() ), or Delete (
), or Delete ( ![]() ) a Combination Bill Rate, click the corresponding buttons in the toolbar. When entering a new Bill Rate you can define the Customer, Site, Employee, Service, Effective Date and the applicable bill rates by hour's type (standard, overtime, double overtime, statutory and other). You may define 'All' for Customer, Sites and Employees by entering '0' and 'All' for Services by entering '*'.
) a Combination Bill Rate, click the corresponding buttons in the toolbar. When entering a new Bill Rate you can define the Customer, Site, Employee, Service, Effective Date and the applicable bill rates by hour's type (standard, overtime, double overtime, statutory and other). You may define 'All' for Customer, Sites and Employees by entering '0' and 'All' for Services by entering '*'.
The Effective Date allows you to define current and future Bill Rates. When calculating billing, eTime Xpress will apply the Bill Rate in effect on the date of the shift.
Viewing Combination Bill Rates
- Specify the applicable filters for the rate records you want to view.
Filter | Description |
Employee, Customer, Site and Service Pull-Down | All = No not filter based on that field |
Employee | Enter an Employee ID. |
Service | Enter a Service code. |
Customer | Enter a Customer ID. |
Site | Enter a Site ID. |
From/To Dates | Specify the effective date range. |
Effective Date Pull-Down | All = No not filter based on that field |
- Click the Refresh button (
 ).
).
Combination Bill Rate Tie Break/Priority Rules
Combination bill rates allow you to assign a bill rate based on a shift's customer, site, employee and service values. Those values may be defined as specific or wild card values. As a result, more than one combination bill rate may apply to a shift requiring prioritization rules as tie breakers.
The following tie break rules are applied in the following priority order when selecting between bill rates that are valid on the same shift:
Priority | Employee | Customer | Site | Service |
1 | √ | √ | √ | √ |
2 | √ | √ | √ | All |
3 | √ | √ | All | √ |
4 | √ | √ | All | All |
5 | √ | All | All | √ |
6 | √ | All | All | All |
7 | All | √ | √ | √ |
8 | All | √ | √ | All |
9 | All | √ | All | √ |
10 | All | √ | All | All |
11 | All | All | All | √ |
12 | All | All | All | All |
√ = Specific Value
All = Wild Card value
Example:
A basic scenario of 2 combination bill rates applying to the same shift would be as follows:
Combination Bill Rate | Employee | Customer | Site | Service |
Bill Rate #1 = $25 | Joe Doe | All | All | All |
Bill Rate #2 = $20 | All | All | All | On Call |
If Joe Doe is scheduled to perform On Call duties that shift satisfies the criteria for both combination bill rate #1 and #2.
Based on the priority table above, bill rate #1 would have priority rank of 6 while bill rate #2 would have priority rank of 11. The system would assign combination bill rate #1 of $25 to the shift.
Note: If shifts were created prior to defining Bill Rates or you are updating an existing Bill Rate, you will be asked whether you want to apply the new Bill Rate to existing shifts. Selecting 'Yes' will recalculate your billing information with the new rate, where as selecting 'No' will apply the new rate only to newly created shifts.
3.7.1. Branch Pay Rates
Branch Pay Rates allow you to define a Pay rate where all Employees performing the same Service are paid at the same rate. Remember that Branch Pay Rates are default rates that are applied when an applicable pay rate cannot be found in Employee Pay rates, Site Pay Rates or Site/Employee Pay rates depending on your configured business rules. Branch Pay Rates can be used as a "catch-all" or if your organization simply pays according to the service performed.
From the Main Menu, click Configuration > Company/Branch > Branch Pay Rates. The Branch Pay Rates screen should appear as shown in the figure below. 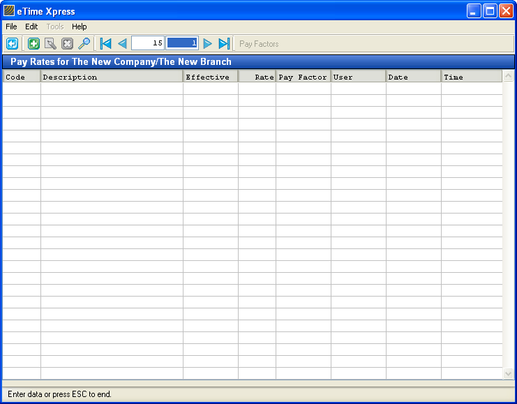 Branch Pay Rates
To Add a Branch Pay Rate:
- Click the Add button ( ) on the Tool Bar - the fields in the Pay Rates browser should become active.
- Assign the Service Code (enter '' for All Services), Effective Date and the applicable Pay Rate. Remember for fields that require entry by codes, you may press the F5 key to bring up a list of valid entries. If a rate exists for both a specific Service Code and '' All Services, the rate assigned to the specific Service Code will be given priority.
- Press the Enter key to save your new Branch Pay Rate.
The Effective Date allows you to define current and future Pay Rates. When calculating payroll, eTime Xpress will apply the Pay Rate in effect on the date of the shift.
When entering a Branch Pay Rate, eTime Xpress automatically applies the 'Default' Pay Factors defined for the Branch. If a Pay Rate requires a custom Pay Factor that is different than the 'Default' Pay Factor, select the Pay Rate and click the Pay Factors button in the Tool Bar. The custom Pay Factors dialog should appear as shown in the figure below.
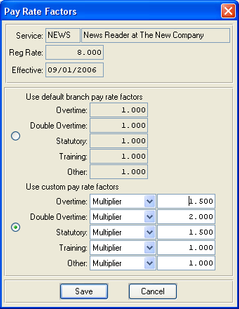 Custom Pay Rate Factors Window
Custom Pay Factors allow you to define new Pay Rate Factors (Multipliers) or dollar amounts (Fixed Amounts) for each hour's type. Pay Rates using custom Pay Factors will be identified in the Branch Pay Rates screen as 'Custom' under the Pay Factor column.
Note: If shifts were created prior to defining Pay Rates or you are updating an existing Pay Rate, you will be asked whether you want to apply the new Pay Rate to existing shifts. Selecting 'Yes' will recalculate your payroll information with the new rate, where as selecting 'No' will apply the new rate only to newly created shifts.
3.7.2. Branch Combination Pay Rates
Branch Combination Pay Rates allow you to view and administer All combination pay rates defined in a branch. Customer, Site, Employee and Service values may be a combination of specific or wild card values.
From the Main Menu, click Configuration > Company/Branch > Branch Combination Pay Rates. The Branch Combination Pay Rates screen should appear as shown in the figure below. 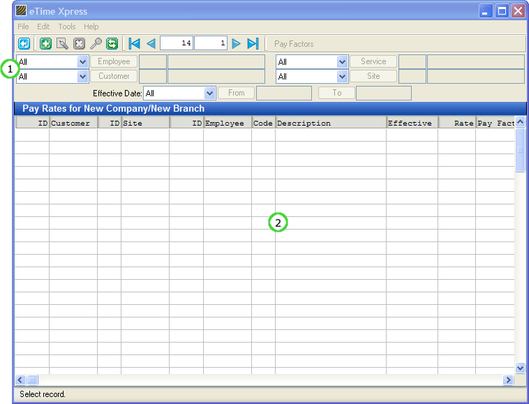
Branch Combination Pay Rates Screen
Annotation | Description |
(1) Filter | Controls the subset of combination pay rate records to be loaded the browser view. Options include setting the Employee, Customer, Site, Service and Effective Dates. |
(2) Rate Listing | Lists combination pay rate records. Click the Refresh button update the display. |
To Add ( ![]() ), Update (
), Update ( ![]() ), or Delete (
), or Delete ( ![]() ) a Combination Pay Rate, click the corresponding buttons in the toolbar. When entering a new pay rate you can define the Customer, Site, Employee, Service, Effective Date and the applicable pay rates. You may define 'All' for Customer, Sites and Employees by entering '0' and 'All' for Services by entering '*'.
) a Combination Pay Rate, click the corresponding buttons in the toolbar. When entering a new pay rate you can define the Customer, Site, Employee, Service, Effective Date and the applicable pay rates. You may define 'All' for Customer, Sites and Employees by entering '0' and 'All' for Services by entering '*'.
The Effective Date allows you to define current and future pay rates. When calculating payroll, eTime Xpress will apply the pay rate in effect on the date of the shift.
Viewing Combination Pay Rates
- Specify the applicable filters for the rate records you want to view.
Filter | Description |
Employee, Customer, Site and Service Pull-Down | All = No not filter based on that field |
Employee | Enter an Employee ID. |
Service | Enter a Service code. |
Customer | Enter a Customer ID. |
Site | Enter a Site ID. |
From/To Dates | Specify the effective date range. |
Effective Date Pull-Down | All = No not filter based on that field |
- Click the Refresh button ( ).
Combination Pay Rate Tie Break/Priority Rules
Combination pay rates allow you to assign a pay rate based on a shift's customer, site, employee and service values. Those values may be defined as specific or wild card values. As a result, more than one combination pay rate may apply to a shift requiring prioritization rules as tie breakers.
The following tie break rules are applied in the following priority order when selecting between pay rates that are valid on the same shift:
Priority | Employee | Customer | Site | Service |
1 | √ | √ | √ | √ |
2 | √ | √ | √ | All |
3 | √ | √ | All | √ |
4 | √ | √ | All | All |
5 | √ | All | All | √ |
6 | √ | All | All | All |
7 | All | √ | √ | √ |
8 | All | √ | √ | All |
9 | All | √ | All | √ |
10 | All | √ | All | All |
11 | All | All | All | √ |
12 | All | All | All | All |
√ = Specific Value
All = Wild Card value
Example:
A basic scenario of 2 combination pay rates applying to the same shift would be as follows:
Combination Pay Rate | Employee | Customer | Site | Service |
Pay Rate #1 = $10 | Joe Doe | All | All | All |
Pay Rate #2 = $ 9 | All | All | All | On Call |
If Joe Doe is scheduled to perform On Call duties that shift satisfies the criteria for both combination pay rate #1 and #2.
Based on the priority table above, pay rate #1 would have priority rank of 6 while pay rate #2 would have priority rank of 11. The system would assign combination pay rate #1 of $10 to the shift.
Pay Rate Factors
When entering a Combination Pay Rate, eTime Xpress automatically applies the 'Default' Pay Factors defined for the Branch. If a Pay Rate requires a custom Pay Factor that is different than the 'Default' Pay Factor, select the Pay Rate and click the Pay Factors button in the Tool Bar. The custom Pay Factors dialog should appear as shown in the figure below. Custom Pay Rate Factors Window
Custom Pay Factors allow you to define new pay rate factors (Multipliers) or dollar amounts (Fixed Amounts) for each hour's type. Pay Rates using custom Pay Factors will be identified in the Combination Pay Rates screen as 'Custom' under the Pay Factor column.
Note: If shifts were created prior to defining Pay Rates or you are updating an existing Pay Rate, you will be asked whether you want to apply the new Pay Rate to existing shifts. Selecting 'Yes' will recalculate your payroll information with the new rate, where as selecting 'No' will apply the new rate only to newly created shifts.
3.8. Branch Bill/Pay Settings
The Branch Bill/Pay Settings allows you to define your baseline business rules for calculating overtime and pay factors. These rules are applied when calculating Shift Distributions for Scheduled and/or Worked shifts in a Branch.
A Shift Distribution is the breakdown of how a shift will be paid and billed. It separates the total hours of a shift into its components such as overtime, double overtime and statutory (holiday) hours.
From the Main Menu, click Configuration > Company & Branch > Bill/Pay Settings. The Branch Bill/Pay Settings Screen should appear as show in the figure below. 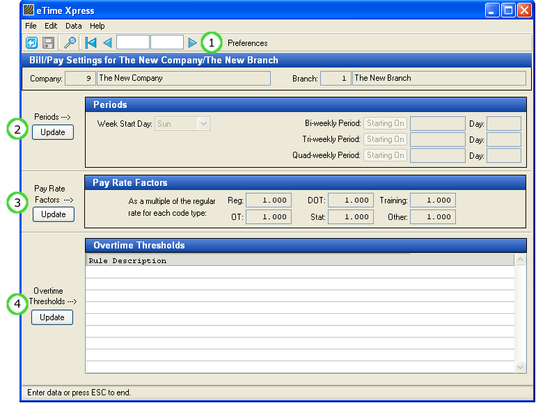
Branch Bill/Pay Settings with Annotations
Annotation | Description |
(1) Preferences | Setup advanced rules for processing bill and pay information. |
(2) Periods | Setup period start days for weekly, bi-weekly, tri-weekly and quad-weekly periods. |
(3) Pay Rate Factors | Setup pay rate factors for regular, overtime, double overtime, statutory, training and other hours. |
(4) Overtime Thresholds | Setup overtime thresholds for bill and/or pay calculations. |
3.8.1. Bill/Pay Preferences
Bill/Pay Preferences allow you to define advance rules for processing bill and pay to comply with specific labor contracts or legislative requirements. From Branch Bill/Pay Settings, click the Preferences button on the Toolbar. The Preferences dialog box should appear as shown in the figure below. 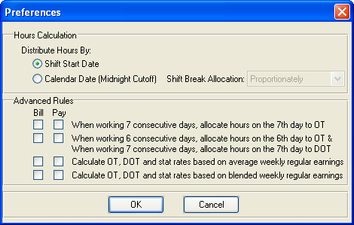
Setting Hours Calculation:
The hours calculation rule sets the cutoff rule when a shift ends the following calendar day (i.e. a graveyard shift from 10pm to 6am). It is a fundamental rule needed to correctly measure the number of hours worked in a day.
The Shift Start Date option will allocate the total hours of a shift to the date when the shift started. The Calendar Date (Midnight Cutoff) option will allocate the total hours of a shift proportionately between the shift date and the next day. The difference between the hours calculation options are illustrated below based on a graveyard shift from 10pm to 6am (8 hours).
Rule/Day | Shift Start Date Rule | Calendar Date Rule |
Current Day (Shift Date) | 8 Hours | 2 Hours |
Next Day | 0 Hours | 6 Hours |
Total Hours | 8 Hours | 8 Hours |
If the Calendar Date option is selected, use the "Shift Break Allocation" pull-down to define how you want to allocate break hours between the Current Day (Shift Date) and Next Day.
Break Allocation | Description |
Proportionately | Allocates shift break hours proportionately between the Current Day and Next Day (i.e. a 10pm to 6am shift would allocate break hours as 2/8 Current Day and 6/8 Next Day). |
Current Day | Allocates all shift break hours to the Current Day (shift date). |
Next Day | Allocates all shift break hours to the Next Day. |
Evenly | Allocates shift break hours 50/50 between the Current Day and Next Day. |
Middle of Shift | Allocates shift break hours based on the date when the mid-point of the shift occurs (i.e. a 10pm to 6am shift would allocate all break hours to the Next Day). |
Advanced Rules: eTime Xpress provides additional advanced hours allocation and rate calculation options to accommodate certain labor contracts or legislative requirements. To enable an advanced rule for bill and/or pay, check-on the applicable checkbox. This allows you to Pay Employees and Bill Customers differently for the same shift.
Advanced Rule | Description |
When working 7 consecutive days, allocate hours on the 7th day to OT | Select rule if overtime rule applies when working 7 consecutive days. |
When working 6 consecutive days, allocate hours on the 6th day to OT & When working 7 consecutive days, allocate hours on the 7th day to DOT | Select rule if overtime rule applies when working 6 or 7 consecutive days. |
Calculate OT, DOT and Stat rates based on average weekly regular earnings | Select rule to calculate OT, DOT and Stat rates by the following formula: (weekly earnings/weekly hours) * applicable pay factor. |
Calculate OT, DOT and Stat rates based on blended weekly regular earnings | Select rule to calculate OT, DOT and Stat rates by the following formula: Regular rate + [(weekly earnings/weekly hours) * (applicable pay factor-1)]. |
3.8.2. Bill/Pay Periods
Overtime is calculated when the number of hours over a period exceeds a specified threshold. If you are configuring a Weekly, Bi-weekly, Tri-weekly and/or Quad-weekly overtime rule, you are required to specify the starting point for the applicable period. To specify a Bill/Pay Period, click on the Update button under Periods and define the start date of the applicable period(s).
Note: For Bi-weekly, Tri-weekly and/or Quad-weekly periods, specify a start date corresponding to a period that starts and ends prior to your first scheduled shift. eTime Xpress will then extrapolate the start and end dates of all future periods.
3.8.3. Pay Rate Factors
Pay rates may be grossed up by a multiple or factor based on the hours type listed below. To specify Pay Rate Factors, click on the Update button under Pay Factors and define the applicable multiple or factor.
Hours Type | Description |
Reg | Regular Hours |
OT | Overtime Hour |
DOT | Double Overtime Hours |
Stat | Statutory (Holiday) Hours |
Training | Training Hours |
Other | Other (Miscellaneous) Hours |
3.8.4. Overtime Thresholds
Overtime Thresholds allow you to define overtime rules based on daily, weekly, bi-weekly, tri-weekly, quad-weekly and monthly periods.
To Add an Overtime Threshold:
- Click the Update button under Overtime Thresholds. The Branch Rule Settings screen for Hours Type Thresholds should appear.
- Follow the configuration instructions for Hours Type Thresholds under Branch Rule Settings.
3.9. Branch Rule Settings
Branch Rule Settings allow the definition of system rules governing certain validations, processes and calculations performed by the application. Filters can then be defined to apply system rules only when specified conditions are met.
Some examples of how the branch rules engine can be used are:
- Defining different overtime rules for employees or groups of employees;
- Defining weekday and weekend overtime rules;
- Restricting shifts and/or defining shift qualifications by employee, customer, site, time of day, weekday or any combination of criteria;
- Defining age restrictions for certain types of shifts.
From the Main Menu, click Configuration > Company & Branch > Branch Settings > Branch Rule Settings. The Branch Rule Settings screen should appear as shown in the figure below. 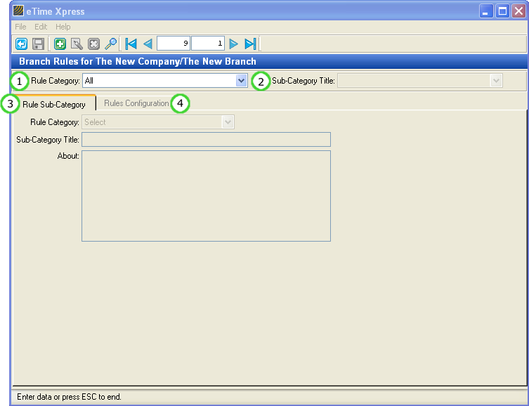
Rule Sub-Category Tab on Branch Rules Screen
Annotation | Description |
(1) Rule Category | Select the type of rule. |
(2) Sub-Category Title | Select the specific rule by user definable name. |
(3) Rule Sub-Category | Define the rule sub-category options and name (Sub-Category Title). |
(4) Rules Configuration | Define rule properties, values and filter criteria. |
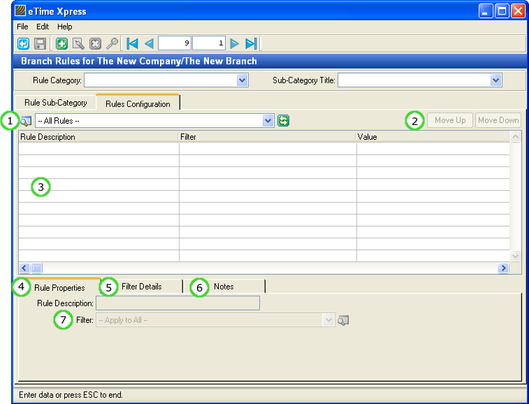
Rules Configuration Tab on Branch Rules Screen
Annotation | Description |
(1) Rule Views | Define custom list views to see specific sets of rules (see Filters in Global Features Guide). |
(2) Ordering Controls | Define the order in which rules are to be processed. |
(3) Rule Listing | Listing of rules matching rule and filter view selected. |
(4) Rules Properties | Define rule values and filter to be applied. |
(5) Filter Details | Text description of filter. |
(6) Notes | User definable notes for rule. |
(7) Filter | Select or define filtering criteria for rule (see Filters in Global Features Guide). |
3.9.1. Hours Type Thresholds
Hours Type Thresholds allow you to define business rules based on the number of shift hours scheduled and/or worked by an employee.
To create an Hours Type Threshold Sub-Category:
- Click the Add button ( ) on the Tool Bar - the fields in the Rule Sub-Category Tab should become active.
- For Rule Category, select Hours Type Thresholds.
- For Sub-Category Title, specify a name or description for the rule. Specify a name which will allow you to easily identify the type of rule and its options. A description incorporating the Type, Period and Hours Type is recommended.
- For Type, select Billing or Payroll to define if the hours type threshold will be applied when calculating billing or payroll information.
- For Period, select the time period (i.e. daily, weekly, bi-weekly etc.) over which hours are to be calculated.
- For Hours Type, select Overtime or Double Overtime.
- Click the Save button ( ) to save your new Rule Sub-Category record. If there are no rule options then only one rule sub-category record will exist.
- Read the About information for details on how the Branch Rule will be applied.
To add an Hours Type Threshold Rule:
- For Rule Category, select Hours Type Thresholds.
- For Rule Sub-Category, select the applicable Rule Sub-Category.
- Click the Rules Configuration tab.
- Click the Add button ( ) on the Tool Bar - the fields in the Rule Properties Tab should become active.
- Specify a Rule Description, Filter (see Filters in Global Features Guide) and an hours threshold amount.
- Click the Save button ( ) to save your new Branch Rule.
- Specify the rule priority using the ordering controls (Move Up and Move Down buttons) to define when the rule should be run, if required. Hours Type Threshold rules are processed on a 'First Match' basis (see Appendix 2 – Rule Processing).
3.9.2. Shift Qualifications
Shift Qualifications define the type of qualifications/skills required by an employee to work certain shifts. The system will validate that employees scheduled to shifts have the necessary qualifications/skills matching the shift qualification rule(s).
To create a Shift Qualification Sub-Category:
- Click the Add button ( ) on the Tool Bar - the fields in the Rule Sub-Category Tab should become active.
- For Rule Category, select Shift Qualifications.
- For Sub-Category Title, specify a name or description for the rule. Specify a name which will allow you to easily identify the type of rule and its options.
- Click the Save button ( ) to save your new Rule Sub-Category record. If there are no rule options then only one rule sub-category record will exist.
- Read the About information for details on how the Branch Rule will be applied.
To add a Shift Qualification Rule:
- For Rule Category, select Shift Qualifications.
- For Rule Sub-Category, select the applicable Rule Sub-Category.
- Click the Rules Configuration tab.
- Click the Add button ( ) on the Tool Bar - the fields in the Rule Properties Tab should become active.
- Specify a Rule Description, Filter (see Filters in Global Features Guide) and qualification codes (see Codes Maintenance to define Qualification Codes). The system will validate that employees scheduled to shifts have qualifications/skills codes matching the qualification requirements of the rule.
- Click the Save button ( ) to save your new Branch Rule.
- Specify the rule priority using the ordering controls (Move Up and Move Down buttons) to define when the rule should be run, if required. Shift Qualification rules are processed on a 'AND' basis (see Appendix 2 – Rule Processing).
3.9.3. Shift Restrictions
Shift Restrictions prevent the creation of certain types of shifts. Prior to creating a restricted shift, a warning or error message will be displayed.
To create a Shift Restriction Sub-Category:
- Click the Add button ( ) on the Tool Bar - the fields in the Rule Sub-Category Tab should become active.
- For Rule Category, select Shift Restrictions.
- For Sub-Category Title, specify a name or description for the rule. Specify a name which will allow you to easily identify the type rule and its options.
- Click the Save button ( ) to save your new Rule Sub-Category record. If there are no rule options then only one rule sub-category record will exist.
- Read the About information for details on how the Branch Rule will be applied.
To add a Shift Restriction Rule:
- For Rule Category, select Shift Restrictions.
- For Rule Sub-Category, select the applicable Rule Sub-Category.
- Click the Rules Configuration tab.
- Click the Add button ( ) on the Tool Bar - the fields in the Rule Properties Tab should become active.
- Specify a Rule Description, Filter (see Filters in Global Features Guide) and restriction code (see Codes Maintenance to define Restriction Codes).
- Click the Save button ( ) to save your new Branch Rule.
- Specify the rule priority using the ordering controls (Move Up and Move Down buttons) to define when the rule should be run, if required. Shift Restrictions rules are processed on a 'First Match' basis (see Appendix 2 – Rule Processing).
3.9.4. Self-Scheduling Start Time
Self-Scheduling Start Time allows you define which employees may select shifts published for self-scheduling in advance of a shift's self-scheduling publish time.
To create a Self-Scheduling Start Time Sub-Category:
- Click the Add button ( ) on the Tool Bar - the fields in the Rule Sub-Category Tab should become active.
- For Rule Category, select Self-Scheduling Start Time.
- For Sub-Category Title, specify a name or description for the rule. Specify a name which will allow you to easily identify the type of rule and its options.
- Click the Save button ( ) to save your new Rule Sub-Category record. If there are no rule options then only one rule sub-category record will exist.
- Read the About information for details on how the Branch Rule will be applied.
To add a Self-Scheduling Start Time Rule:
- For Rule Category, select Self-Scheduling Start Time.
- For Rule Sub-Category, select the applicable Rule Sub-Category.
- Click the Rules Configuration tab.
- Click the Add button ( ) on the Tool Bar - the fields in the Rule Properties Tab should become active.
- Specify a Rule Description, Filter (see Filters in Global Features Guide) and the amount of lead time in minutes.
- Click the Save button ( ) to save your new Branch Rule.
Specify the rule priority using the ordering controls (Move Up and Move Down buttons) to define when the rule should be run, if required. Self-Scheduling Start Time rules are processed on a 'First Match' basis (see Appendix 2 – Rule Processing).
3.9.5. Shift Locations
Shift Locations allows you to auto-assign a location type to a shift. When a shift's location field is blank, the system will attempt to auto-assign a location type based on the branch's shift location rules.
To create a Shift Locations Sub-Category:
- Click the Add button ( ) on the Tool Bar - the fields in the Rule Sub-Category Tab should become active.
- For Rule Category, select Shift Locations.
- For Sub-Category Title, specify a name or description for the rule. Specify a name which will allow you to easily identify the type of rule and its options.
- Click the Save button ( ) to save your new Rule Sub-Category record. If there are no rule options then only one rule sub-category record will exist.
- Read the About information for details on how the Branch Rule will be applied.
To add a Shift Locations Rule:
- For Rule Category, select Shift Locations.
- For Rule Sub-Category, select the applicable Rule Sub-Category.
- Click the Rules Configuration tab.
- Click the Add button ( ) on the Tool Bar - the fields in the Rule Properties Tab should become active.
- Specify a Rule Description, Filter (see Filters in Global Features Guide) and Location type to be assigned.
- Click the Save button ( ) to save your new Branch Rule.
Specify the rule priority using the ordering controls (Move Up and Move Down buttons) to define when the rule should be run, if required. Shift Locations rules are processed on a 'First Match' basis (see Appendix 2 – Rule Processing).
3.9.6. Minimum Rest Period
Minimum Rest Period allows you to define a minimum time period between shifts.
To create a Minimum Rest Period Sub-Category:
- Click the Add button ( ) on the Tool Bar - the fields in the Rule Sub-Category Tab should become active.
- For Rule Category, select Minimum Rest Period.
- For Sub-Category Title, specify a name or description for the rule. Specify a name which will allow you to easily identify the type of rule and its options.
- Click the Save button ( ) to save your new Rule Sub-Category record. If there are no rule options then only one rule sub-category record will exist.
- Read the About information for details on how the Branch Rule will be applied.
To add a Minimum Rest Period Rule:
- For Rule Category, select Minimum Rest Period.
- For Rule Sub-Category, select the applicable Rule Sub-Category.
- Click the Rules Configuration tab.
- Click the Add button ( ) on the Tool Bar - the fields in the Rule Properties Tab should become active.
- Specify a Rule Description, Filter (see Filters in Global Features Guide) and Location type to be assigned.
- Click the Save button ( ) to save your new Branch Rule.
Specify the rule priority using the ordering controls (Move Up and Move Down buttons) to define when the rule should be run, if required. Minimum Rest Period rules are processed on a 'First Match' basis (see Appendix 2 – Rule Processing).
3.10. Branch Statutory Days
When a shift occurs on a Statutory Day (Holiday), the associated hours may be broken-out as Statutory hours for billing and/or payroll purposes. Statutory days can be setup to apply to all shifts worked at a Branch or customized to apply to specific Employees and Sites.
From the Main Menu, click Configuration > Company & Branch > Branch Settings > Branch Statutory Days. The Branch Statutory Days screen should appear as shown in the figure below. 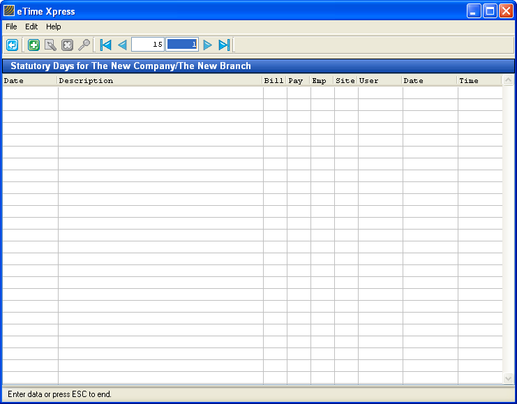 Branch Statutory Days
To Add a Statutory Day:
- Click the Add button ( ) on the Tool Bar - the fields in the Statutory Days browser should become active.
- Assign the Date, Description, Bill (Yes/No), Pay (Yes/No), Employee (Yes/No) and Site (Yes/No) as shown in the figure below. Remember for fields that require entry by codes, you may press the F5 key to bring up a list of valid entries.
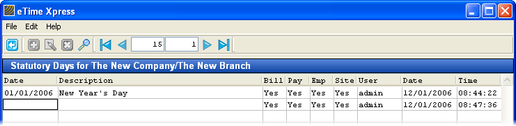
- Press the Enter key to save your new Statutory Day record.
Note: For each Statutory Day, you can define how a Statutory Day rule is applied by toggling between Yes and No for Bill, Pay, Employee and Site. For example, the combination Bill (No), Pay (Yes), Employee (Yes) and Site (Yes) results in shifts being billed normally and paid as a Statutory Day.
3.10.1 Customizing Statutory Days for Employees and Sites
The Employee (Yes/No) and Site (Yes/No) values of a Branch Statutory Day record are used as the initial 'Apply?' value in the Employee Statutory Days and Site Statutory Days screens, respectively. You can customize the Statutory Day rules for Employees and Sites by selecting which Statutory Days to 'Apply'.
To customize Employee Statutory Days:
From the Main Menu, click Employee > Employee Statutory Days. The Employee Statutory Days screen should appear as shown in the figure below. 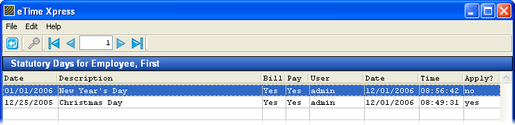 Employee Statutory Days
Employee Statutory Days lists all of the Statutory days defined for the Branch and whether a Statutory Day applies for bill or pay purposes. To turn off a Statutory Day rule, double-click on the record - the value in the 'Apply?' column will toggle between 'yes' and 'no'.
To customize Site Statutory Days:
From the Main Menu, click Customers > Site Statutory Days. The Site Statutory Days screen should appear as shown in the figure below. 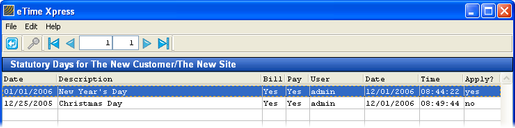 Site Statutory Days
Site Statutory Days lists all of the Statutory days defined for the Branch and whether a Statutory Day applies for bill or pay purposes. To turn off a Statutory Day rule, double-click on the record - the value in the 'Apply?' column will toggle between 'yes' and 'no'.
3.11. Branch Daylight Saving Times
When a shift occurs during a Daylight Savings Time change, the total hours of a shift can be automatically adjusted for the time change. A "spring" Forward rule would subtract one hour from a shift whereas a "fall" Back rule would add one hour to a shift.
From the Main Menu, click Configuration > Company & Branch > Branch Daylight Savings Times. The Branch Daylight Savings Time Changes screen should appear as shown in the figure below. 
Branch Daylight Savings Times
To Add a Daylight Savings Time Change:
- Click the Add button ( ) on the Tool Bar - the fields in the Daylight Savings Time Change browser should become active.
- Assign the Date, time of change and change type ("spring" Forward or "fall" Back). The time of change value is normally 0159 (01:59AM) in North America and 0059 (00:59AM) in the European Union.
- Press the Enter key to save your new Daylight Savings Time record.
3.12. Branch Break Thresholds
Unpaid breaks can be defined so that breaks are deducted from the shift's total hours when calculating billing and payroll information.
By default, you can enter breaks manually when you add or update a shift. Branch Break Thresholds simplifies the entry of breaks by auto-completing the Break field when a shift length exceeds a certain number of hours. When enabled, the Break field will be auto-completed after you specify the Start and End times of a shift (note: you may still override the break field by manually typing in the break).
From the Main Menu, click Configuration > Company & Branch > Branch Break Thresholds. The Branch Break Thresholds screen should appear as shown in the figure below. 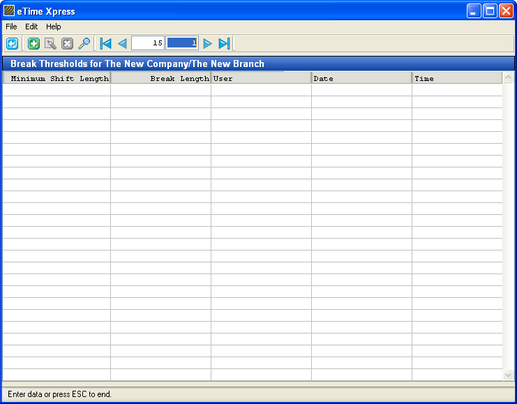
Branch Break Thresholds
To Add a Branch Break Threshold:
- Click the Add button ( ) on the Tool Bar - the fields in the Break Thresholds browser should become active.
- Assign the minimum shift length (hours) and the break length (hours).
- Press the Enter key to save your new Break Threshold record.
Note: Break Thresholds can also be defined at the Employee and Site level. To select which Break Threshold rules to apply, go to Site Main screen, select the applicable Site, click the Billing Settings tab and choose the applicable rule under the Break Thresholds field.
3.13. Branch Time Off Debit Thresholds
When Time Off records are entered, the Debit Amount is the number of hours to be charged against an Employee's Time Off entitlement balance. For example, if an Employee is away on sick leave, the Employee would be unavailable for the entire day (24 hour period) but the Debit Amount would only be up to the standard work day of say 8 hours.
By default, you can enter Debit Amounts manually when you add or update a Time Off record as shown in the figure below.  Time Off Schedule – Time Off Record Entry
Branch Debit Thresholds simplifies the entry of debit amounts by auto-completing the debit amount field when a Time Off record exceeds a certain number of hours. When enabled, the Debit Amount field will be auto-completed after you specify the Start and End times when entering a Time Off record (note: you may still override the Debit Amount field by manually typing in the debit amount).
From the Main Menu, click Configuration > Company & Branch > Branch Time Off Debit Thresholds. The Branch Time Off Debit Thresholds screen should appear as shown in the figure below. 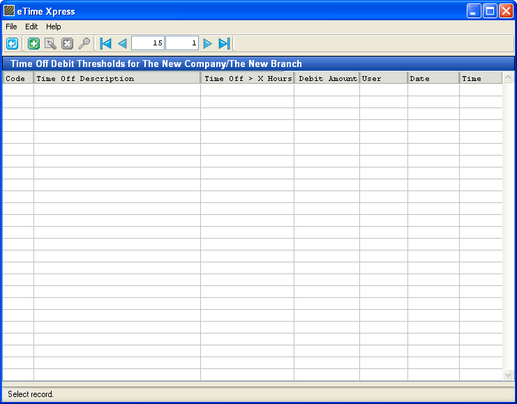 Branch Time Off Debit Thresholds
To Add a Branch Time Off Debit Threshold:
- Click the Add button ( ) on the Tool Bar - the fields in the Time Off Debit Thresholds browser should become active.
- Assign the Time Off code (enter '*' for All Time Off types), minimum Time Off length (hours) and the Debit Amount (hours).
- Press the Enter key to save your new Time Off Debit Threshold record.
Note: If the debit amount is entered as zero, the system will calculate the debit amount to be equal to the total length of the time off period. To allow for zero debit amounts, create a Time Off Debit Threshold where Time Off code = '*', minimum Time Off length = 0 and the Debit Amount = 0.
3.14. Branch Recurring Allowances
Recurring Allowances are rules that can be created to automatically attach allowances (i.e. mileage, meals etc.) based on predefined shift criteria.
From the Main Menu, click Configuration > Company & Branch > Branch Recurring Allowances. The Branch Recurring Allowances screen should appear as shown in the figure below. 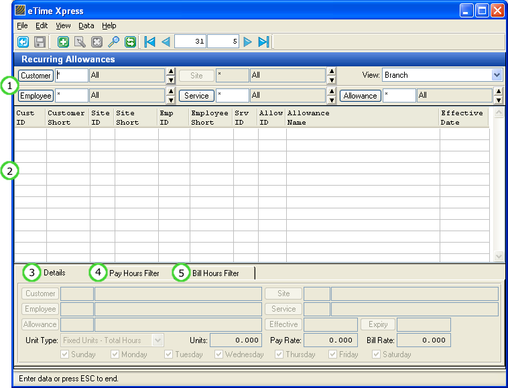 Recurring Allowances
Annotation | Description |
(1) View Selector | Specify the Recurring Allowance Rules to view. Enter "*" to display All records (i.e. Customer, Site, Employee, Service and Allowance). |
(2) Allowance Rules | Displays applicable Recurring Allowance Rules. |
(3) Allowance Details Tab | Define the shift criteria, allowance type, unit calculation, pay rate and bill rate. |
(4) Pay Hours Filter Tab | Define pay hours sum rule and evaluative condition to be applied. |
(5) Bill Hours Filter Tab | Define bill hours sum rule and evaluative condition to be applied. |
To Add a Recurring Allowance:
- Click the Add button ( ) on the Tool Bar - the fields under Allowance Details tab should become active.
- Define Shift Criteria. Specify the shifts you want to apply the recurring allowance by defining the Customer, Site, Employee and Service requirements (enter '*' for All). Remember for fields that require entry by codes, you may press the F5 key to bring up a list of valid entries.
- Define Allowance Type. Specify the type of allowance.
- Define Effective Date. Specify the effective and expiry date of the shift allowance. If the shift allowance does not expire then leave the expiry date blank.
- Define Unit Calculation. Select the unit calculation rule. The unit is basis for the allowance and is multiplied by the shift pay/bill allowance rate to calculate the total allowance.
Unit Type | Description |
Fixed Units | Define flat amount in the Unit field. |
Total Hours | Calculates allowance based on total hours of a shift. |
Fixed Units - Total Hours | Calculates allowance based on a defined flat amount less the total hours of a shift. |
Total Hours - Fixed Units | Calculates allowance based on the total hours of a shift less a defined flat amount. |
Total Hours * Fixed Units | Calculates allowance based on the total hours of a shift multiplied by defined flat amount. |
- Define Allowance Rates. Specify pay and bill rates for the allowance.
- Define Day Criteria. Specify the days of the week that qualify for the allowance.
- Click the Pay Hours Filter and/or Bill Hours Filter tab to define the shift hours sum rule - you may define the hours filter to sum by specific hours types. By default, all hours types will be summed. Next, select the evaluative condition to be applied in order to qualify for the allowance - leave the 'Hours Over' or 'Hours Under' as zero if there are no hour limitations.
Item | Description |
Hours Type | Specify the type of hours to be summed when applying the allowance. |
Hours | Select the threshold hours condition.If Over, applies the allowance if the summed hours are over or equal to the specified threshold. |
Over/Under | Specify the threshold hours amount. |
- Click the Save button ( ) to save your new Recurring Allowance.
To Apply Recurring Allowances:
- From Time & Attendance, click Tools > Recurring Allowances from the Menu bar.
- Specify the date range to calculate Recurring Allowances and click the Apply button. Allowances will be attached to shifts according to your Recurring Allowance rules.
Note: To define Allowance codes go to Administration menu > Configuration > Codes Maintenance. From the Codes Maintenance screen, select 'Shift Allowance Code' and click the Add button to create a new Allowance Code.
3.15. Branch Accruals
Accruals allow you to configure complex formulas to automatically calculate accrual balances such as holiday, sick time and other entitlements. Please refer to the Accruals User Guide for more information.
The Accruals module in eTime Xpress requires additional licensing. If you wish to purchase the Accruals Module, please contact your Celayix Software Sales Representative.
3.16. Branch Message Types
In the Visual Scheduler of eTime Xpress, shifts are validated against your business rules to reduce errors and to meet your scheduling objectives. The standard Business Rules validated by eTime Xpress can be found in the Branch Message Types screen.
From the Main Menu, click Configuration > Company & Branch > Branch Message Types. Branch Message Types should appear as follows:
Validation | Description |
Shift Exceeds Counter | The number of shifts exceeds the coverage requirements pre-defined in the Shift Counters (see Using Shift Counters). |
Employee is Double Booked to a Shift | The Employee is has already booked during that time. |
Employee Budget Exceeded | The shift will cause the total number of hours budgeted for the Employee to be exceeded (see Employee Main Screen > Pay Settings Tab). |
Minimum Rest Period Between Shifts | There is insufficient time between shifts necessary for rest. |
Location Travel Time | There is insufficient time between shifts necessary for travel. |
Max Pay Rate Exceeded | The Pay Rate of the scheduled Employee exceeds the pay guidelines for the Site (see Site Main Screen > Pay Settings Tab). |
Employee Failed Shift Qualifications | The scheduled Employee does not have the required Qualifications to work at the shift (see Employee User Guide > Employee Qualifications and Administrator Guide > Branch Rules Setting > Shift Qualifications). |
Shift is Restricted | The shift is restricted (Administrator Guide > Branch Rules Setting > Shift Restrictions). |
Site Budget exceeded | The shift will cause the total number of hours budgeted for the Site to be exceeded (see Site Main Screen > Bill Settings Tab). |
Employee has Time Off | The scheduled Employee has time off booked (see Using the Time Off Schedule). |
Employee has that Day Off | The scheduled Employee does not normally work on that day (see Employee Main Screen > File > Set Work Week). |
Employee has Requested that Time Off | The scheduled Employee has requested time off which has not been posted in the Time Off Schedule. |
Shift Self-Scheduled | The shift has been self-scheduled by an employee. |
Shift Published for Self-Scheduling | The shift has been published to employees as available for self-scheduling. |
When a validation fails, it can be classified as a Warning or Error. The proper classification of validations depends on the scheduling objectives of your organization. Generally, validations classified as Errors are limited to those business rules where zero tolerance is required.
Failed Validation Type | Description |
Warning | Scheduler has the option of 'Ignoring' the failed validation and can save the shift without changes. |
Error | Scheduler must correct the cause of the failed validation or "Reject" proposed shift. Schedulers are not permitted to "Ignore" validation Errors. |
Ignore | Business rule is not validated. |
To change whether a Failed Validation is processed as a Warning or Error:
- Double-click on the Validation or Message Type you want to update. The Message Type field should become editable.
- Specify Warning, Error or Ignore (click the F5 key to bring up a valid list of entries). Setting a Message Type to Ignore will permanently disable the validation.
- Press the Enter key to save your new changes.
3.17. Branch Colors
In the Visual Scheduler of eTime Xpress, shifts are color coded to highlight specific shift types or conditions. Shift colors can be customized to match your preferences.
The default shift color scheme is summarized in the figure below.
Shift Type | Description |
| Scheduled Shifts are set with blue text on a white background. |
| Scheduled Overtime Shifts are set with white text on a red background. |
| Worked Shifts are set with black text on a white background. |
| Worked Overtime Shifts are set with red text on a white background. |
| Locked Shifts are set with black text on a white background. |
| Locked Overtime Shifts are set with red text on a white background. |
| Open Shifts are set with black text on a yellow background. |
| Tentative Shifts are set with white text on a green background. |
From the Main Menu, click Configuration > Company & Branch > Branch Colors. The Branch Colors screen should appear as shown in the figure below. 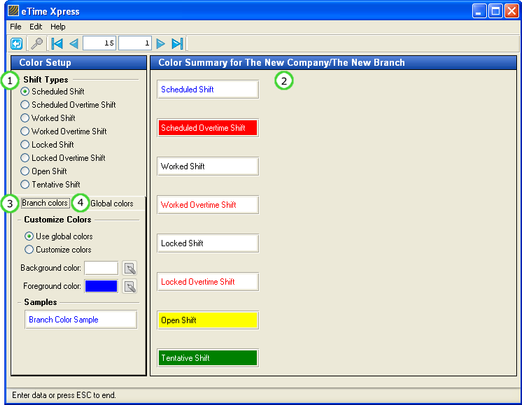 Branch Colors
Annotation | Description |
(1) Shift Type Selector | Setup advanced rules for processing bill and pay information. |
(2) Color Summary | Setup period start days for weekly, bi-weekly, tri-weekly and quad-weekly periods. |
(3) Branch Colors Tab | Setup pay rate factors for regular, overtime, double overtime, statutory, training and other hours. |
(4) Global Colors Tab | Setup overtime thresholds for bill and/or pay calculations. |
Branches are configured by default to apply the Global color scheme unless a custom color scheme is defined for the Branch. If you want to modify the default color scheme of all Branches, simply update Global colors.
To Update the shift colors of a Branch:
- Select the shift type (i.e. Scheduled Shift, Scheduled Overtime Shift etc.) you want to update.
- Select the Branch colors tab and click Customize colors.
- Define the Background color and Foreground color by clicking the respective Update buttons ( ).
To Update the Global colors:
- Select the shift type (i.e. Scheduled Shift, Scheduled Overtime Shift etc.) you want to update.
- Select the Global colors tab.
- Define the Background color and Foreground color by clicking the respective Update buttons ( ).
3.18. Branch E-mail Settings
eTime Xpress allows you to email schedules to your Employees, Customers or Sites. Schedules can be emailed by clicking Reports > Scheduling > Schedules. The Schedules Report dialog box should appear as shown in the figure below. 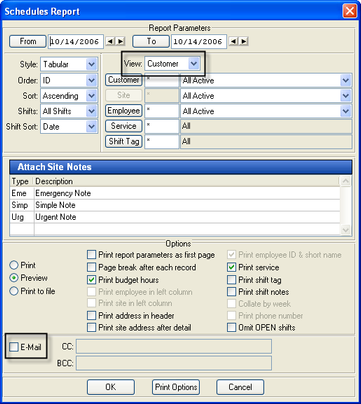 Schedules Report Dialog Box
To email schedules:
- Select Employee, Customer or Site from the View pull-down. Based on your selection, schedules will be sent to the email addresses defined under the Contact tab found in the Employee, Customer and Site Main screens, respectively.
- Specify the schedule to be sent by defining the applicable settings including style, sort order, notes and other options.
- Check-on the E-mail option and specify CC and BCC email addresses, if required. Click OK to start emailing schedules.
By default, eTime Xpress attempts to send emails using the Microsoft Outlook account active on your PC. If you wish you sent emails using a SMTP server, you may configure your SMTP settings by going to the Main Menu and clicking Configuration > Company & Branch > Branch E-mail Settings. The Branch E-mail Settings Screen should appear as shown in the figure below. 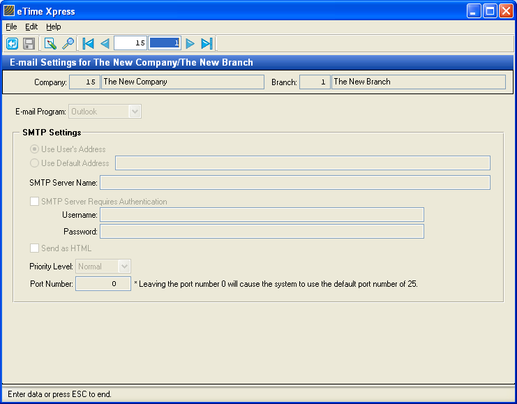 Branch E-mail Settings
Item | Description |
E-mail Program | Select Outlook to use Microsoft Outlook to email schedules.Select SMTP to use a SMTP server to email schedules. |
Use User's Address | Define the From address to be email address defined for the User under User Security. |
Use Default Address | Specify From address to attach to emailed schedules. |
SMTP Server Name | Specify URL or IP address of SMTP server. |
SMTP Authentication | If SMTP server requires authentication, specify username and password. |
Send as HTML | Select if emails are to be sent in HTML format. |
Priority Level | Specify priority level. |
Port Number | Specify the port number to be used when accessing the SMTP server. |
Note: To configure your SMTP settings, please consult your network administrator.
3.19. Branch Alert Settings
If you have licensed the Alert feature of Voice Xpress, you will need to specify the program to be used to send emails.
From the Main Menu, click Configuration > Company & Branch > Alert Settings. The Branch Alert E-mail Settings screen should appear as shown in the figure below. 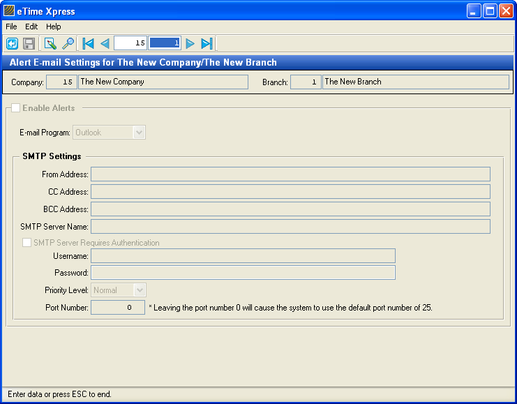 Branch Alert Settings
Item | Description |
E-mail Program | Specify email program. |
From Address | Define the From address. |
CC Address | Define the CC address. |
BCC Address | Define the CC address. |
SMTP Server Name | Specify URL or IP address of SMTP server. |
SMTP Authentication | If SMTP server requires authentication, specify username and password. |
Priority Level | Specify priority level. |
Port Number | Specify the port number to be used when accessing the SMTP server. |
Note: To configure your SMTP settings, please consult your network administrator.
3.20. Branch Services
Service is one of the primary objects used to define a shift - it is the 'what' or the action to be performed by an Employee. The Services relevant to your organization should be created before scheduling shifts.
From the Main Menu, click Configuration > Company & Branch > Branch Codes > Branch Services. The Branch Services screen should appear as shown in the figure below. 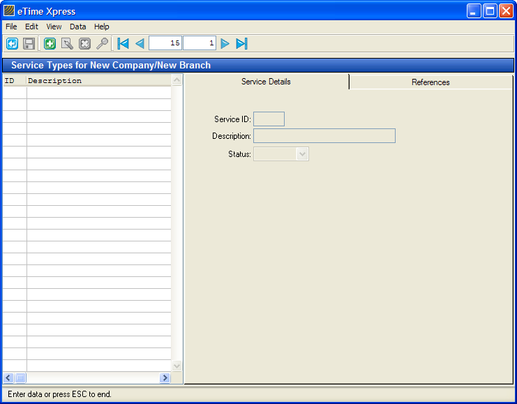 Branch Services
To Add a Branch Service:
- Click the Add button ( ) on the Tool Bar - the fields under Service Details should become active.
- Assign the Service ID, Description and Status (Active).
- Click the Save button ( ) to save your new Service record.
3.20.1. Importing/Exporting Branch Services
eTime Xpress allows Branch Services to be imported or exported from/to a .CSV file.
From the menu bar in the Branch Services screen, click File > Import or Export. Select the Standard Format and click OK.
For more information on importing or exporting data from eTime Xpress, see the Global Features Guide.
3.20.2. Branch Service References
Service References are fields that let you add information to a Service record for use in other applications. In some cases, you may want to describe additional Service information not found in the standard fields of eTime Xpress. These References can be selected to appear in Reports, used as a linking ID when exporting to 3rd party applications and to create record filters.
To define a Service Reference:
- From the Branch Services Screen, select a service and click the update button.
- Click on the References tab.
- Click the Save button to save the new References.
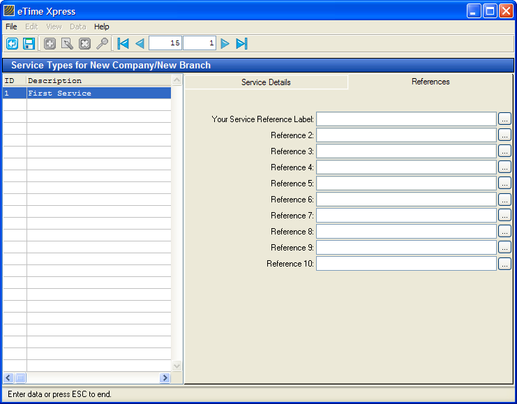
Note: To replace the labels (i.e. Reference 1, Reference 2, Reference 3…) in the Service References tab, go to the eTime Xpress Main screen and click Configuration > Codes Maintenance (requires user with Administrator rights). From the Codes Maintenance screen, select 'External Srv Ref.' and then add a new Code with a matching number and description. The number in the Code field is the numeric label you want to replace and the description is the new label.
Service reference values can be added to lookups by selecting External Srv Ref. 1-10 Lookup in Codes Maintenance and adding applicable reference values.
3.21. Branch Locations
eTime Xpress allows you to create Branch Location types that can be assigned to shifts (i.e. cities, regions, buildings etc.). Travel times can then be defined between locations to ensure there is sufficient time left between shifts to accommodate for travel.
From the Main Menu, click Configuration > Company/Branch > Branch Codes > Branch Locations. The Branch Locations screen should appear as shown in the figure below. 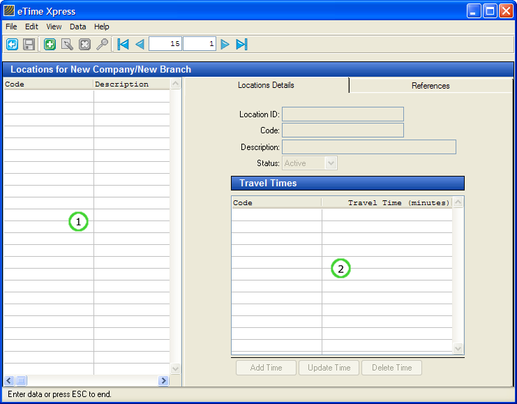 Branch Location Codes with Annotations
Annotation | Description |
(1) Location Codes | Displays locations. |
(2) Travel Times | Displays time required to travel between locations. |
To create Location types:
- From the Branch Location screen, click the Add button ( ).
- Specify the Location Code, Description and Status (Active).
- Click the Save button ( ) to save the new Location code.
To create Travel Times:
- From the Branch Locations screen, select the applicable Location code and click the Add Time button.
- Specify another Location code and travel time in minutes. Remember for fields that require entry by codes, you may press the F5 key to bring up a list of valid entries.
3.21.1. Importing/Exporting Branch Locations
eTime Xpress allows Branch Locations to be imported or exported from/to a .CSV file.
From the menu bar in the Branch Locations screen, click File > Import or Export. Select the Standard Format and click OK.
For more information on importing or exporting data from eTime Xpress, see the Global Features Guide.
3.21.2. Branch Location References
Location References are fields that let you add information to a Location record for use in other applications. In some cases, you may want to describe additional Location information not found in the standard fields of eTime Xpress. These References can be selected to appear in Reports, used as a linking ID when exporting to 3rd party applications and to create record filters.
To define a Location Reference:
- From the Branch Locations Screen, select a location and click the update button.
- Click on the References tab.
- Click the Save button to save the new References.

Note: To replace the labels (i.e. Reference 1, Reference 2, Reference 3…) in the Location References tab, go to the eTime Xpress Main screen and click Configuration > Codes Maintenance (requires user with Administrator rights). From the Codes Maintenance screen, select 'External Loc Ref.' and then add a new Code with a matching number and description. The number in the Code field is the numeric label you want to replace and the description is the new label.
Location reference values can be added to lookups by selecting External Loc Ref. 1-10 Lookup in Codes Maintenance and adding applicable reference values.
3.22. Branch Time Off Codes
eTime Xpress allows you to create the Time Off types applicable to your organization (i.e. days off, maternity leave, vacation time, sick days, personal leave days etc.). Time Off statuses (i.e. pending, rejected, approved etc.) allow you to setup an authorization process for Time Off requests.
From the Main Menu, click Configuration > Company/Branch > Branch Codes > Time Off Codes. The Time Off Codes screen should appear as shown in the figure below. 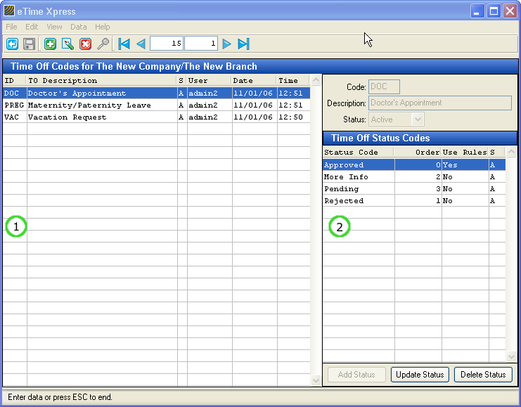
Branch Time Off Codes with Annotations
Annotation | Description |
(1) Time Off Type | Displays Time Off record types. |
(2) Time Off Status | Displays Time Off statuses associated with a record type. Each Time Off type may have different Time Off statuses. |
To create Time Off types:
- From the Time Off Codes screen, click the Add button ( ).
- Specify the Time Off Code, Description and Status (Active).
- Click the Save button ( ) to save the new Time Off code.
To create Time Off Statuses:
- From the Menu bar in Time Off Codes screen, click File > Status Setup. The Status Setup screen should appear as shown in the figure below.
- Click the Add button ( ) and specify the Time Off Status code, Description, Order and Status (Active). The Order field defines the logical sequence which the status should appear. For example, the order fields may be defined as follows: Draft (1), Submitted (2), Pending Review (3), Rejected (4) and Approved (5).
- Click the Save button ( ) to save the new Time Off Status code.

Time Off Status Codes
eTime Xpress allows you to define which statuses apply to specific Time Off types. Certain Time Off types may have only a single status type (i.e. sick days may always be Approved) where as others may require the full approval process to be followed (i.e. vacation requests).
To assign Time Off statuses to Time Off types:
- From the Branch Time Off Codes screen, select the applicable Time Off code and click the Add Status button.
- Specify the Status code, Order and Use Rules value. The Order value will be defaulted to the Order value defined in the Time Off Status Codes screen – you can update this value if required. Remember for fields that require entry by codes, you may press the F5 key to bring up a list of valid entries.
The 'Use Rules' field determines whether the Time Off type and status combination will be validated against the Working Schedule. If a Time Off record has 'Use Rules' set to 'Yes', Employees are prevented from being scheduled at that time. Generally, an Approved status type has 'Use Rules' set to 'Yes' and a Pending or Rejected status type has the 'Use Rules' set to 'No'.
3.23. Branch Time Sheet Status Codes
If you have licensed the Time Sheet feature of Web Xpress, you will need to define Time Sheet Status Codes (i.e. draft, submitted, approved, rejected etc.) for the purposes of authorizing Time Sheets.
From the Main Menu, click Configuration > Company/Branch > Branch Codes > Time Sheet Status Codes. The Time Sheet Status Codes screen should appear as shown in the figure below. 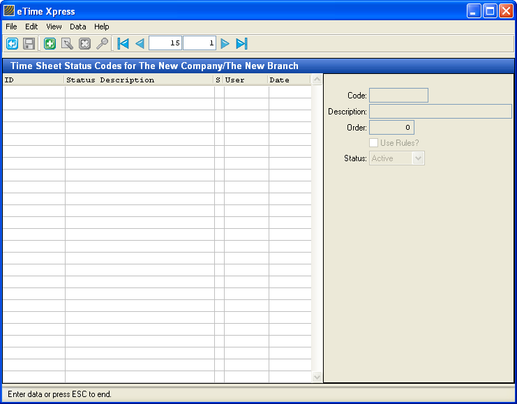
Branch Time Sheet Status Codes
To create Time Sheet Statuses:
- From the Branch Time Sheet Status Codes screen, click the Add button ( ) – the fields under Time Sheet Status Codes should become active.
- Specify the Time Sheet Status code, Description, Order, User Rules value and Status (Active). The Order field defines the logical sequence which the status should appear. For example, the order fields may be defined as follows: Draft (1), Submitted (2), Approved (3) and Rejected (4).
- Click the Save button ( ) to save the new Time Sheet Status code.
The 'Use Rules' field determines whether the Time Sheet Status code can be posted to the Time & Attendance records. For example, Approved may have the 'Use Rules' set to 'Yes' while Draft, Submitted and Rejected may have the 'Use Rules' set to 'No'.
3.24. Branch Shift Tag Sets
Shift Tags Sets are flags or classifications that can be attached to shifts so that they can be visually distinguished from other shifts. Shift Tag Sets allow you to customize shift colors and views of your schedule. For example, you can have a Shift Tag Set to distinguish "Indoor and Outdoor Shifts" or "Regular or Premium Shifts".
From the Main Menu, click Configuration > Company/Branch > Branch Codes > Branch Shift Tag Sets. The Branch Shift Tag Sets screen should appear as shown in the figure below. 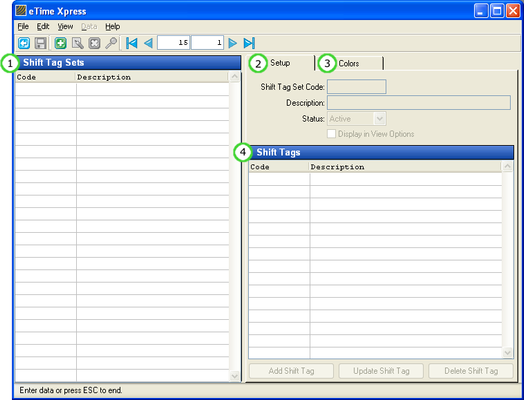 Branch Shift Tag Sets
Annotation | Description |
(1) Shift Tag Sets | Grouping of Shift Tags. |
(2) Setup Tab | Displays Shift Tag Set information and associated Shift Tags. |
(3) Colors Tab | Custom color scheme for Shift Tag Set. |
(4) Shift Tags | Shift Tags associated with Shift Tag Set. |
3.24.1. Shift Tags versus Shift Tag Sets
A Shift Tag is a special classification associated with a shift (i.e. Indoor, Outdoor, Regular, Premium etc.). A Shift Tag Set is a grouping of one or more Shift Tags (i.e. a relevant grouping may be a Premium and Outdoor classification).
eTime Xpress allows you to attach only a single Shift Tag Set to a shift record. That is, for a shift to have multiple Shift Tags, they must be defined within the applicable Shift Tag Set.
Shift Tag Sets can be applied from the Visual Scheduler when creating and updating shifts. Both Shift Tags and Shift Tag Sets can be used to generate schedule views. See the Scheduling User Guide for more information.
3.24.2. Add a Shift Tag
- From the Branch Shift Tag Sets screen, click File > Shift Tag Setup from the Menu bar. The Branch Shift Tag Setup screen should appear as shown in the figure below.
- Click the Add button ( ) and specify the Shift Tag Code, description, Status (Active) and 'Display in View Options' value. If the 'Display in View Options' is checked-on, the Shift Tag will appear in the Shift Type pull-down in the Visual Scheduler. This allows you to generate schedule view based on the Shift Tag.
- Click the Save button ( ) to save the new Shift Tag.
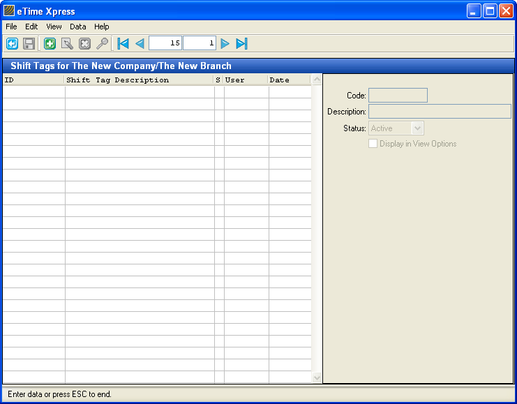 Branch Shift Tag Setup
3.24.3. Add a Shift Tag Set
- From the Branch Shift Tag Sets screen, click the Add button ( ) and specify the Shift Tag Set Code, description, Status (Active) and 'Display in View Options' value. If the 'Display in View Options' is checked-on, the Shift Tag Set will appear in the Shift Type pull-down in the Visual Scheduler. This allows you to generate schedule view based on the Shift Tag Set.
- Click the Save button ( ) to save the new Shift Tag Set.
3.24.4. Add Shift Tags to Shift Tag Sets
- From the Branch Shift Tag Sets screen, select a Shift Tag Set and click the Setup tab.
- Under the Shift Tags browser in the Setup tab, click the Add Shift Tag button – the fields in the Shift Tags browser should become active.
- Specify the applicable Shift Tag to be associated with the Shift Tag Set. Remember for fields that require entry by codes, you may press the F5 key to bring up a list of valid entries.
- Press the Enter key to save the Shift Tag to the Shift Tag Set.
3.24.5. Customize Colors for a Shift Tag Set
In the Visual Scheduler of eTime Xpress, shifts are color coded to highlight specific shift types or conditions. By default, Shift Tag Sets apply the same color scheme as defined under Branch Colors unless a custom color scheme is defined for the Shift Tag Set.
To Update the shift colors of a Shift Tag Set:
- From the Branch Shift Tag Sets screen, select a Shift Tag Set and click the Colors tab.
- Select the shift type (i.e. Scheduled Shift, Scheduled Overtime Shift etc.) you want to update.
- Select the Customize Tag Colors option.
- Define the Background color and Foreground color by clicking the respective Update buttons ( ).
4. Codes Maintenance
Many fields in eTime Xpress that require entry by codes are user definable. This allows you to define the terms and descriptions familiar to your organization. The list of user definable fields, definitions and where they are commonly used can be found in Appendix 3 - User Definable Codes.
From the Main Menu, click Configuration > Codes Maintenance. The Codes Maintenance screen should appear as shown in the figure below. 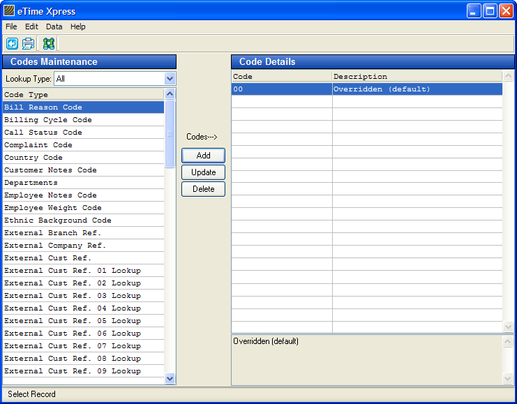 Codes Maintenance
To add a Code:
- From the Codes Maintenance screen, select the Code Type that you want to add a new Code. You can filter the code types by entity using the Lookup Type filter.
- Click the Add button – the fields under Code Details should become active.
- Specify the code and description.
- Press the Enter key to save the new code.
5. Control Center
eTime Xpress allows you to set security on the Control Center to manage what dates are accessible as well as add, update and delete permissions.
From the Main Menu, click Configuration > Control Center. The Control Center Security screen should appear as shown in the figure below. 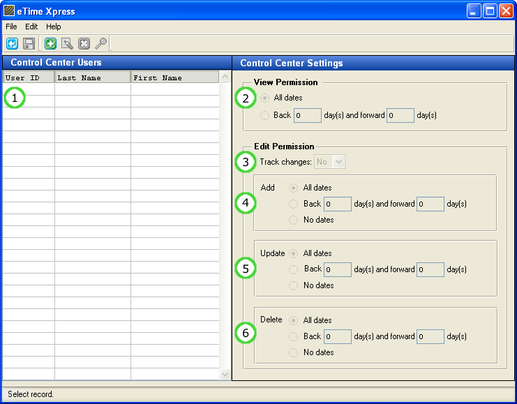 Control Center Security
Annotation | Description |
(1) User list | Specify Users which you want to apply security when accessing the Control Center. |
(2) View Permission | Set range of dates that can be viewed. |
(3) Track Changes | Specify if changes made by user should be logged. |
(4,5,6) Add, Update, Delete | Specify edit permissions and applicable date ranges. |
To set Control Center Security for a User:
- From the Control Center Security screen, the click the Add button ( ) – the field in the Control Center Users browser should become active.
- Specify a user ID. Remember for fields that require entry by codes, you may press the F5 key to bring up a list of valid entries.
- Press the Enter key to save the user to the Control Center Security screen.
- Select a user ID and click the Update button ( ) on the Tool Bar – the fields under Control Center Settings should become active.
- Specify the users Control Center Security permissions.
- Click the Save button ( ) to save the user permissions.
If you select to 'Track Changes', you can review changes made through the Control Center by going to Reports > Scheduling > Control Center > Changes.
6. Workstations (Configuring Autodialing)
eTime Xpress allows you to use your PC's modem to autodial employee phone numbers when performing call-outs. Your PC must have a modem connected to your telephone to use this feature. Autodialing may be run from various modules in eTime Xpress by clicking the telephone button ( ![]() ).
).
You are required to register the computer name of each workstation that you want to enable autodialing. From the Main Menu, click Configuration > Workstations. The Workstations screen should appear as shown in the figure below. 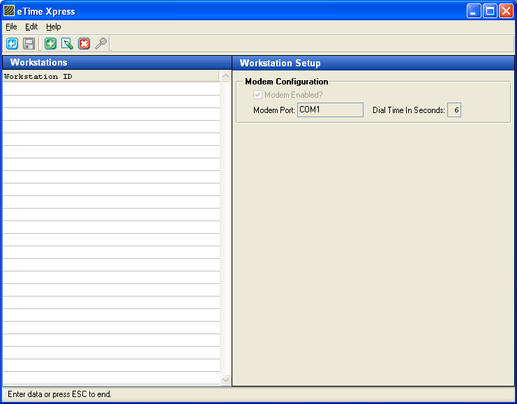
Workstation Setup
To register a Workstation for Autodialing:
- From the Workstations screen, the click the Add button ( ) – the field in the Workstation ID browser should become active.
- Specify the applicable computer name(s) which you want to enable autodialing. The computer name is the unique description which identifies the PC on your network. You may find this information under the System Properties of your PC.
- Press the Enter key to save the Workstation ID.
- Select a Workstation ID and click the Update button ( ) on the Tool Bar – the fields under Workstation Setup should become active.
- Check-on 'Modem Enabled' and update the Modem Port and Dial Time if required.
- Click the Save button ( ) to save the Workstation Setup.
7. Custom Labels
eTime Xpress allows certain objects within the application to be customized to match the terminology used by your organization.
From the Main Menu, click Configuration > Custom Labels. The Custom Labels screen should appear as shown in the figure below. 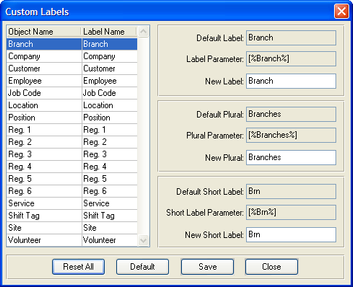 Custom Labels
Item | Description |
Object Name | Formal description of objects found within the application. |
Default Label, Plural and Short | Default label of objects. |
Label, Plural and Short Parameter | Parameter values are used when creating custom views in the Visual Scheduler to apply custom labels to user defined descriptions. For example, by naming a view "[%Branch%]", eTime Xpress will apply the custom label defined for the Branch object. |
New Label, Plural and Short | Specify edit permissions and applicable date ranges. |
8. Employee Types
Employee types allow you categorize Employees by groupings or types for searches, seniority and reporting.
From the Main Menu, click Configuration > Employee Types. The Employee Types screen should appear as shown in the figure below. 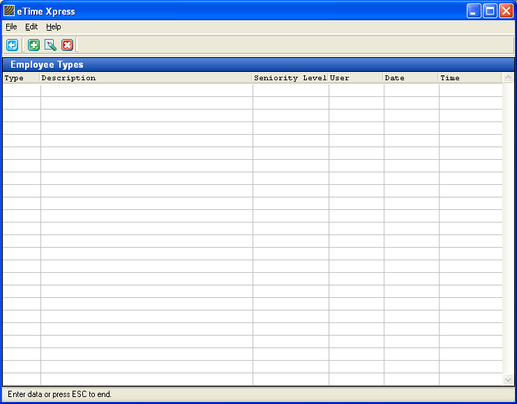 Employee Types
To add an Employee Type:
- From the Employee Types screen, click the Add button ( ) – the fields in the Employee Types browser should become active.
- Specify the Employee Type code, Description and Seniority Level. The Seniority Level is the numerical ranking of Employee Types with '1' being the most senior (i.e. seniority levels 2, 3, 4… are considered progressively less senior). A Seniority Level of '0' means that the Employee Type should be excluded when evaluating seniority.
- Press the Enter key to save the new Employee Type.
To assign an Employee to an Employee Type:
- From the Main Menu, click Employees > Pay Settings tab.
- Assign the Employee Type in the applicable field.
9. Seniority
The Visual Scheduler in eTime Xpress allows you to use seniority as a criterion when scheduling shifts - seniority may be defined according to a number of conditions.
From the Main Menu, click Configuration > Seniority. The Seniority screen should appear as shown in the figure below. 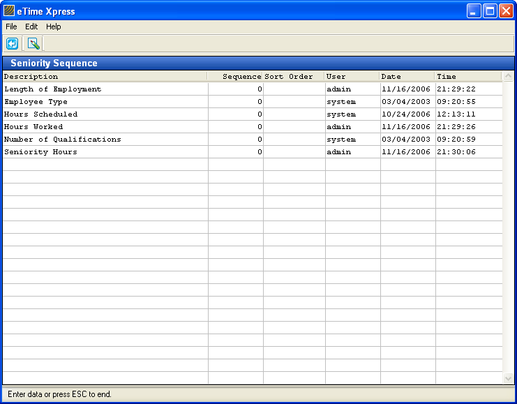 Seniority Setup
Seniority Rules | Where to Configure |
Length of Employment | Employee > History Tab > Start |
Employee Type | Employee > Pay Settings Tab > Emp Type |
Hours Scheduled | System will automatically sum scheduled hours of employees. |
Hours Worked | System will automatically sum worked hours of employees. |
Number of Qualifications | Employee > Employee Scheduling > Employee Qualifications |
Seniority Hours | Employee > Pay Settings Tab > Seniority Hours |
To define Seniority,
- Decide on the seniority rules you want to apply.
- Rank the seniority items by clicking the Update button ( ) on the Tool Bar and specifying a Sequence value. Sequence is the order in which the seniority rules should be applied. The system will try to rank Employees according to the first seniority rule and then apply successive seniority rules in tie break situations. A Sequence value of '0' will disable the seniority rule.
- Specify the Sort Order for a seniority rule as Ascending or Descending. Remember for fields that require entry by codes, you may press the F5 key to bring up a list of valid entries.
- Press the Enter key to save the seniority rule.
10. User Security
If multiple individuals are going to be using eTime Xpress, you may want to create a user account for each person or role accessing the software. You may restrict/grant user access depending on their responsibilities and position.
From the Main Menu, click Administration > Security > User Security - the User Security screen should appear as shown in the figure below. 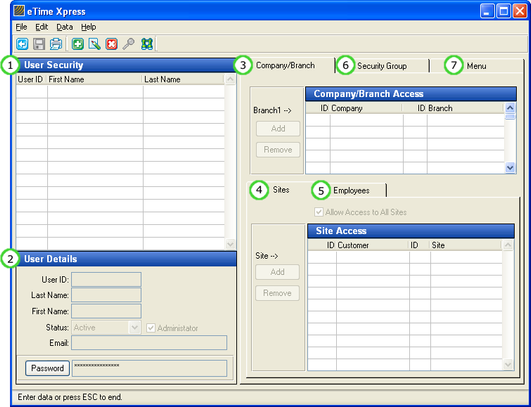
User Security
Annotation | Description |
(1) User list | List of User accounts. |
(2) User Details | Displays User account information. You can also reset the passwords by updating the User Details. |
(3) Company/Branch Tab | Specify the User's Company/Branch access rights. |
(4) Sites Tab | Specify the User's Customer/Site access rights. |
(5) Employees Tab | Specify the User's Employee access rights. |
(6) Security Group Tab | Specify the Security Groups to which the User is a member. |
(7) Menu Tab | Specify the User's Menu (module and feature) restrictions |
10.1. Add a New User
- From the User Security screen, click the Add button ( ) from the Tool Bar – the fields under User Details should become active.
- Enter the User ID (login name), Last Name, First Name, Status, Administrator value, Email and password. The user Status should be 'Active' - you can disable a user account by changing the account status to 'Inactive' or 'Void'. If you want the user to have Administrator rights, check-on the 'Administrator' checkbox.
- Click the Save button ( ) to save your new user. You will be asked to verify the password.
Note: Security restrictions may be set for users with administrator rights to hide records and modules. When a user is created with non-administrator rights, by default that user has access to all modules except for those found under Security and Configuration options. Non-administrators cannot be given access to security related modules.
10.2. Company/Branch Access
- From the User Security screen, select a User and click the Company/Branch tab.
- Click the Add button next to the Company/Branch Access browser.
- Specify the Company and Branch IDs to which the User should have access. Remember for fields that require entry by codes, you may press the F5 key to bring up a list of valid entries.
- Press the Enter key to save the Company/Branch access record.
Note: If the user has been granted Administrator rights, the user will always have All Company and Branches displayed.
10.3. Site Access
Before defining a user's Site Access rights, you must first specify the user's Branch Access.
- From the User Security screen, select a User and click the Company/Branch tab > Sites Tab.
- By default, the User will have access to all Sites. If the User should only have access to specific Sites, uncheck 'Allow Access to All Sites' and click the Add button next to the Site Access browser.
- Specify the Customer and Site IDs to which the User should have access. Remember for fields that require entry by codes, you may press the F5 key to bring up a list of valid entries.
- Press the Enter key to save the Site access record.
Note: If the user has been granted Administrator rights, the user will always have 'Allow Access to All Sites' checked-on.
10.4. Employee Access
Before defining a user's Employee Access rights, you must first specify the user's Branch Access.
- From the User Security screen, select a User and click the Company/Branch tab > Employees Tab.
- By default, the User will have access to all Employees. If the User should only have access to specific Employees, uncheck 'Allow Access to All Employees' and click the Add button next to the Employee Access browser.
- Specify the Employee IDs to which the User should have access. Remember for fields that require entry by codes, you may press the F5 key to bring up a list of valid entries.
- Press the Enter key to save the Employee access record.
Note: If the user has been granted Administrator rights, the user will always have 'Allow Access to All Employees' checked-on.
10.5. Menu Access (Modules and Features)
eTime Xpress allows you to specify User access to modules and/or features within a module. Security is defined according to Restrictions which means that a User will have access to a module or feature unless they are restricted.
To Restrict Menu Access:
- From the User Security screen, select a User and click the Menu Tab – the Menu Restrictions should appear as shown in the figure below.
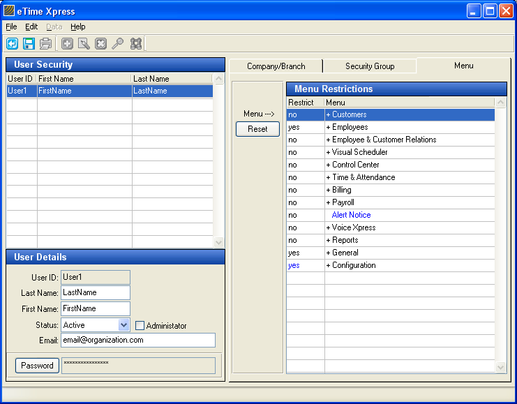
Restricting Menu Access
- By default, the User will have access to all Menu items (i.e. the user has no restrictions). If the User should only have access to specific modules or functions, double-click on the Restrict column next to an item that is to be restricted until it reads 'yes'.
Items proceeded by a ![]() symbol denotes additional sub-items. To view the sub-items, double-click the
symbol denotes additional sub-items. To view the sub-items, double-click the ![]() symbol. You may restrict sub-items by double-clicking on the Restrict column next to a sub-item until it reads 'yes'.
symbol. You may restrict sub-items by double-clicking on the Restrict column next to a sub-item until it reads 'yes'.
Note: If all sub-items are restricted, the 'yes' value next to a ![]() symbol will be displayed as a blue font. If only specific sub-items are restricted, the 'yes' value next to a
symbol will be displayed as a blue font. If only specific sub-items are restricted, the 'yes' value next to a ![]() symbol will be displayed as a black font.
symbol will be displayed as a black font.
10.6. Security Groups
Security Groups allow you to define a profile of access rights and menu restrictions. When a User is added to a Security Group, they automatically inherit the profile of the Security Group.
To Setup a Security Group:
- From the Menu bar in User Security screen, click Data > Security Groups > Security Group Details – the Security Groups screen should appear.
- Click the Add button ( ) from the Tool Bar – the fields in the Security Groups browser should become active.
- Specify the Group ID and Description.
- Click the Users tab to add Users to the Security Group.
- Click the Company/Branch tab to setup Company/Branch, Sites and Employee access rights.
- Click the Menu tab to setup module and feature restrictions.
Note: If a conflict exists between user security and group security records for site and employee permissions, the group security definition will win. For example, if a site is defined both at the user and group security level and that site access record is deleted from the security group, the site access record will be removed from the user permissions.
10.7. Change User Logon
If an individual has been issued multiple user logon accounts, those user logon accounts may be displayed as a grouped so that the individual can easily switch between user logon accounts. The system uses the email address field in the user account to determine which user accounts belong to the same individual.
Among other uses, multiple user accounts may used to apply record security to support specific reporting requirements.
To view and switch between user accounts, the individual may click Main Screen > File > Change User Logon.
The Change User Logon feature may be configured to automatically apply the existing password from the current user logon account, pre-populate the password or display an empty password field requiring the individual to re-enter their password when switching user accounts.
Note: This feature requires additional system configuration. If you require this feature, please contact Celayix support to have it enabled.
11. Log Manager
Log Manager allows users with administrator access to review system log records created. By default, the system will store log records for up to 2 years prior to overwriting. Administrators may also manually archive log records from the database and export them to a log file external to the database. When log records are archived, they are permanently deleted from the database.
Viewable log records include:
- Alert errors;
- Data Update transactions;
- System errors;
- Import errors;
- Information messages (i.e. login);
- Web Xpress transactions
To review log records, from the toolbar on the Main screen, click Administration > Log Manager. The Log Manager should appear as shown in the figure below. 
Annotation | Description |
(1) Record Filter | Create custom log record filters to view only specific log records. |
(2) Refresh | Click refresh to load log records into viewer. |
(3) Log Record List | List of log records |
(4) Properties | Display additional information for a selected log record. |
(5) Archive | Manually archive log records to a log file external to the database. Note: Archived records are deleted from the database after they are saved to the log file. |
Appendix 1 – Backing-Up and Restoring Database
As part of your general maintenance procedures of eTime Xpress, it is recommended that you regularly backup your database.
The following backup options are available:
1. Offline Backup
The Offline Backup is the more simple backup procedure to perform but requires that the eTime Xpress database be stopped. Prior to stopping the eTime Xpress database, all users must first exit the application.
1.1. Performing an Offline Backup
To perform an Offline Backup:
- Ensure all users have logged off from the eTime Xpress application.
- Stop Database. From the eTime Xpress server, click the Start button and select Program Files > Celayix > dbstop.
You can also stop the database by running the following command from the command prompt: 'c:\program files\celayix\etx\dbstop.bat'.
- Copy all files under 'c:\program files\celayix' to a backup directory. After the backup is complete, it is recommended that a copy of the backup files be stored at an off-site location.
- Start Database. From the eTime Xpress server, click the Start button and select Program Files > Celayix > dbstart.
You can also start the database by running the following command from the command prompt: 'c:\program files\celayix\etx\dbstart.bat'.
Note: If you installed eTime Xpress in a directory other than 'c:\program files', please substitute the correct directory path in the steps above.
1.2. Restoring from an Offline Back-up
To restore from an Offline Backup:
- Re-install eTime Xpress, if necessary. Please refer to the applicable installation guide. The eTime Xpress version must correspond to the version of eTime Xpress at the time the database was backed-up.
- Stop Database. From the eTime Xpress server, click the Start button and select Program Files > Celayix > dbstop.
You can also stop the database by running the following command from the command prompt: 'c:\program files\celayix\etx\dbstop.bat'.
- Copy all files from your backup directory to 'c:\program files\celayix'.
- Start Database. From the eTime Xpress server, click the Start button and select Program Files > Celayix > dbstart.
You can also start the database by running the following command from the command prompt: 'c:\program files\celayix\etx\dbstart.bat'.
2. Online Backup
The Online Backup is recommended for environments where eTime Xpress users cannot log off (i.e. 24 hours operations) and/or using Celayix Voice Xpress and Web Xpress products.
The Online Backup generates a batch file of your database and requires more time to run relative to the Offline Backup.
2.1. Performing an Online Backup
To perform an Online Backup, enter the following commands in the command prompt:
- Go to the drive where eTime Xpress is installed.
Enter: c:
(note: if you installed eTime Xpress in another drive path, replace 'c:' with the correct drive letter)
- Go to the eTime Xpress directory.
Enter: cd "%celayix%etx\db"
- Run backup command.
Enter: "%dlc%\bin\probkup" online og400 og400backup.bkp
(note: if you wish to rename the backup file, replace 'og400backup' with the desired file name)
After the backup is complete, it is recommended that a copy of the backup files be stored at an off-site location.
2.2. Restoring from an Online Backup
To restore from an Online Backup:
- Re-install eTime Xpress, if necessary. Please refer to the applicable installation guide. The eTime Xpress version must correspond to the version of eTime Xpress at the time the database was backed-up.
- Stop Database. From the eTime Xpress server, click the Start button and select Program Files > Celayix > dbstop.
You can also stop the database by running the following command from the command prompt: 'c:\program files\celayix\etx\dbstop.bat'.
Enter the following commands in the command prompt:
- Go to the drive where eTime Xpress is installed.
Enter: c:
(note: if you installed eTime Xpress in another drive path, replace 'c:' with the correct drive letter)
- Go to the eTime Xpress directory.
Enter: cd "%celayix%etx\db"
- Run restore command.
Enter: "%dlc%\bin\prorest" og400 og400backup.bkp
(note: if you rename the backup file, replace 'og400backup' with the applicable backup file name)
Appendix 2 – Rule Processing
The manner in which business rules are processed varies by rule category.
Rule Category | Rule Processing |
Hours Type Thresholds | First Match |
Minimum Rest Period | First Match |
Self-Scheduling Start Time | First Match |
Shift Locations | First Match |
Shift Qualifications | AND |
Shift Restrictions | First Match |
Rule Processing Examples:
- First Match
Rules are processed in order until a matching rule is found. The order which rules are defined will impact what results are generated.
For example,
Rule 1: Daily OT occurs after 6 hours for any shifts worked by John Doe.
Rule 2: Daily OT occurs after 8 hours for all employees.
John Doe works 9 hours.
If Rule 1 is ordered before Rule 2 then 3 hours OT is calculated.
If Rule 2 is ordered before Rule 1 then 1 hour of OT is calculated.
- 'AND'
All rules for a rule sub-category are processed. The rule properties for all matching rules are accumulated and applied.
For example,
Rule 1: Shifts at XYZ require qualification 1.
Rule 2: Shifts worked from 12AM to 8AM require qualification 2.
A shift at XYZ from 12AM to 8AM requires qualification 1 and 2.
Appendix 3 – User Definable Codes
The following table is a summary of the user definable codes found in eTime Xpress.
Codes Type | Description | Where It's Used |
Bill Reason Code | Reason for overriding the bill hours or bill rates of a shift distribution | Time & Attendance |
Billing Cycle Code | Defines bill cycles for processing billing | Site > Bill Settings tab |
Call Status Code | Categorize call types or results | Employee Call Log |
Complaint Code | Complaint types | Employee ComplaintsSite Complaints |
Country Code | Country code for filling in addresses | Company, Branch, Employee, Customer, Site contact information |
Customer Notes Code | Categorize Customer notes | Customer Notes |
Departments | Define departments | Employee > Pay Settings tab |
Employee Notes Code | Categorize Employee notes | Employee Notes |
Employee Weight Code | Units of measure for weight – only one record should be specified | Employee |
Ethnic Background Code | Ethnic types | Employee > Profile tab |
External Branch Ref. | External Branch Reference Label | Branch > File > References |
External Company Ref. | External Company Reference Label | Company > File > References |
External Cust Ref. | External Customer Reference Label | Customers > References Tab |
External Cust Ref. 1-10 Lookup | User definable Customer reference value | Customers > References Tab |
External Emp Ref. | External Employee Reference Label | Employees > References Tab |
External Emp Ref. 1-10 Lookup | User definable Employee reference value | Employees > References Tab |
External Loc Ref. | External Location Reference Label | Administration > Company/Branch > Branch Codes > Branch Locations |
External Loc Ref. 1-10 Lookup | User definable Location reference value | Administration > Company/Branch > Branch Codes > Branch Locations |
External Shift Ref. 1-5 Lookup | User definable shift reference value | Visual Scheduler > Add/Update > References Tab |
External Shift Ref. Labels | External shift reference label | Visual Scheduler > Add/Update > References Tab |
External Site Ref. | External Site References | Customers > Site > References Tab |
External Site Ref. 1-10 Lookup | User definable Site reference value | Customers > Site > References Tab |
External Srv Ref. | External Service References | Administration > Company/Branch > Branch Codes > Branch Services |
External Srv Ref. 1-10 Lookup | User definable Service reference value | Administration > Company/Branch > Branch Codes > Branch Services |
Incident Code | Incident types | Employee IncidentsSite Incidents |
Inventory Code | Inventory type | Employee Inventory |
Marital Status Code | Marital status | Employee > Profile Tab |
Pay Reason Code | Reason for overriding the pay hours or pay rates of a shift distribution | Time & Attendance |
Payroll Cycle Code | Defines pay cycles for processing payroll | Employee > Pay Settings tab |
Phone Code | Type of phone number | Company, Branch, Employee, Customer, Site contact information |
Position Code | Position types | Employee > Pay Settings tab |
Qualifications Code | Qualification types | Employee Qualifications |
Restriction Code | Restriction types | Employee RestrictionsSite RestrictionsShift Restrictions Branch Rule |
Shift Allowances Code | Allowance types | Branch Recurring Allowances |
Site Notes Code | Categorize Site notes | Site Notes |
State/Province Code | State/Province information | Company, Branch, Employee, Customer, Site contact information |
Statutory Day Code | Statutory days | Branch Statutory DaysSite Statutory Days |
Termination Code | Reason for termination | Employee > History tab |
Volunteer Codes | Volunteer types | Volunteer Schedule |
Appendix 4 – Database Administration
This section does not apply to databases hosted on the cloud.
The following items should be reviewed by the database administrator of the application.
1. Monitoring Database Size
Your database files should be monitored (.bi, .db, .lg, etc.) to ensure they do not exceed the design specifications of a single volume database. When any single database file exceeds 1.5 GB, the database must be setup to support multi-volumes. Exceeding the file size limit may result in data loss.
If any of your database files are approaching 1.5 GB in size, please contact Celayix support for assistance (conversion fees will apply).