Employee Setup
- Gurpreet Banwait (Deactivated)
- Michael Shumko (Deactivated)
This page applies to R814 and earlier of Celayix.
Users of R900 and higher, much of this information is still valid, except that most of the screens are read-only. Most adjustments must be made in Schedule Xpress. In those cases, refer to the relevant guides in the Schedule Xpress section.
The Employee User Guide will review the features available in the Employee module.
eTime Xpress
Employee User Guide
(For versions 8.14.0 and earlier)  Table of Contents
1. Overview
1.1. Employee Overview
1.2. Creating New Employees
1.3. Importing/Exporting Employees
1.4. Set Employee Work Week
1.5. Employee References
1.6. Archiving/Un-archiving Employees
2. Employee Administration Options
2.1. Employee Bill Rates
2.2. Employee Combination Bill Rates (previously Employee Site Bill Rates)
2.3. Employee Pay Rates
2.4. Employee Combination Pay Rates (previously Employee Site Pay Rates)
2.5. Employee Statutory Days
2.6. Employee Break Thresholds
2.7. Employee Complaints
2.8. Employee Inventory
2.9. Employee Contacts
2.10. Employee Notes
2.11. Employee Attachments
3. Employee Scheduling Options
3.1. Employee Schedule
3.2. Employee Qualifications
3.2.1. Importing/Exporting Employee Qualifications
3.3. Employee Restrictions
3.4. Employee Incidents
3.5. Employee Time Off
3.6. Employee Accruals (Additional Module)
3.7. Employee Call Log
1. Overview
This document will discuss how to use the various features found within the Employee module of eTime Xpress. While there are a variety of features available - you only have to set up those features that your organization needs.
Below is a data hierarchy diagram of eTime Xpress with relevant definitions of how the Employee object is used in the application. 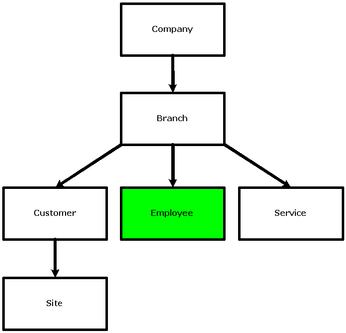
eTime Xpress Organizational Hierarchy
Employee. The Employee object is a sub-unit within a Branch. It is the 'who', the person or object you are scheduling.
Note: This document uses the default Labels that are assigned when eTime Xpress is originally installed. It's possible for a user to define their labels for "Employee". If default labels have been changed please make a note of the new names to reduce confusion when following this Guide.
1.1. Employee Overview
To access Employees, go to the Main Menu and double-click on the Employees button. The Employee Main screen should appear as shown in the figure below. 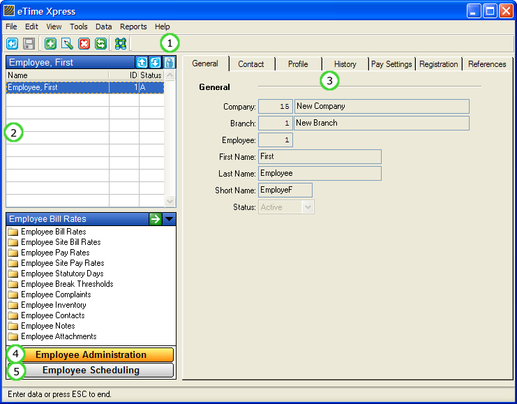
Employee Main Screen with Annotations
Annotation | Description |
(1) Tool Bar | Contains buttons to run features like Close, Save, Add, Edit, Delete, Lookup and Find. |
(2) Employee Listing | Listing of all the Employees in the Branch. Double-clicking a name edits that Employee's Details. |
(3) Employee Details | Employee Details tabs contain General information, Contact information, Employee Profile, Employee History, Pay Settings, Registration and References. |
(4) Employee Administration | Additional Employee related administration features and options. Click the Employee Administration button to bring up the Employee Administration Options and double-click on a folder to run the selected option. |
(5) Employee Scheduling | Additional Employee related scheduling features and options. Click the Employee Scheduling button to bring up the Employee Scheduling Options and double-click on a folder to run the selected option. |
1.2. Creating New Employees
Before expanding on other areas in the Employee module, let's review the Employee creation process.
To add a new Employee:
- From the Main Menu, double-click on the Employees button. The Employee main screen should appear as shown in the figure below.
- Click the Add button (
 ) from the Tool Bar to create a new Employee.
 - All fields under the General tab (i.e. First Name, Last Name, and Short Name) are required fields. The other fields in the Contact, Profile, History, Pay Settings, Registration and References tabs are optional. However, certain fields may need to be configured later depending on the features you use in the application (please see the Time & Attendance User Guide).
- Click the Save button (
 ) to save your new Employee.
To Update ( ![]() ) or Delete (
) or Delete ( ![]() ) an existing Employee record, click the corresponding buttons in the toolbar.
) an existing Employee record, click the corresponding buttons in the toolbar. 
Creating a New Employee
1.3. Importing/Exporting Employees
eTime Xpress allows Employee information to be imported or exported from/to a .CSV file.
From the menu bar in the Employee Main screen, click File > Import or Export. Select the Standard Format and click OK.
For more information on importing or exporting data from eTime Xpress, see the Global Features Guide.
1.4. Set Employee Work Week
Set Work Week allows you to define the days an Employee is expected to work. An Employee's default work week can be applied as a search filter when using the Availability or other scheduling tools.
To set an Employee's Work Week:
- From the menu bar in the Employee Main Screen, click File > Set Work Week.
- The Set Work Week dialog should appear as shown below - check marks denote the days an Employee is expected to work.
- Click OK to save the Work Week.
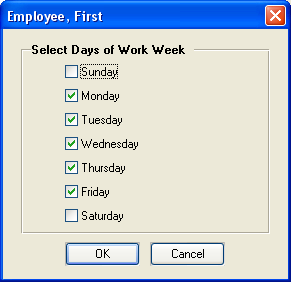
Work Week Dialog Window
1.5. Employee References
Employee References are fields that let you add information to an Employee record for use in other applications. In some cases, you may want to describe additional Employee information not found in the standard fields of eTime Xpress (e.g., swipe card ID number, passport number). These References can be selected to appear in Reports, used as a linking ID when exporting to 3rd party applications and to create record filters.
To define an Employee Reference:
- From the Employee Main Screen, select an employee and click the update button.
- Click on the References tab.
- Click the Save button to save the new References.
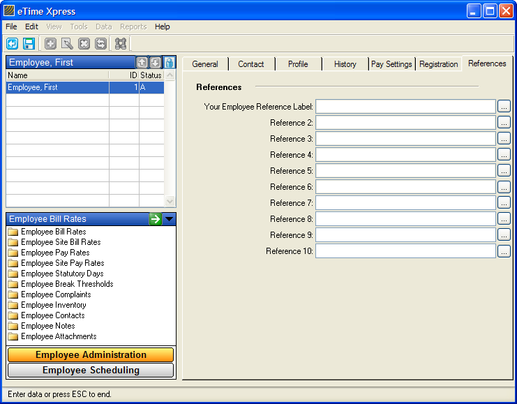
Note: To replace the labels (i.e. Reference 1, Reference 2, Reference 3…) in the Employee References tab, go to the eTime Xpress Main screen and click Configuration > Codes Maintenance. From the Codes Maintenance screen, select 'External Emp Ref.' and then add a new Code with a matching number and description. The number in the Code field is the numeric label you want to replace and the description is the new label.
Employee reference values can be added to lookups by selecting External Emp Ref. 1-10 Lookup in Codes Maintenance and adding applicable reference values.
1.6. Archiving/Un-archiving Employees
Employee records with a Void status can be archived and excluded from the employee count determined for licensing purposes. This feature is implemented to address terminated, seasonal and other employee turnover considerations.
Archived records can be accessed for historical reporting purposes but are restricted from being used to create new records such as shifts and time and attendance items.
To archive an Employee:
- From the Employee main screen, select the employee to be archived.
- Click the Update button (
 ) from the toolbar, set the record Status field on the General tab to 'Void' and click the save button. The archive check-box and date fields should become visible.
 - From the toolbar, click Edit > Archive Void Record. The Confirm Archive dialog should appear.
- Click OK to archive the employee record.
- Note: archiving an employee does not remove their Team Xpress account. See the Web Xpress Administrator Guide.
n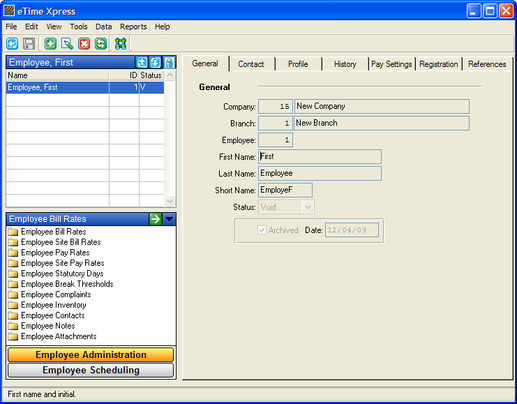
To un-archive an Employee:
- From the Employee main screen, select the archived employee.
- From the toolbar, click Edit > Restore Void Record. The record will be restored provided there are unused employee count licenses.
2. Employee Administration Options
eTime Xpress provides several basic HR features where you can store and manage Employee administration information. From the Employee Main screen, select the applicable Employee from your Employee list and next double-click the Employee Administration Option you want to access. 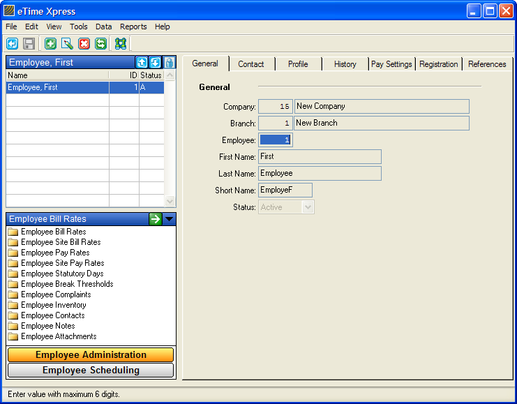
Employee Main Screen – Employee Administration Options
2.1. Employee Bill Rates
Employee Bill Rates allow you to define a bill rate card for an Employee. When shifts are billed according Employee Bill Rates, the Employee's standard Bill Rate by Service is applied regardless of the Site.
Employee Bill Rates is one of several bill rate options that can be configured in eTime Xpress (see the Time & Attendance User Guide for more information). If you are not using eTime Xpress to generate billing information, you are not required to setup this feature.
From the Employee Main screen, double-click the Employee Bill Rates folder. The Employee Bill Rates screen should appear as shown in the figure below. 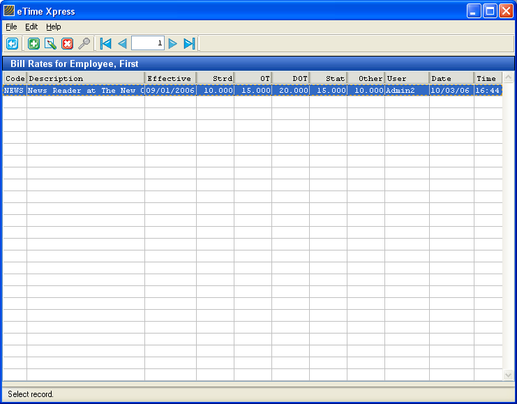
Employee Bill Rates Screen
To Add ( ![]() ), Update (
), Update ( ![]() ), or Delete (
), or Delete ( ![]() ) a Bill Rate, click the corresponding buttons in the toolbar. When entering a new Bill Rate, you can define the Service Code, Effective Date and the applicable Bill Rates by hour's type (standard, overtime, double overtime, statutory and other). When a shift is created, eTime Xpress applies your business rules and automatically breaks-out the shift hours into the correct hour's type. You may define All Services by entering '*' in the Code column for a Bill Rate.
) a Bill Rate, click the corresponding buttons in the toolbar. When entering a new Bill Rate, you can define the Service Code, Effective Date and the applicable Bill Rates by hour's type (standard, overtime, double overtime, statutory and other). When a shift is created, eTime Xpress applies your business rules and automatically breaks-out the shift hours into the correct hour's type. You may define All Services by entering '*' in the Code column for a Bill Rate.
The Effective Date allows you to define current and future Bill Rates. When calculating billing, eTime Xpress will apply the Bill Rate in effect on the date of the shift.
Note: If shifts were created prior to defining Bill Rates or you are updating an existing Bill Rate, you will be asked whether you want to apply the new Bill Rate to existing shifts. Selecting 'Yes' will recalculate your billing information with the new rate, where as selecting 'No' will apply the new rate only to newly created shifts.
2.2. Employee Combination Bill Rates (previously Employee Site Bill Rates)
Employee Combination Bill Rates allow you to define bill rates based on a shift's Customer, Site and Service values.
Employee Combination Bill Rates is one of several bill rate options that can be configured in eTime Xpress (see the Time & Attendance User Guide for more information). If you are not using eTime Xpress to generate billing information, you are not required to setup this feature.
From the Employee Main screen, double-click the Employee Combination Bill Rates folder. The Employee Combination Bill Rates screen should appear as shown in the figure below. 
Employee Combination Bill Rates
To Add ( ![]() ), Update (
), Update ( ![]() ), or Delete (
), or Delete ( ![]() ) a Bill Rate, click the corresponding buttons in the toolbar. When entering a new Bill Rate you can define the Customer ID, Site ID, Service Code, Effective Date and the applicable Bill Rates by hour's type (standard, overtime, double overtime, statutory and other). When a shift is created, eTime Xpress applies your business rules and automatically breaks-out the shift hours into the correct hour's type. You may define 'All' for Customers/Sites by entering '0' and Services by entering '*' in the respective columns.
) a Bill Rate, click the corresponding buttons in the toolbar. When entering a new Bill Rate you can define the Customer ID, Site ID, Service Code, Effective Date and the applicable Bill Rates by hour's type (standard, overtime, double overtime, statutory and other). When a shift is created, eTime Xpress applies your business rules and automatically breaks-out the shift hours into the correct hour's type. You may define 'All' for Customers/Sites by entering '0' and Services by entering '*' in the respective columns.
The Effective Date allows you to define current and future Bill Rates. When calculating billing, eTime Xpress will apply the Bill Rate in effect on the date of the shift.
Note: If shifts were created prior to defining Bill Rates or you are updating an existing Bill Rate, you will be asked whether you want to apply the new Bill Rate to existing shifts. Selecting 'Yes' will recalculate your billing information with the new rate, where as selecting 'No' will apply the new rate only to newly created shifts.
2.3. Employee Pay Rates
Employee Pay Rates allow you to define a Pay rate card by Service. When shifts are paid according Employee Pay Rates, an Employee is paid by the Service performed regardless of where they worked.
Employee Pay Rates is one of several pay rate options that can be configured in eTime Xpress (see the Time & Attendance User Guide for more information). If you are not using eTime Xpress to generate payroll information, you are not required to setup this feature.
From the Employee Main screen, double-click the Employee Pay Rates folder. The Employee Pay Rates screen should appear as shown in the figure below. 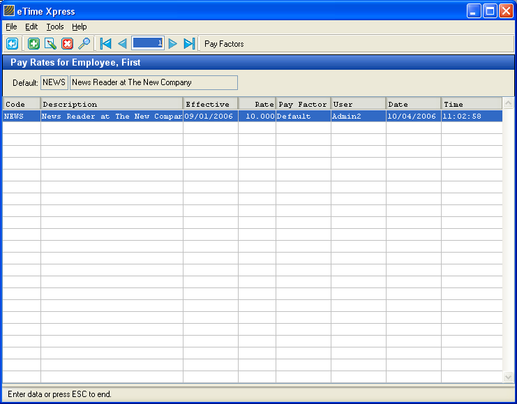
Employee Pay Rates Screen
To Add ( ![]() ), Update (
), Update ( ![]() ), or Delete (
), or Delete ( ![]() ) a Pay Rate, click the corresponding buttons in the toolbar. When entering a new Pay Rate you can define the Service Code, Effective Date and the applicable Pay Rate. You may define All Services by entering '*' in the Code column for a Pay Rate.
) a Pay Rate, click the corresponding buttons in the toolbar. When entering a new Pay Rate you can define the Service Code, Effective Date and the applicable Pay Rate. You may define All Services by entering '*' in the Code column for a Pay Rate.
The Effective Date allows you to define current and future Pay Rates. When calculating payroll, eTime Xpress will apply the Pay Rate in effect on the date of the shift.
When entering an Employee Pay Rate, eTime Xpress automatically applies the 'Default' Pay Factors defined for the Branch. If a Pay Rate requires a custom Pay Factor that is different than the 'Default' Pay Factor, select the Pay Rate and click the Pay Factors button in the Tool Bar. The custom Pay Factors dialog should appear as shown in the figure below. 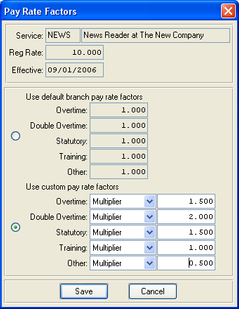
Custom Pay Rate Factors Window
Custom Pay Factors allow you to define new pay rate factors (Multipliers) or dollar amounts (Fixed Amounts) for each hour's type. Pay Rates using custom Pay Factors will be identified in the Employee Pay Rates screen as 'Custom' under the Pay Factor column.
Note: If shifts were created prior to defining Pay Rates or you are updating an existing Pay Rate, you will be asked whether you want to apply the new Pay Rate to existing shifts. Selecting 'Yes' will recalculate your payroll information with the new rate, where as selecting 'No' will apply the new rate only to newly created shifts.
A Pay Factor should be distinguished from a Pay Rate. A Pay Rate is the dollar per hour rate an Employee earns. A Pay Factor is the additional multiplier applied to the Pay Rate if hours are classified as Overtime, Double Overtime, Statutory Holidays, Training Rate or Other.
2.4. Employee Combination Pay Rates (previously Employee Site Pay Rates)
Employee Combination Pay Rates allow you to define pay rates based on a shift's Customer, Site and Service values.
Employee Combination Pay Rates is one of several pay rate options that can be configured in eTime Xpress (see the Time & Attendance User Guide for more information). If you are not using eTime Xpress to generate payroll information, you are not required to setup this feature.
From the Employee main screen, double-click the Employee Combination Pay Rates folder. The Employee Combination Pay Rates screen should appear as shown in the figure below. 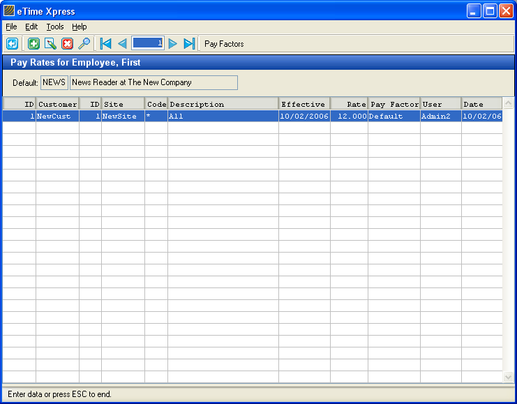
Employee Combination Pay Rates Screen
To Add ( ![]() ), Update (
), Update ( ![]() ), or Delete (
), or Delete ( ![]() ) a Pay Rate, click the corresponding buttons in the toolbar. When entering a new Pay Rate you can define the Customer ID, Site ID, Service Code, Effective Date and the applicable Pay Rate. You may define 'All' for Customers/Sites by entering '0' and Services by entering '*' in the respective columns.
) a Pay Rate, click the corresponding buttons in the toolbar. When entering a new Pay Rate you can define the Customer ID, Site ID, Service Code, Effective Date and the applicable Pay Rate. You may define 'All' for Customers/Sites by entering '0' and Services by entering '*' in the respective columns.
The Effective Date allows you to define current and future Pay Rates. When calculating payroll, eTime Xpress will apply the Pay Rate in effect on the date of the shift.
When entering an Employee Combination Pay Rate, eTime Xpress automatically applies the 'Default' Pay Factors defined for the Branch. If a Pay Rate requires a custom Pay Factor that is different than the 'Default' Pay Factor, select the Pay Rate and click the Pay Factors button in the Tool Bar. The custom Pay Factors dialog should appear as shown in the figure below.
Custom Pay Rate Factors Window
Custom Pay Factors allow you to define new pay rate factors (Multipliers) or dollar amounts (Fixed Amounts) for each hour's type. Pay Rates using custom Pay Factors will be identified in the Employee Combination Pay Rates screen as 'Custom' under the Pay Factor column.
Note: If shifts were created prior to defining Pay Rates or you are updating an existing Pay Rate, you will be asked whether you want to apply the new Pay Rate to existing shifts. Selecting 'Yes' will recalculate your payroll information with the new rate, where as selecting 'No' will apply the new rate only to newly created shifts.
A Pay Factor should be distinguished from a Pay Rate. A Pay Rate is the dollar per hour rate an Employee earns. A Pay Factor is the additional multiplier applied to the Pay Rate if the hours are classified as Overtime, Double Overtime, Statutory Holidays, Training Rate or Other.
2.5. Employee Statutory Days
When a shift occurs on a Statutory Day (Holidays), the associated hours may be broken-out as Statutory hours billed and/or paid at Statutory rates (see Time & Attendance User Guide). If you are not using eTime Xpress to generate billing or payroll information, you are not required to setup this feature.
From the Employee Main screen, double-click the Employee Statutory Days folder. The Employee Statutory Days screen should appear as shown in the figure below. 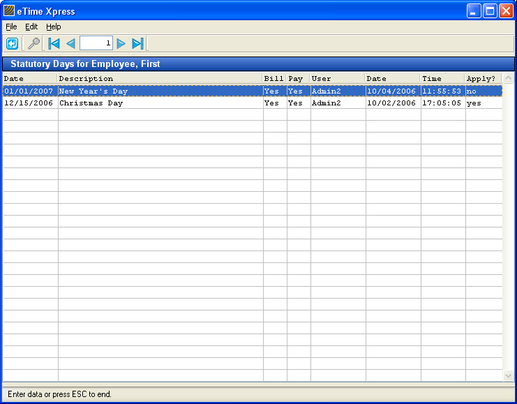
Employee Statutory Days Screen
Employee Statutory Days lists all of the Statutory days defined for the Branch and whether a Statutory Day applies for bill or pay purposes. To turn off a Statutory Day rule, double-click on the record - the value in the 'Apply?' column will toggle between 'yes' and 'no'.
For shift hours to be classified as Statutory hours, the shift must occur on a Statutory Day and the Statutory Day Rule for the applicable Site (Site Statutory Days – see Customer and Site User Guide) and Employee (Employee Statutory Days) must be 'Apply?' = yes.
Note: Statutory Days can be created from the Branch Statutory Days screen. From the Main Menu, go to Configuration > Company/Branch > Branch Statutory Days under the Branch tab.
2.6. Employee Break Thresholds
Unpaid breaks can be defined for an Employee so that breaks are deducted from the shift's total hours when calculating billing and payroll information.
By default, you can enter breaks manually when you add or update a shift. Employee Break Thresholds simplifies the entry of breaks by auto-completing the Break field when a shift length exceeds a certain number of hours for an Employee. When enabled, the Break field will be auto-completed after you specify the Start and End times of a shift (note: you may still override the break field by manually typing in the break).
From the Employee Main screen, double-click on the Employee Break Thresholds folder. The Employee Break Thresholds screen should appear as shown in the figure below. 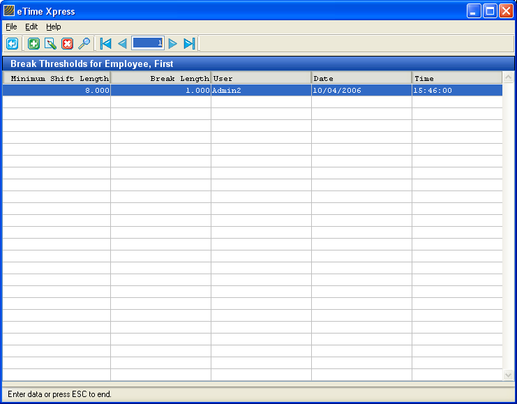
Employee Break Thresholds Screen
To Add ( ![]() ), Update (
), Update ( ![]() ), or Delete (
), or Delete ( ![]() ) a Break Threshold, click the corresponding buttons in the toolbar. When entering a new Break Threshold, you can define the Minimum Shift Length and the Break Length.
) a Break Threshold, click the corresponding buttons in the toolbar. When entering a new Break Threshold, you can define the Minimum Shift Length and the Break Length.
Note: Break Thresholds can also be defined at the Branch and Site level. To select which Break Threshold rules to apply, go to Site Main screen, select the applicable Site, click the Billing Settings tab and choose the applicable rule under the Break Thresholds field.
2.7. Employee Complaints
Employee Complaints track, categorize and maintain a history of Complaints against the Employee. You can generate a Report summarizing Complaints by going to Reports > Customer & Employee > Complaints.
From the Employee Main screen, double-click on the Employee Complaints folder. The Employee Complaints screen should appear as shown in the figure below. 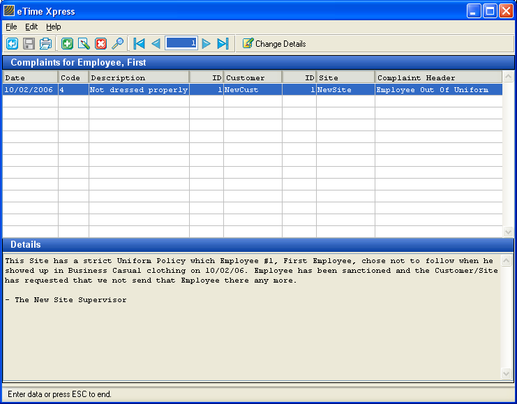
Employee Complaints Screen
To Add ( ![]() ), Update (
), Update ( ![]() ), or Delete (
), or Delete ( ![]() ) a Complaint, click the corresponding buttons in the toolbar. You can also Print (
) a Complaint, click the corresponding buttons in the toolbar. You can also Print ( ![]() ) a specific Complaint or group of Complaints. When entering a new Employee Complaint, you can define the Date, Complaint Code, Customer ID, Site ID and Complaint Header. To enter text in the Details section, click the Change Details button (
) a specific Complaint or group of Complaints. When entering a new Employee Complaint, you can define the Date, Complaint Code, Customer ID, Site ID and Complaint Header. To enter text in the Details section, click the Change Details button ( ![]() ) and begin typing. Remember to save your changes by clicking the Save button (
) and begin typing. Remember to save your changes by clicking the Save button ( ![]() ).
).
Note: To define Complaint codes go to Configuration > Codes Maintenance. From the Codes Maintenance screen, select 'Complaint Code' and click the Add button to create a new Complaint Code.
Information entered in Employee Complaints is also cross-referenced with the Site Complaints feature (see Customer and Site User Guide).
2.8. Employee Inventory
Employee Inventory is a log that tracks items issued to an Employee. You can generate a Report summarizing Inventory issue/return dates and cost by going to Reports > Customer & Employee > Inventory.
From the Employee Main screen, double-click on the Employee Inventory folder. The Employee Inventory screen should appear as shown in the figure below. 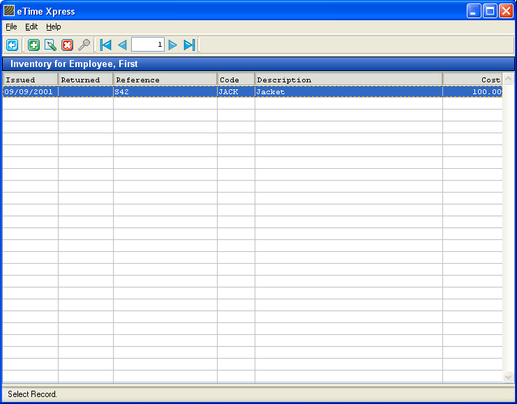
Employee Inventory Screen
To Add ( ![]() ), Update (
), Update ( ![]() ), or Delete (
), or Delete ( ![]() ) an Inventory item, click the corresponding buttons in the toolbar. When entering a new Inventory Item, you can define the Issue Date, Return Date, Reference ID, Inventory Code and Cost. The Reference field may be used to record an internal tracking code or serial number for the inventory item.
) an Inventory item, click the corresponding buttons in the toolbar. When entering a new Inventory Item, you can define the Issue Date, Return Date, Reference ID, Inventory Code and Cost. The Reference field may be used to record an internal tracking code or serial number for the inventory item.
Note: To define Inventory codes go to Configuration > Codes Maintenance. From the Codes Maintenance screen, select 'Inventory Code' and click the Add button to create a new Inventory Code.
2.9. Employee Contacts
Employee Contacts expands on the contact information defined in the Employee Main screen under the Contact tab. You may create complete contact lists for Employees with individual phone numbers, fax numbers, email addresses, and more.
From the Employee Main screen, double-click on the Employee Contacts folder. The Employee Contacts screen should appear as shown in the figure below. 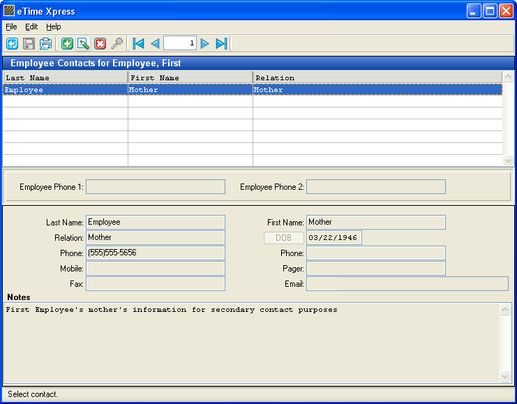
Employee Contacts Screen
To Add ( ![]() ), Update (
), Update ( ![]() ), or Delete (
), or Delete ( ![]() ) a Contact, click the corresponding buttons in the toolbar. You can also Print (
) a Contact, click the corresponding buttons in the toolbar. You can also Print ( ![]() ) a specific Contact or group of Contacts in a Report.
) a specific Contact or group of Contacts in a Report.
Note: The Employee Phone 1 and Employee Phone 2 records display the phone numbers defined in the Employee Main screen under the Contact tab for the Employee.
2.10. Employee Notes
Employee Notes allow you to record information/notes about a specific Employee. You can organize Employee notes by tagging them with specific code classifications. Tagging notes allow for easier searching and printing in the future.
From the Employee Main screen, double-click the Employee Notes folder. The Employee Notes screen should appear as shown in the figure below. 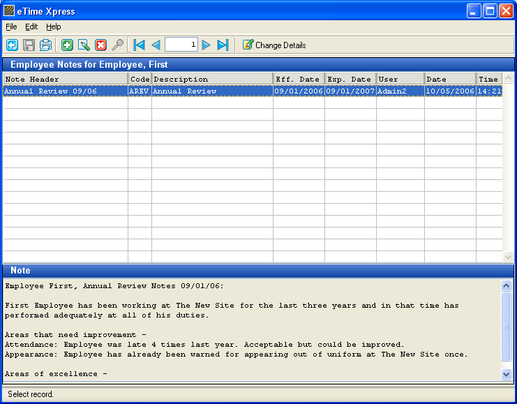
Employee Notes Screen
To Add ( ![]() ), Update (
), Update ( ![]() ), or Delete (
), or Delete ( ![]() ) a Note header, click the corresponding buttons in the toolbar. You can also Print (
) a Note header, click the corresponding buttons in the toolbar. You can also Print ( ![]() ) a specific Note or group of Notes. When entering a new Employee Note, you can define the Note Header, Note Code/Tag and Effective Dates. To enter text in the Note section, click the Change Details button (
) a specific Note or group of Notes. When entering a new Employee Note, you can define the Note Header, Note Code/Tag and Effective Dates. To enter text in the Note section, click the Change Details button ( ![]() ) and begin typing. Remember to save your changes by clicking the Save button (
) and begin typing. Remember to save your changes by clicking the Save button ( ![]() ).
).
Effective and expiry dates may be defined to set a time period which the Note is applicable. By leaving these fields blank, the note will be effective for all dates. You can print notes based on code tags and effective dates using the Notes report under the Reports Menu > Customer & Employee.
Note: To define Note codes/tags go to Configuration > Codes Maintenance. From the Codes Maintenance screen, select 'Employee Notes Code' and click the Add button to create a new Note Code.
To attach a document, use the applicable option under Tools (see Global Features Guide).
2.11. Employee Attachments
Employee Attachments allow you to import external files such as Word, Excel, PDF etc. documents directly into the eTime Xpress database. Documents are saved in the Employee Attachments folder. For more information on using attachments in eTime Xpress, see the Global Features Guide.
3. Employee Scheduling Options
Employee Scheduling Options include features and tools for managing Employee related scheduling information. From the Employee Main screen, select the applicable Employee from your Employee list, click the Employee Scheduling button to expand the Options menu and double-click the Employee Scheduling Option you want to access. 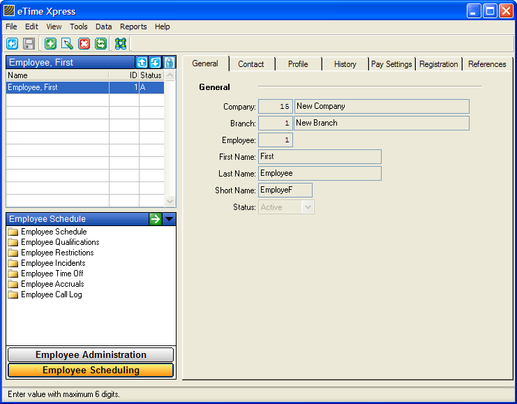
Employee Main Screen - Scheduling Options
3.1. Employee Schedule
Employee Schedule displays a read-only list view of the Employee's scheduled shifts over a specified date range.
From the Employee Main screen, double-click the Employee Schedule folder. The Employee Schedule screen should appear as shown in the figure below. 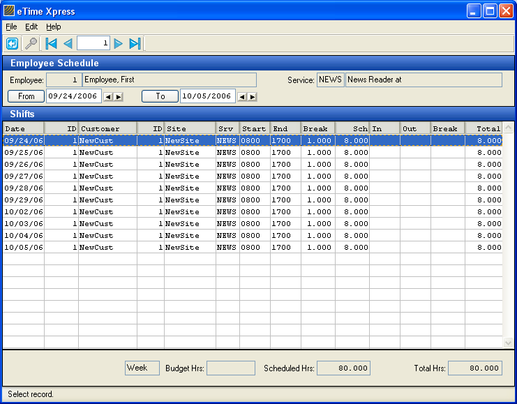
Employee Schedule Screen
To display shifts, enter the applicable From and To dates and click on a row in the browser area under Shifts.
3.2. Employee Qualifications
Employee Qualifications allow you to define the skills and qualifications of an Employee. eTime Xpress will automatically apply your Shift Qualification rules when scheduling shifts. If an Employee does not have the necessary Qualifications, you will be notified before saving the shift.
From the Employee Main screen, double-click on the Employee Qualifications folder. The Employee Qualifications screen should appear as shown in the figure below 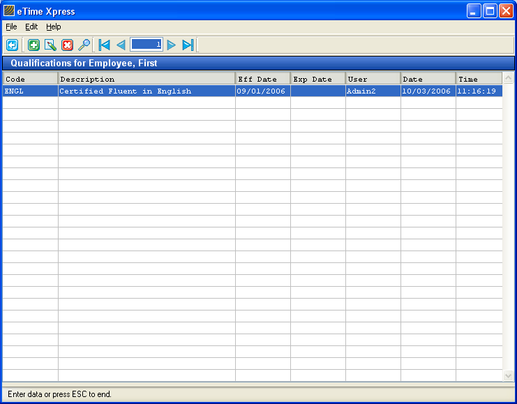
Employee Qualifications Screen
To Add ( ![]() ), Update (
), Update ( ![]() ), or Delete (
), or Delete ( ![]() ) a Qualification, click the corresponding buttons in the toolbar. When entering a new Site Qualification, you can define the Qualification Code, Effective Date and Expiry Date.
) a Qualification, click the corresponding buttons in the toolbar. When entering a new Site Qualification, you can define the Qualification Code, Effective Date and Expiry Date.
The Effective and Expiry Date allow you to define current, future and expiring Qualifications. When you create or update shifts, eTime Xpress will validate for the required Qualifications in effect on the date of the shift. If the Effective and Expiry Date fields are left blank, the Qualification requirement will be effective for all dates.
To setup Shift Qualification rules, please refer to Branch Rule Settings in the Administrator Guide.
Note: To define Qualification Codes go to Configuration > Codes Maintenance. From the Codes Maintenance screen, select 'Qualifications Code' and click the Add button to create a new Qualification.
3.2.1. Importing/Exporting Employee Qualifications
eTime Xpress allows Employee Qualifications to be imported or exported from/to a .CSV file.
From the menu bar in the Employee Qualifications screen, click File > Import or Export. Select the Standard Format and click OK.
For more information on importing or exporting data from eTime Xpress, see the Global Features Guide.
3.3. Employee Restrictions
For eTime Xpress versions 7.003 and higher, the previous feature of Employee Restrictions has been replaced with the Shift Restrictions feature under Branch Rule Settings.
To setup Shift Restriction rules, please refer to Branch Rule Settings in the Administrator Guide.
3.4. Employee Incidents
Employee Incidents track, categorize and maintain a history of Incidents relating to an Employee. You can generate a Report summarizing Incidents by going to Reports > Customer & Employee > Incidents.
From the Employee Main screen, double-click on the Employee Incidents folder. The Employee Incidents screen should appear as shown in the figure below. 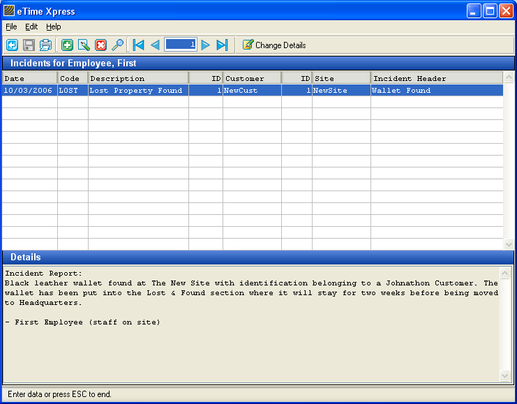
Employee Incidents Screen
To Add ( ![]() ), Update (
), Update ( ![]() ), or Delete (
), or Delete ( ![]() ) an Incident, click the corresponding buttons in the toolbar. You can also Print (
) an Incident, click the corresponding buttons in the toolbar. You can also Print ( ![]() ) a specific Incident or group of Incidents in a Report. When entering a new Site Incident, you can define the Date, Incident Code, Customer ID, Site ID and Incident Header. To enter text in the Details section, click the Change Details button (
) a specific Incident or group of Incidents in a Report. When entering a new Site Incident, you can define the Date, Incident Code, Customer ID, Site ID and Incident Header. To enter text in the Details section, click the Change Details button ( ![]() ) and begin typing. Remember to save your changes by clicking the Save button (
) and begin typing. Remember to save your changes by clicking the Save button ( ![]() ).
).
Note: To define Incident Codes go to Configuration > Codes Maintenance. From the Codes Maintenance screen, select 'Incident Code' and click the Add button to create a new Incident.
To attach a document, use the applicable option under Tools (see Global Features Guide).
Information entered in Employee Incidents is also cross-referenced with the Site Incidents feature (see Customer and Site User Guide).
3.5. Employee Time Off
Employee Time Off allows you to schedule Time Off including days off, vacation, maternity leave, bereavement, sick days etc. eTime Xpress will automatically cross-check the Time Off Schedule and Working Scheduling when creating shift and Time Off records, respectively. If an Employee is scheduled for Time Off, you will be notified before saving the shift. Correspondingly, if an Employee is scheduled in the Working Schedule, your will be notified before saving the Time Off record.
For more information on how to use the Time Off Schedule, see the Visual Scheduler User Guide.
From the Employee Main screen, double-click the Employee Time Off folder. The Time Off Schedule screen should appear as shown in the figure below. 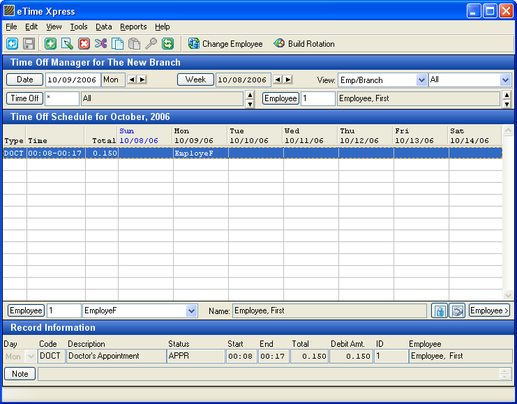
Time Off Schedule Screen
3.6. Employee Accruals (Additional Module)
Employee Accruals allow you to define formulas to automatically calculate accrual balances (i.e. vacation, sick, holiday pay etc.) based on the shifts worked by Employees.
For more information on how to use the Accruals Module, see the Accruals User Guide.
From the Employee Main screen, double-click the Employee Accruals folder. The Employee Accruals screen should appear as shown in the figure below. 
Employee Accruals Screen
3.7. Employee Call Log
Employee Call Log tracks, categorizes and maintains a history of phone contacts with an Employee (i.e. refused shift, no show, requested extra work, called in sick etc.). You can generate a Report summarizing Employee Call Logs by going to Reports > Customer & Employee > Call Logs.
From the Employee main screen, double-click on the Employee Call Log folder. The Employee Call Log screen should appear as shown in the figure below. 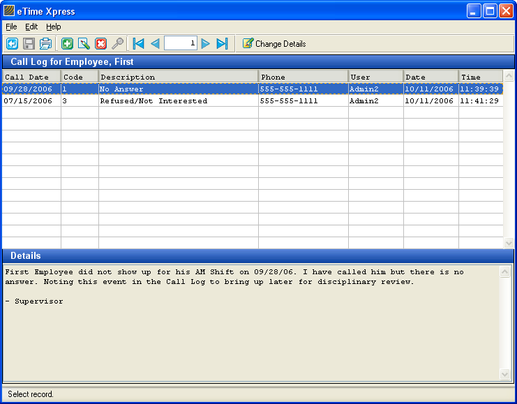
Employee Call Log Screen
To Add ( ![]() ), Update (
), Update ( ![]() ), or Delete (
), or Delete ( ![]() ) a Call Log, click the corresponding buttons in the toolbar. You can also Print (
) a Call Log, click the corresponding buttons in the toolbar. You can also Print ( ![]() ) a specific Incident or group of Call Logs in a Report. When entering a new Call Log entry, you can define the Call Date, Call Code, and Phone number used. To enter text in the Details section, click the Change Details button (
) a specific Incident or group of Call Logs in a Report. When entering a new Call Log entry, you can define the Call Date, Call Code, and Phone number used. To enter text in the Details section, click the Change Details button ( ![]() ) and begin typing. Remember to save your changes by clicking the Save button (
) and begin typing. Remember to save your changes by clicking the Save button ( ![]() ).
).
Note: To define Call Log Codes go to Configuration > Codes Maintenance. From the Codes Maintenance screen, select 'Call Status Code' and click the Add button to create a new Call Log Code.